CAN Bus Location Guide
Installation Guide
0 mins to read
Learn more about the CAN bus location and capacitive connection points for uReader devices in supported trucks and vans. If you can not find a certain vehicle, or the CAN bus location has changed or is not available, please contact Support.
Possible connection points for uReader devices
EN - DE - ES (ES) - ES (LATAM) - FR (FR) - FR (CA) - IT - NL - PL
Introduction
This document is a reference guide for the CAN bus location and capacitive connection points in all supported vehicles.
If you can not find a certain vehicle, or the CAN bus location has changed or is not available, please contact the Support or the Integration team.
Trucks
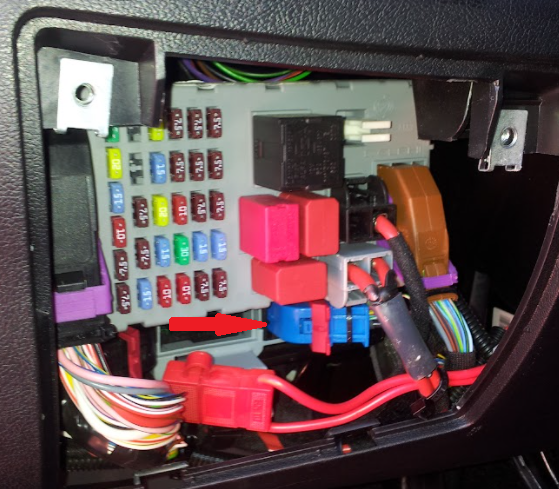
MAN TGA, TGL, TGM, TGS and TGX Euro 3-5
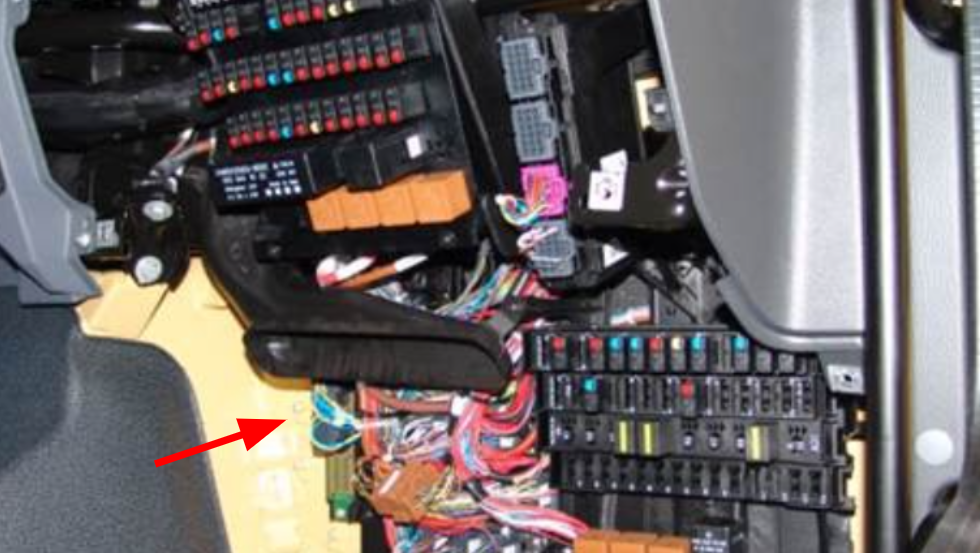
Location: On the passenger side of the vehicle, on the left side of the fuse box. Locate a connector with a twisted pair of blue/red and blue/white wires. |
| |
| ||

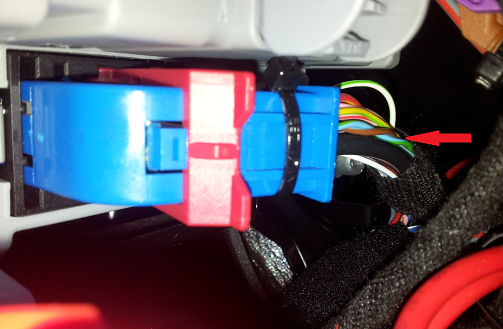
MAN TGA, TGL, TGM, TGS Euro 6, MAN TGX Euro 6 (before 2019)
Location: On the passenger side of the vehicle, on the left side of the fuse box. Locate a black connector with a twisted pair of blue/red and blue/white wires. |
| |
| ||

MAN TGL, TGM Euro 6 (2020+)
Location: Behind the instrument cluster. Locate a blue connector and connect to the twisted pair of white wires numbered 173-21 and 174-21. |
| |
| ||


MAN TGX (2024)
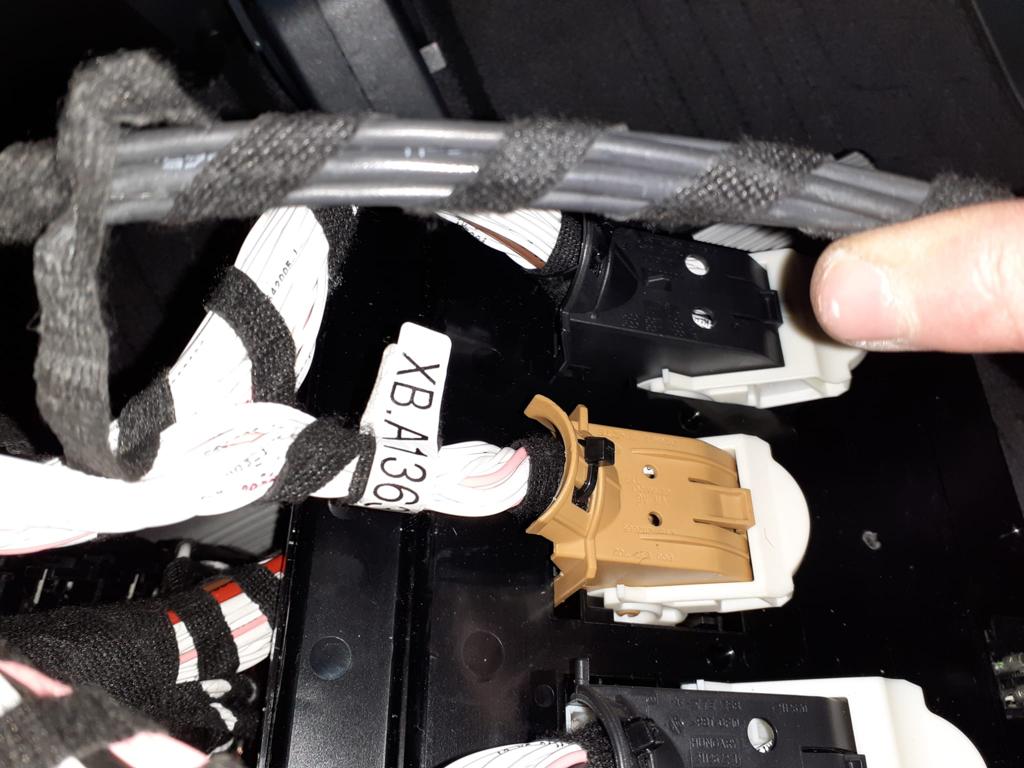
Location: Behind the fuse box. Locate the black connector above the brown one and connect to the twisted pair of white wires numbered 185_361 and 186_361. |
| |
| ||


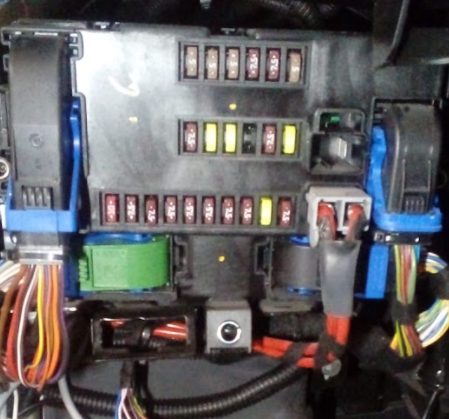
MAN TGX Euro 6 (2020+)
Location: Behind the fuse box. Locate a brown connector labeled as XB.1366-2 and connect to the twisted pair of white wires numbered 174-02 and 173-02. |
| |
| ||

MAN TGM (2024)
Location: Near the fuse area where the central gateway is located. Identify the first black connector from the top. The required wires are labeled:
|
| |
| ||


Iveco Stralis and Eurocargo Euro 3-6
Location: On the passenger side of the vehicle behind the fuse box. Find a black cable with two green and white wires. |
| |
| ||


Iveco Stralis Euro 6 (2018+)
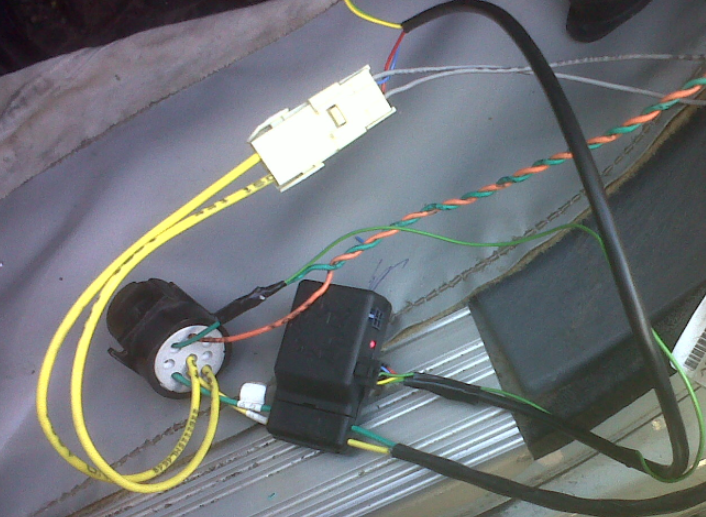
Location: On the passenger side of the vehicle, under the fuse box. Locate a white and black connector with a twisted pair of orange and white wires. |
| |
| ||


Iveco S-Way CNG
Same as Iveco Stralis Euro 6 (2018+).
Scania R, P, G Euro 3-6
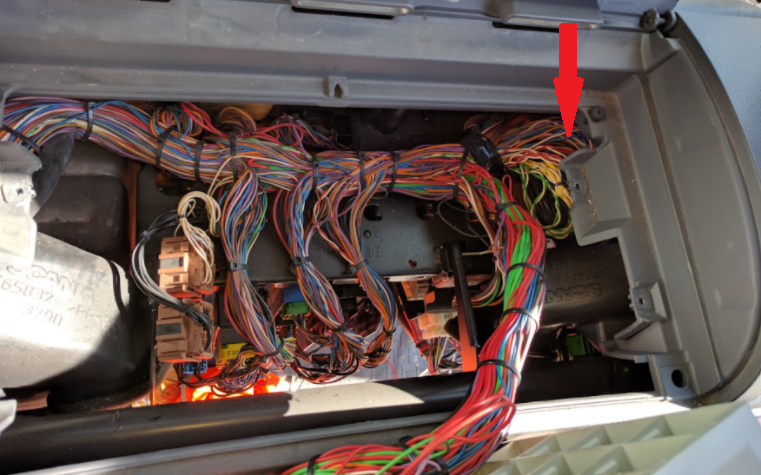
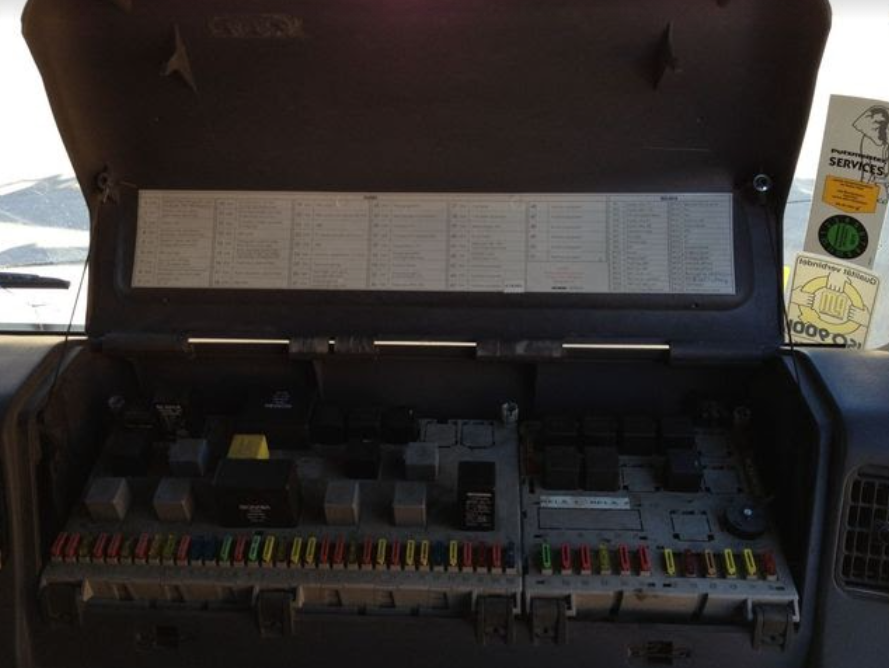
Location: On the passenger side of the vehicle, behind the fuse box. Locate a blue connector on the door side with twisted yellow and white wires. ✱ NOTE: In some vehicles, the connector is hidden in the right-hand corner. |
| |
| ||


Scania 4 & T - Series
Location: On the passenger side of the vehicle, behind the fuse box. Locate a black connector in the middle section with twisted blue and gray wires. |
| |
| ||

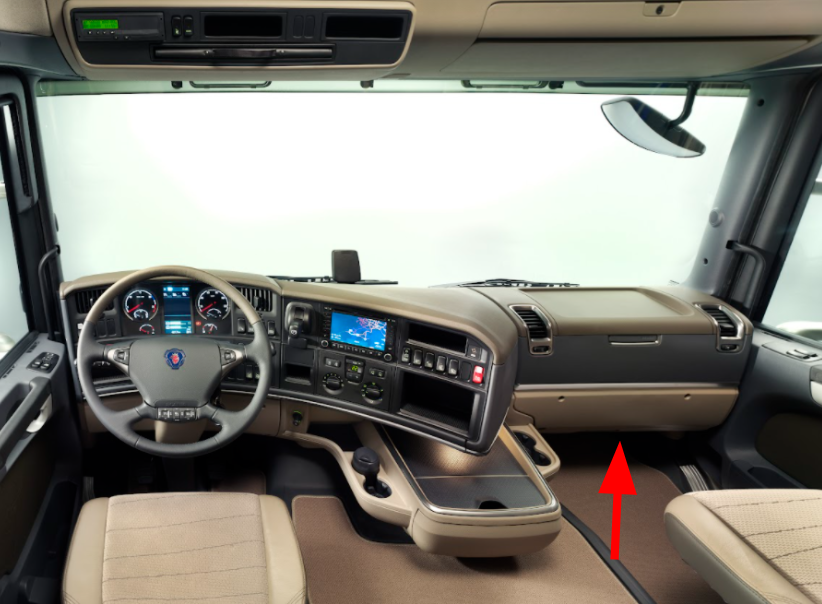
Scania R, P, S Euro 6 2016+
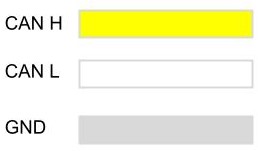
Location: On the passenger side of the vehicle, behind the fuse box. Locate triple twisted yellow, white, and gray wires on the left-hand side. ✱ NOTE: Connect to the yellow and white wires. |
| |
| ||

Mercedes Actros, Atego MP1
Location: On the passenger side of the vehicle, behind the fuse box. Find a twisted pair of yellow and blue wires. |
| |
| ||


Mercedes Actros MP2 & MP3
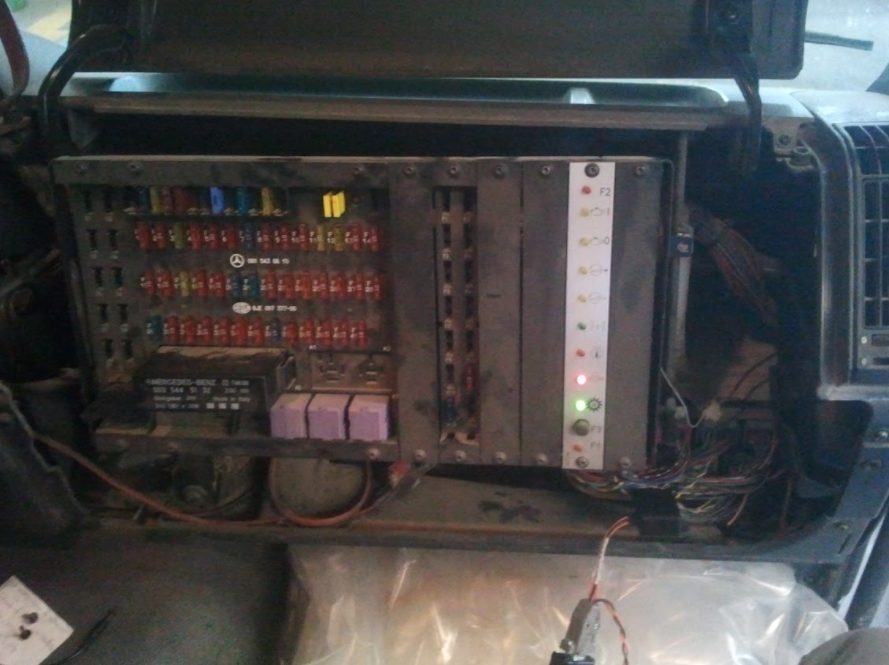
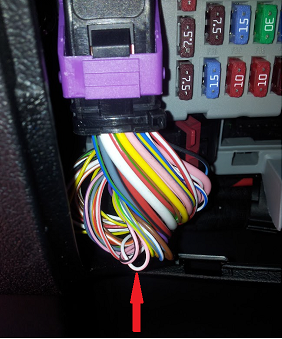
Location: Remove the lower dashboard on the passenger side of the vehicle. On the left-hand side of the fuse box, locate the X11 purple connector with multiple twisted pairs of yellow and blue wires. * NOTE: An alternative connection point is under the upper dashboard cover, using connector A11.1. |
| |
| ||
| ||


Mercedes Atego, Axor MP2 & MP3
Location: On the passenger side of the vehicle, behind the fuse box. Find a connector with multiple twisted pairs of yellow and blue wires. |
| |
| ||

Mercedes Actros, Antos, Atego MP4 (before 2018)
Location: On the passenger side of the vehicle, behind the lower dashboard, locate two gray connectors with multiple twisted pairs of blue and green wires. Connect to a pair from the right connector (the one with the highest number of wire pairs). |
| |
| ||


Mercedes Actros, Antos, Atego MP4, MP5 (2018+)
Location: On the passenger side of the vehicle, behind the lower dashboard, locate a gray connector in the top center with multiple twisted pairs of blue and green wires. You can use any of these pairs. |
| |
| ||


Mercedes Actros L (2024+)
Location: On the passenger side of the vehicle, behind the lower dashboard. Find a gray connector labeled “A2aX1” with a twisted pair of blue and green wires.
|
|


Mercedes Econic (before 2013)
Location: On the passenger side of the vehicle, behind the fuse box. Find a purple connector with a twisted pair of yellow and blue wires. |
|

Mercedes Econic (2013+)
Location: Behind the instrument cluster. Locate a twisted pair of yellow and blue wires. |
|

DAF CF, LF and XF Euro 3-5 (before 2014)
Location: On the passenger side of the vehicle, behind the fuse box. Find a connector with multiple twisted pairs of blue and yellow wires. |
| |
| ||


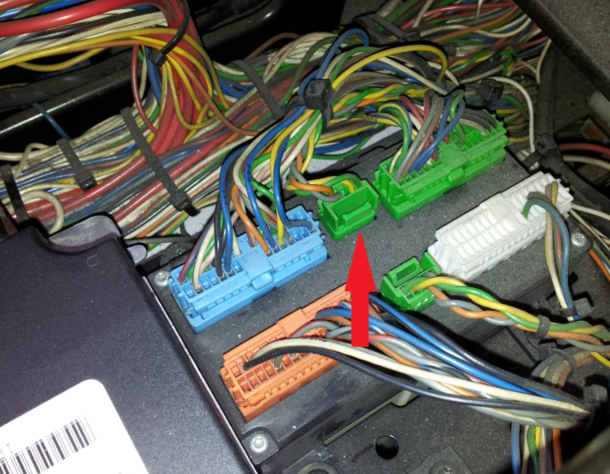
DAF CF Euro6 (2014+)
Location: On the passenger side of the vehicle, behind the lower dashboard. Locate a green 36-pin connector with a twisted pair of red and yellow wires. |
|

DAF LF Euro6 (2014+) / DAF XB Euro6 (2023+)
Location: On the passenger side of the vehicle, in the center of the fuse box. Look for a Green Connector (Label D421.A) with twisted pairs of red and yellow wires. |
| |
| ||


DAF XF Euro6 (2014+)
Location: On the passenger side of the vehicle, behind the fuse box. Look for a blue connector with twisted pairs of red and yellow wires. |
| |
| ||


DAF XG (2024+)
Location 1: CAN Module #1
Location: On the passenger side of the vehicle, the main CAN module is located in the upper-left of the fuse box. Look for a twisted pair of blue, yellow and green wires. | ||
| ||


Location 2: CAN Module #2
Location: On the passenger side of the vehicle, the main CAN module is located in the upper-left of the fuse box. Look for a twisted pair of white, yellow and green wires. | ||
| ||


Location 3: CAN Module #3
Location: On the passenger side of the vehicle, the main CAN module is located in the upper-left of the fuse box. Look for a twisted pair of purple, yellow and green wires. | ||
| ||


Location 4: FMS Port
Location: On the passenger side of the vehicle, in the fuse box, locate the FMS port pins 9 and 10. Find the corresponding twisted pair of blue, and yellow and green wires. | ||
| ||


Volvo FH & FM (before 2012)
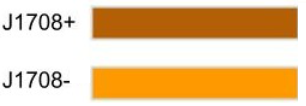
Location: The A94 control unit below the fuse box in the middle of the dash panel. Locate a green 5-pin connector between blue and green connectors, with a twisted pair of yellow and green wires and another twisted pair of orange and gray wires. Use the capacitive clip only on the J1708 bus (orange and gray twisted pair). |
| |
| ||

Volvo FH & FM Euro6 (2012+)
Location: In the middle of the dashboard, locate the black connector in the upper left side of the fuses. This connector has two twisted pairs of yellow and green wires. Connect to the pair on the right. |
| |
| ||


Volvo FE & FL (before 2012)
Location: On the passenger side of the vehicle, on the right side of the fuse box. Locate a green 5-pin connector, between blue and green connectors, with a twisted pair of orange and green wires and another twisted pair of orange and brown wires. Use the capacitive clip only on the J1708 bus (brown and orange twisted pair). |
| |
| ||


Volvo FE & FL Euro6 (2012+)
Location: The control unit is on the right-hand side of the fuse box on the passenger side of the vehicle. Locate a 5-pin green connector, between blue and green connectors, with a twisted pair of yellow and green wires. |
|

Renault Premium, Kerax & Midlum DXI (2006+)
Location: On the passenger side of the vehicle, on the right-hand side of the fuse box. Locate a green 5-pin connector, between blue and green connectors, with a twisted pair of orange and green wires and another twisted pair of orange and brown wires. Use the capacitive clip only on the J1708 bus (brown and orange twisted pair). |
| |
| ||


Renault Magnum DXI
Location: Behind the lowest dashboard panel on the passenger side of the vehicle. Locate the ECU on the right-hand side of the fuse box. Find a black connector at the top with a twisted pair of green and orange wires and a purple connector with orange and brown cables. Use the capacitive clip only on the J1708 bus (brown and orange twisted pair). |
| |
| ||

Renault Midlum DCI
Location: On the passenger side of the vehicle, in the lower dashboard on the left-hand side of the fuse box. Find a twisted pair of yellow wires. |
|

Renault Magnum DCI
Location: On the passenger side of the vehicle, behind the dashboard panel. To the right of the fuse box, find a twisted pair of yellow and blue wires. |
| |
| ||


Renault Premium & Kerax DCI
Location: On the passenger side of the vehicle, behind the dashboard panel. To the right of the fuse box, find a twisted pair of yellow and blue wires. |
| |
| ||


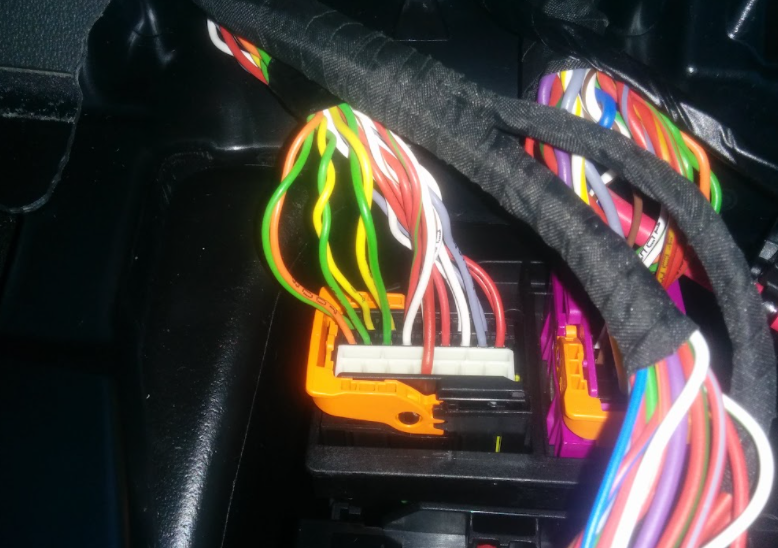
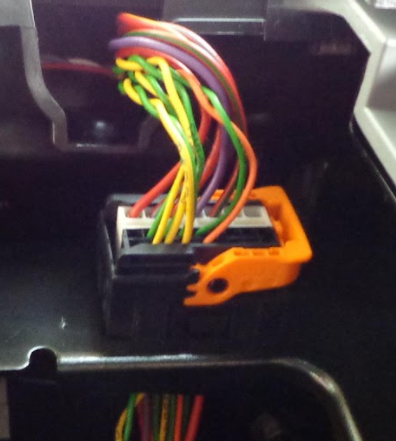
Renault T-series & K-series & C-serie Euro6 (2014+)
Location: Behind the middle dashboard on the passenger side of the vehicle. To the right of the fuse box, find a black and white connector with an orange brace. Connect to the second twisted pair of yellow and green wires. |
| |
| ||

Renault D-series (before 2021)
Location: The right-hand side of the fuse box on the passenger side of the vehicle. Find a green connector between a green connector and a blue connector. Connect to a twisted pair of yellow and green wires. |
| |
| ||


Renault D-series (2021+)
Location: On the passenger side of the vehicle, remove the upper dashboard panel and locate a black connector. Connect to a twisted pair of yellow and green wires. |
| |
| ||


Mitsubishi Fuso
Location: Behind the instrument cluster or on the passenger side of the vehicle. To the right of the fuse box, locate a twisted pair of yellow and blue wires. |
| |
| ||


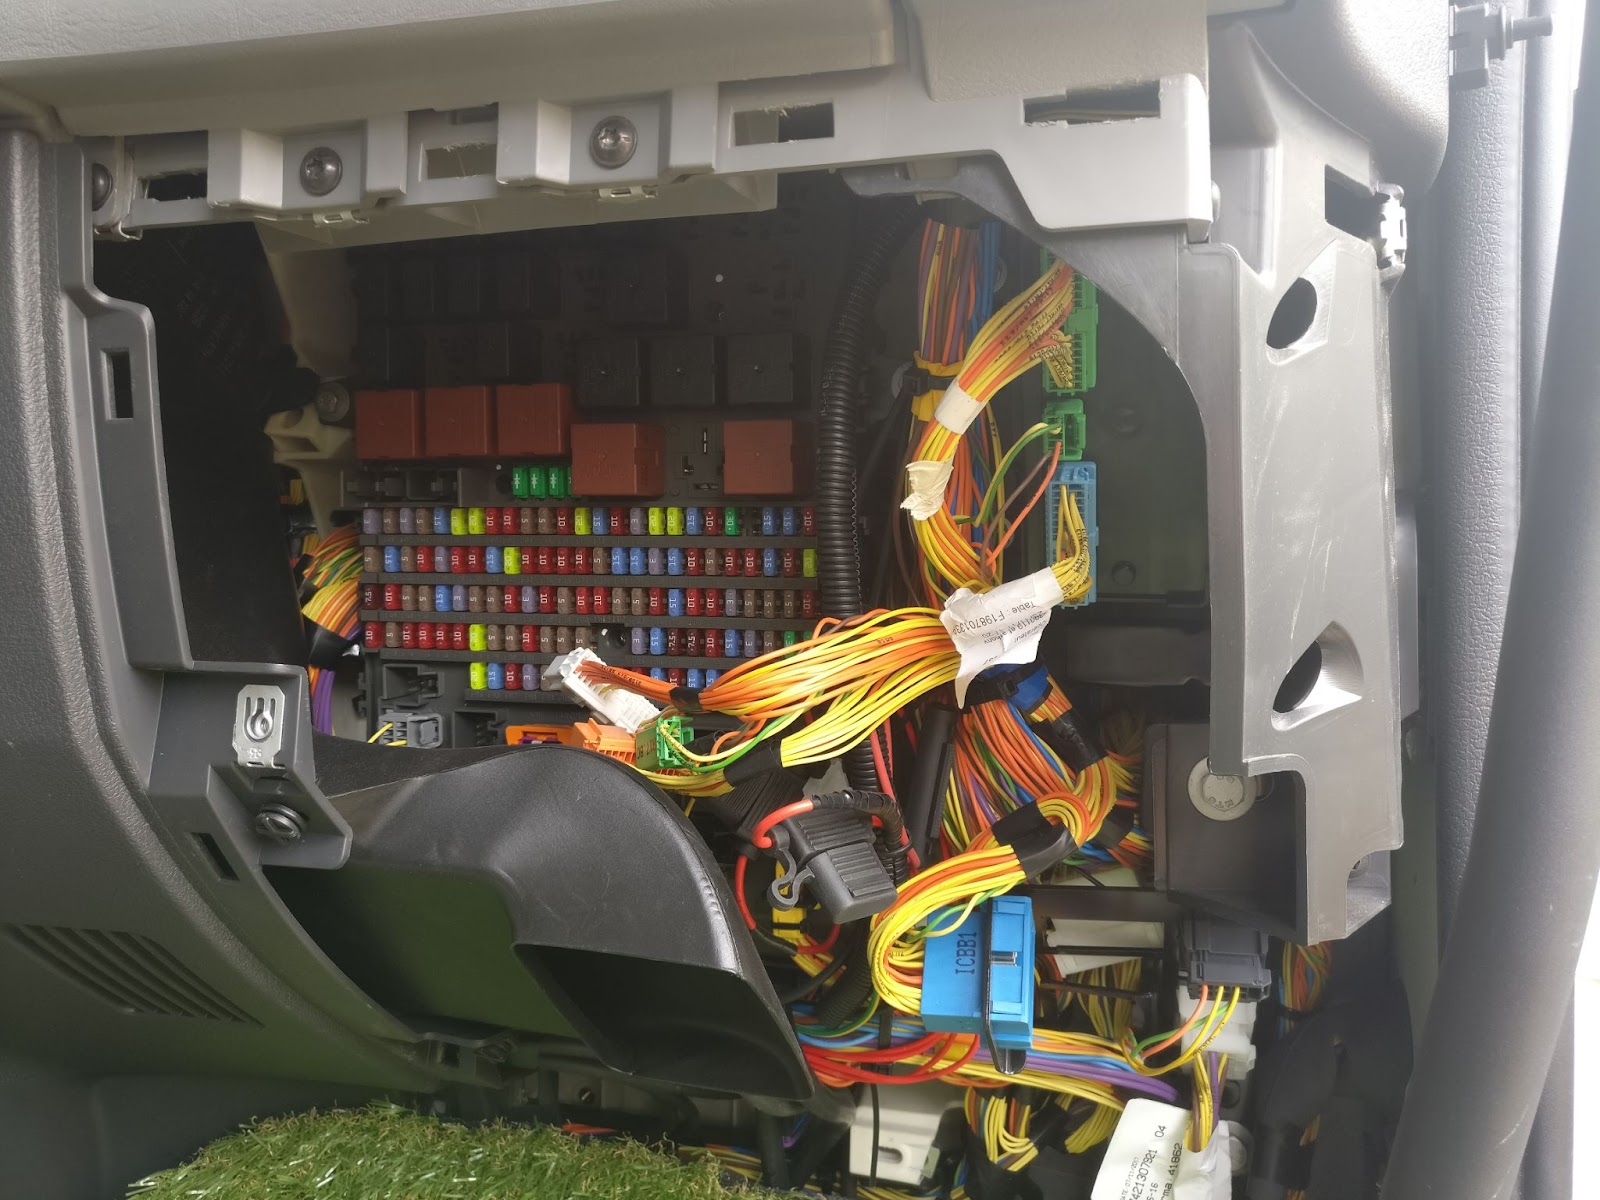
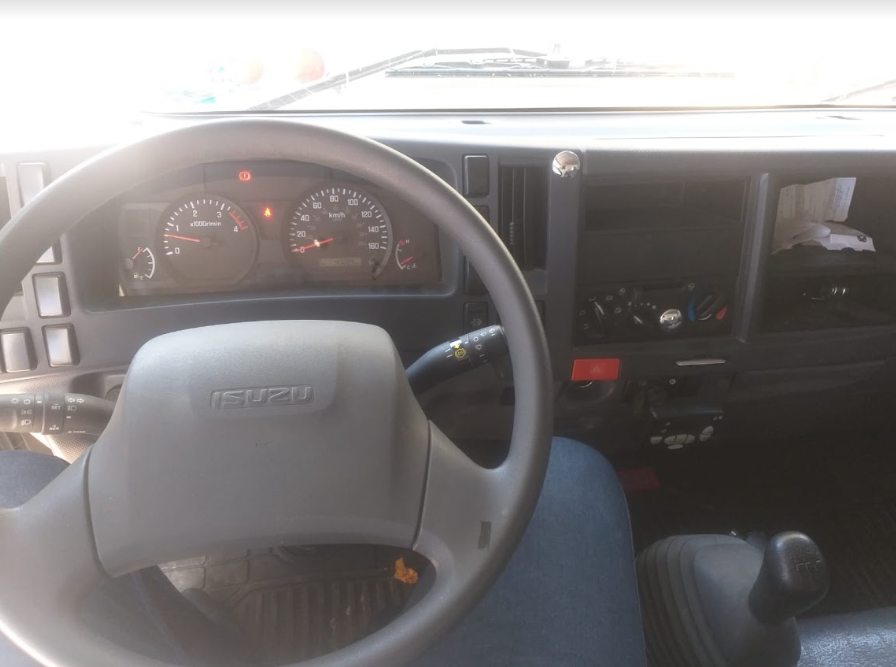
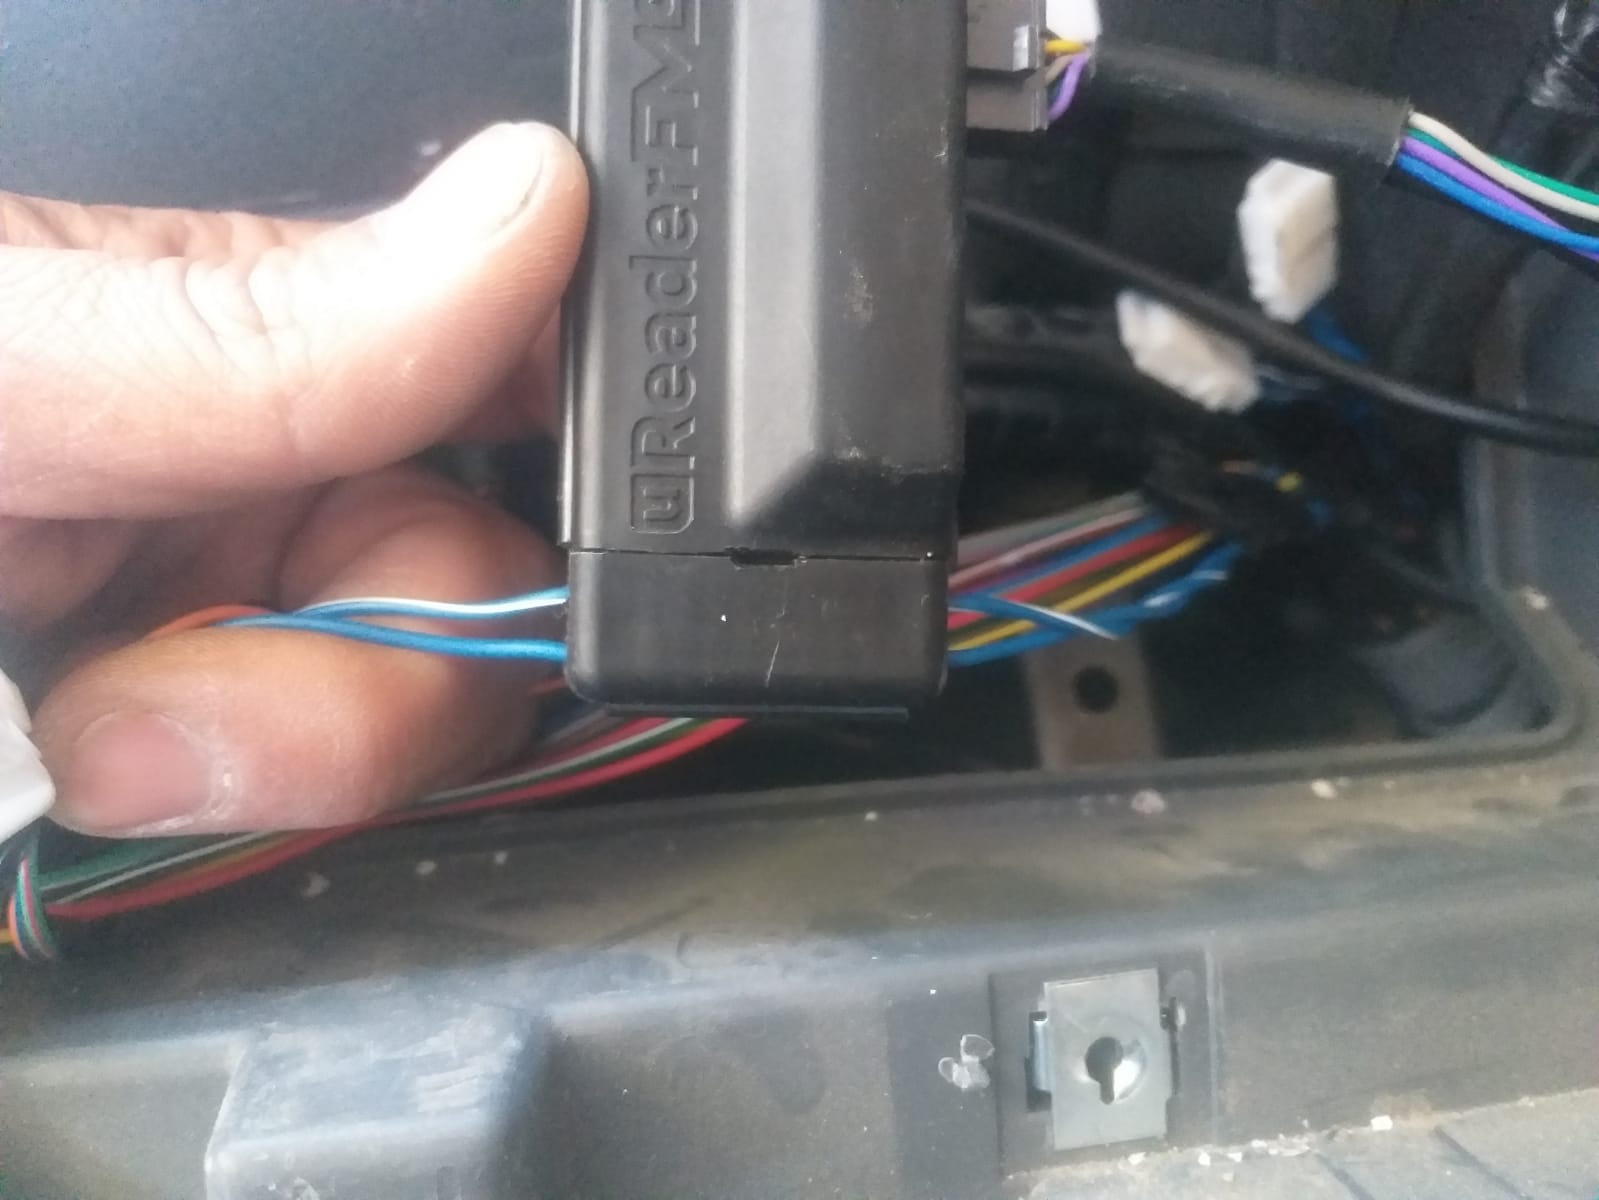
Isuzu N-Series Euro3+
Location: On the passenger side door or behind the speedometer. Locate a twisted pair of blue and blue/white wires. |
| |
| ||


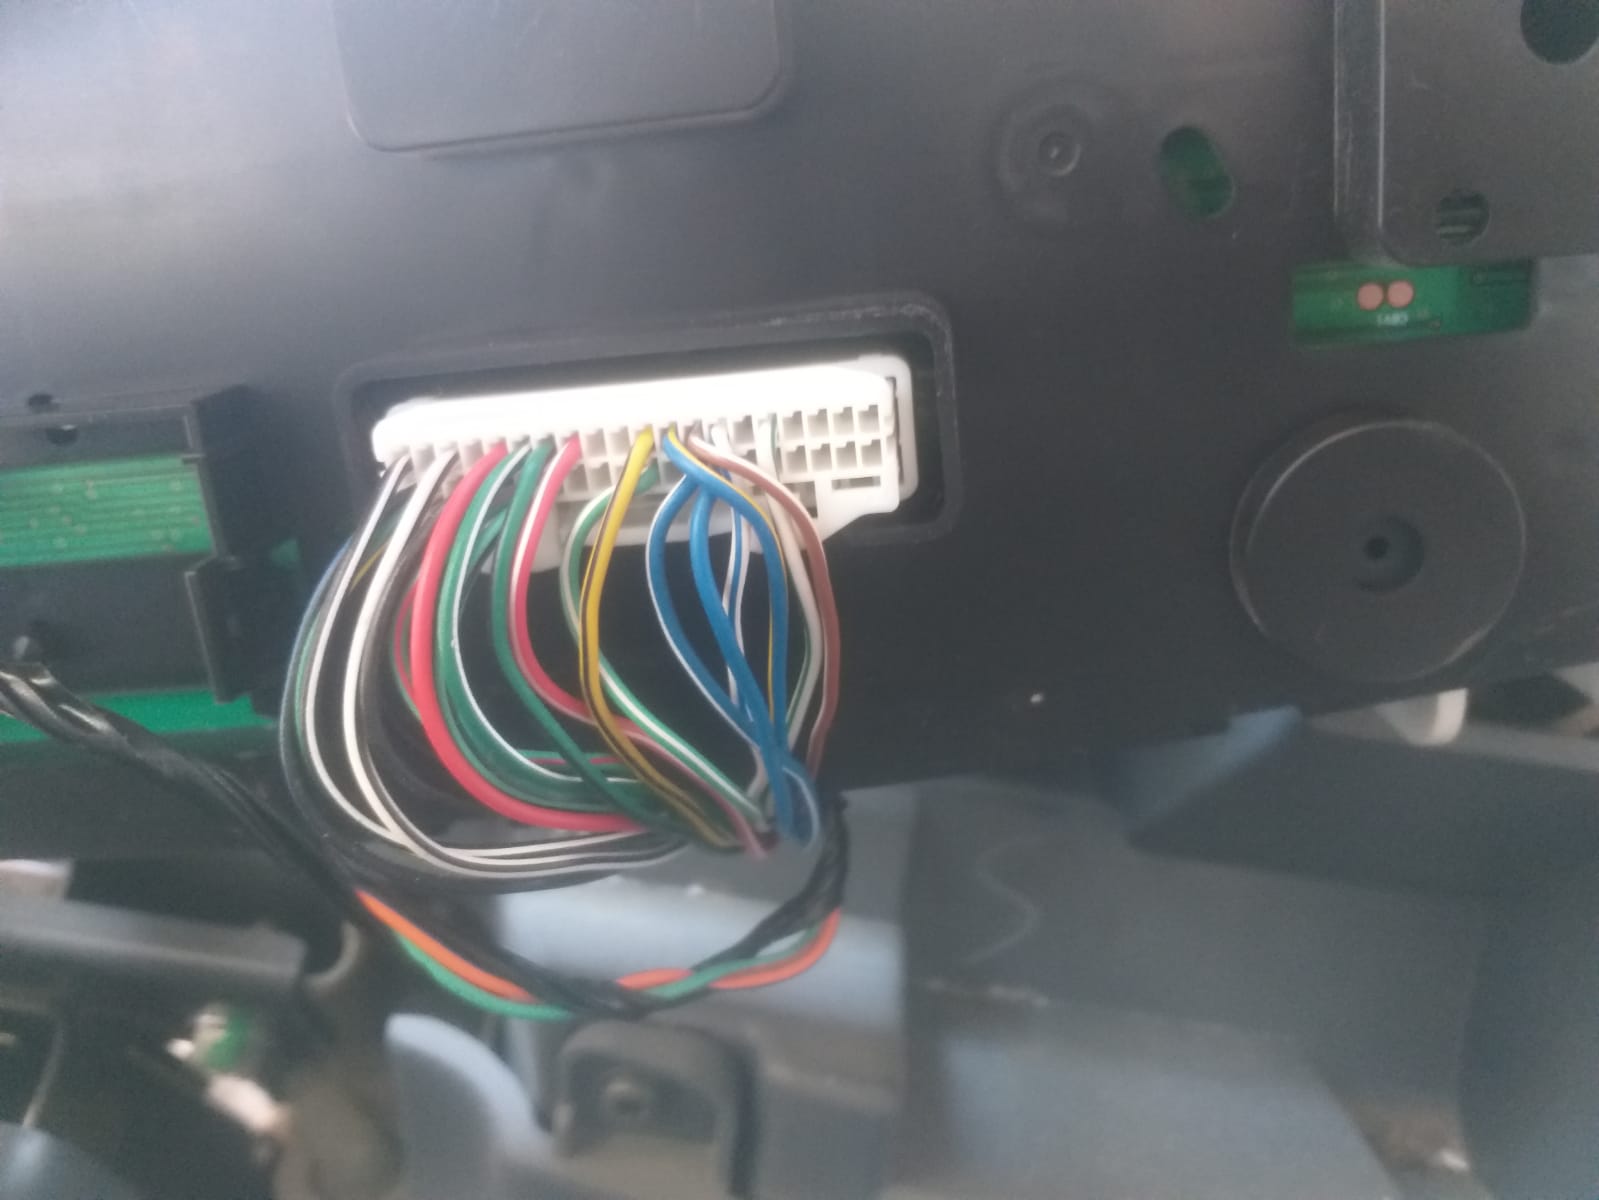
Isuzu NQR, NPR & FSR
Location: Behind the instrument cluster. Locate a twisted pair of blue and blue/white wires. |
|

Isuzu ELF 400 (2022)
Location: Behind the instrument cluster. Locate a twisted pair of blue and blue/white wires connected to a white MOLEX connector. |
| |
| ||

Hino
Location: Behind the instrument cluster. Locate a twisted pair of red and green wires. |
| |
| ||


UD Quon (2015+) JAPAN
Location: In the ECM/module area behind the panel on the lower passenger side of the vehicle dash. The CAN bus is a a twisted pair of wires on the 14-pin female connector:
| ||
| ||


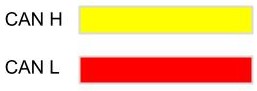
North American 9-pin Deutsch Connector
Location: Locate pin C and pin D of the OBD Deutsch Connector on the passenger side. Wire colors depend on the vehicle. Truck list:
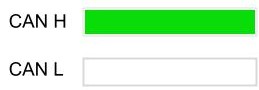
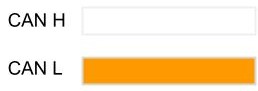
| CAN H OBD PIN C CAN L OBD PIN D J1708+ OBD PIN F J1708- OBD PIN G | |
| ||
Howo ZZ331 (T7S 430) 2024
Location: OBD-II port located near the driver footwell. Connection Point: OBD-II Port | ||
| ||


Howo ZZ425 (420) 2021
Location: OBD-II port located in the front panel beside the other switches. Connection Point: OBD-II Port | ||
| ||


Howo ZZ425 (N7/NX) 2022 - 2025
Location: OBD-II port located in the bottom compartment on the passenger side. Connection Point: OBD-II Port | ||
| ||


Vans
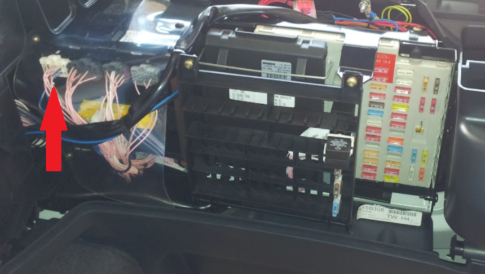
Fiat Ducato, Peugeot Boxer (before 2014)
There are 2 CAN buses. Connect depending on needs.
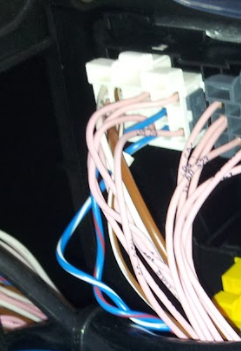
All data except accelerator pedal position:
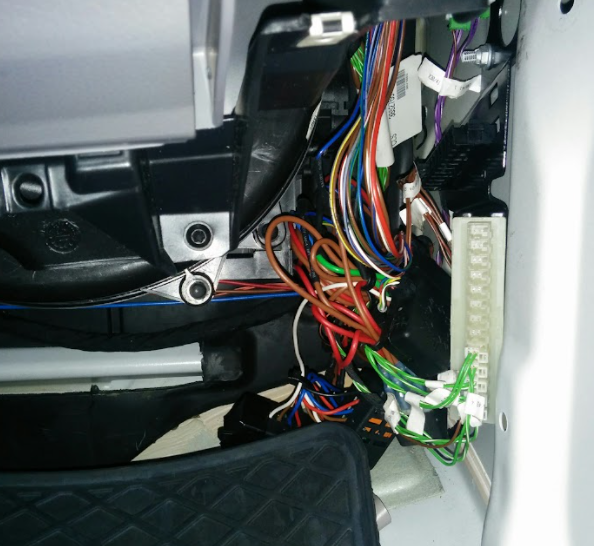
Location: Locate a black and purple connector to the left of the fuse box. Connect to the twisted pair of pink/black and pink/white wires. You can also find them behind the radio or behind the instrument cluster. |
| |
| ||

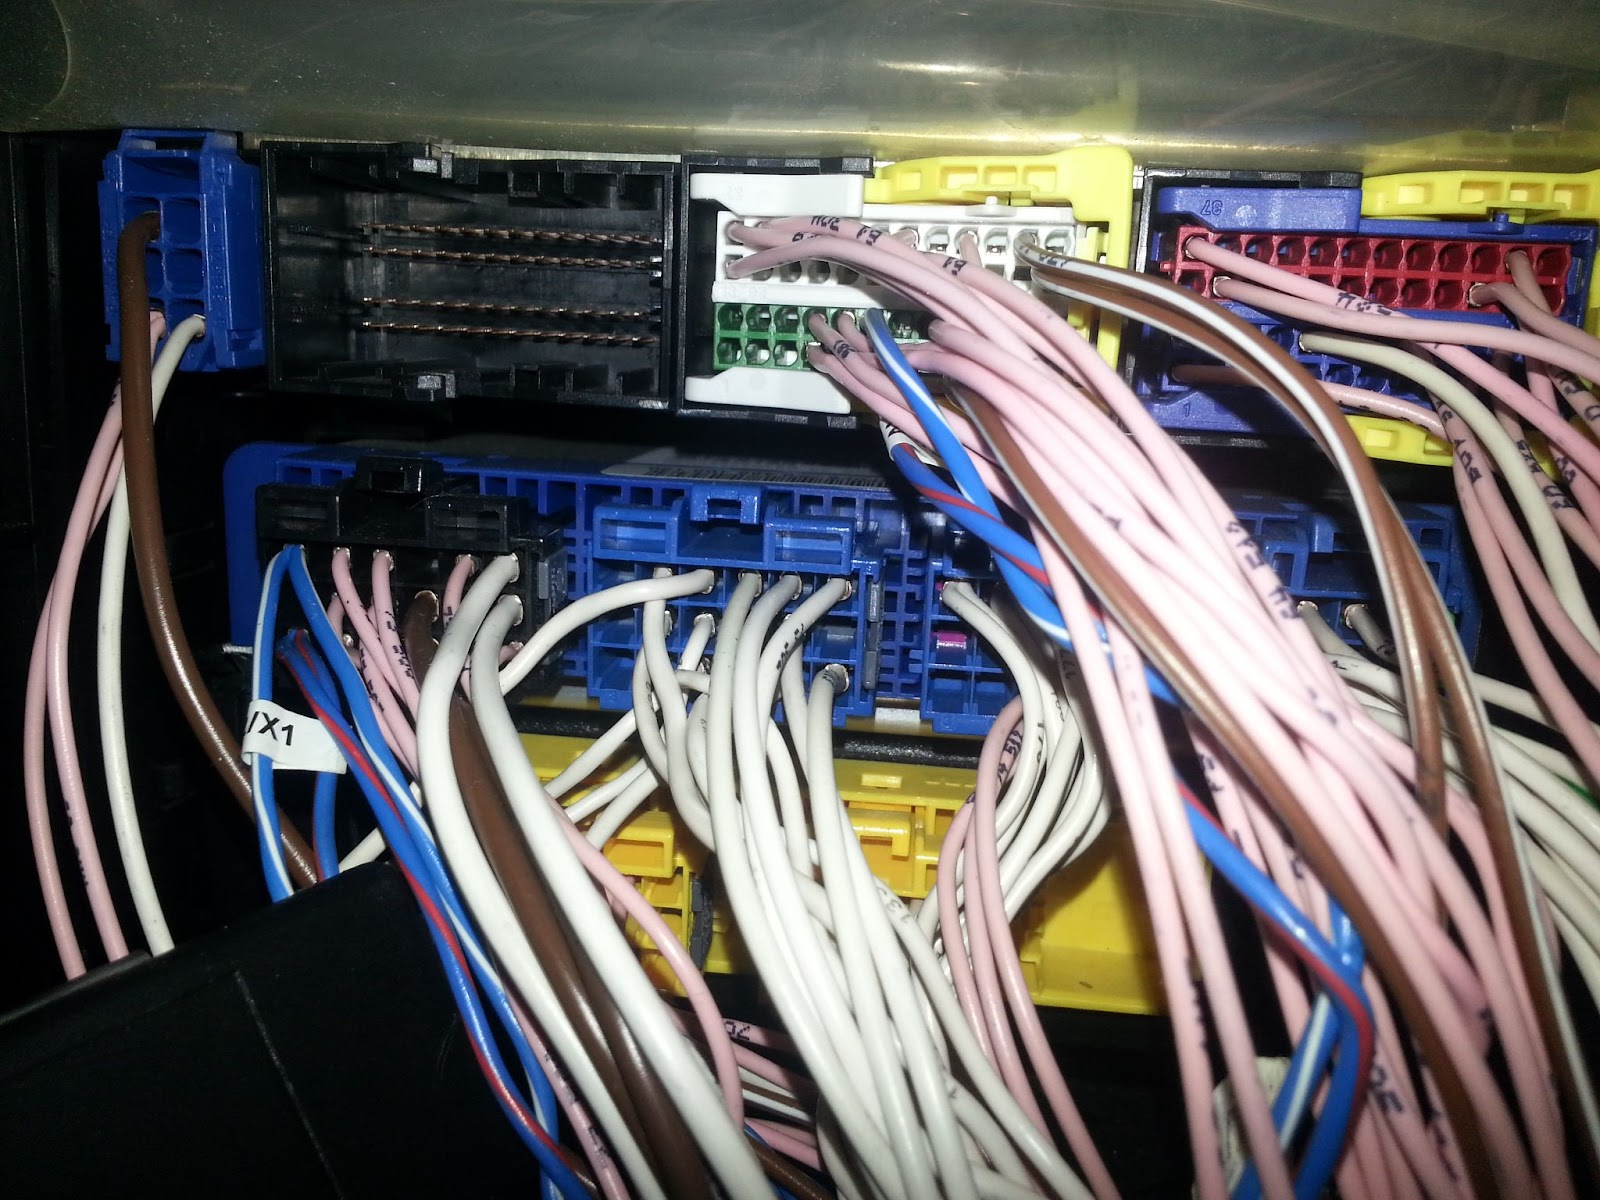
All data except odometer:
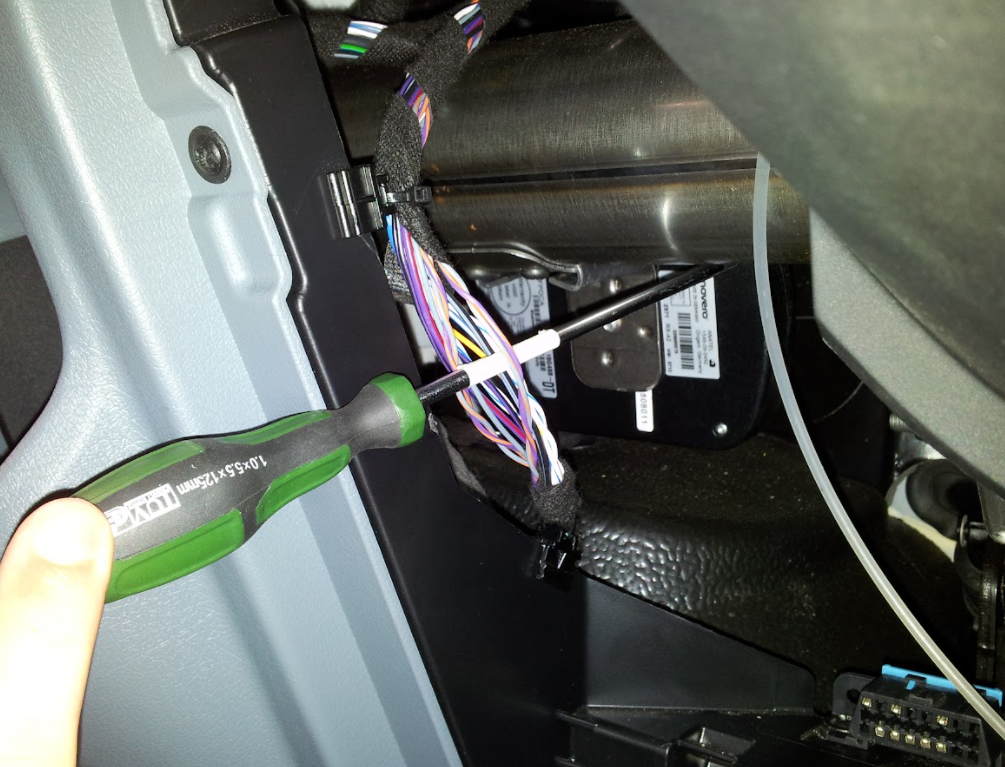
Location: Locate a blue connector below the fuse box, or connector A behind the tachograph. Connect to the twisted pair of blue/green and blue/brown wires. |
| |
| ||

Fiat Ducato, Peugeot Boxer (2014+)
Location: Connect to pins 1 and 9 (blue and white wires) of the OBD connector on the driver side of the vehicle. ✱ NOTE: Fuse box connectors are black and blue instead of purple. |
| |
| ||

Fiat Doblò (2019+)
Location: Locate black connector with a red stripe behind the OBD connector. Connect to blue and white wires. ✱ NOTE: Fuel level drops to 0 when ignition is off. |
| |
| ||


Mercedes Sprinter (before 2018), Mercedes Viano & Vito (before 2014), Volkswagen Crafter (before 2017)
There are 2 CAN buses. Connect depending on needs.
All data except torque:
Location: Connect to the twisted pair of brown and brown/red wires located on the passenger side on the door side. |
| |
| ||
All data except odometer:
Location: Behind the speedometer or behind the glove box. Connect to the twisted pair of green/white and green wires. |
| |
| ||


Mercedes Vito (2014+)
Location: Behind the speedometer or behind the glove box. Connect to the twisted pair of green/white and green wires. |
| |
| ||


Mercedes Sprinter (2018+)
Location: Locate a white connector with purple wires on the passenger side of the vehicle. Connect to a twisted pair of purple and purple/white wires. |
| |
| ||


Volkswagen Crafter (2017+)
Location: Under the dashboard cover on the driver side of the vehicle. Connect to the twisted pair of orange/black and orange/brown wires. |
|

Ford Transit, Connect, Custom, Ranger & Tourneo
Location: Locate pins 6 and 14 (white and blue/white wires) of the OBDII connector on the passenger side of the vehicle. |
| |
| ||

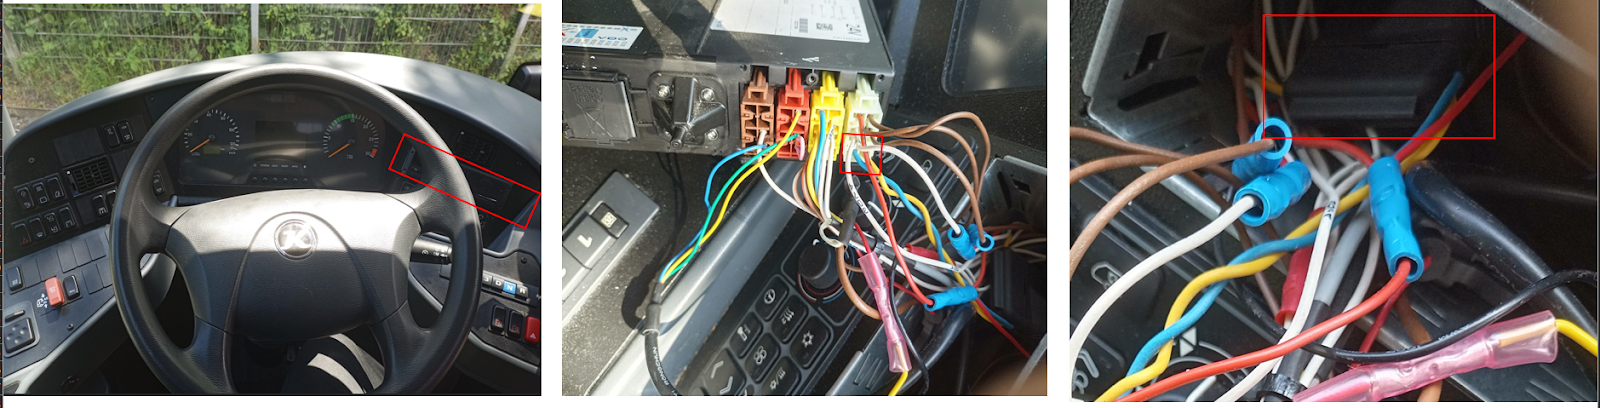
Iveco Daily (before 2014)
Location: In the steering column, locate a connector with four cables (green, white, pink, and white). Connect to the twisted pair of green and white wires. ✱ NOTE: Do not connect to the OBDII. |
|

Iveco Daily (2014 - 2022)
Location: Locate the OBDII connector behind the dashboard on the driver side of the vehicle. Connect to pins 6 and 14 (the twisted pair of green and white wires). |
| |
| ||


Iveco Daily (2022)
Location: Locate a cable running up the left of the dashboard. Connect to a twisted pair of white and orange wires. ✱ NOTE: It is necessary to peel off the cable in order to access to the twisted pair. |
| |
| ||


Citroën Berlingo (2008+)
Location: Locate the OBDII connector in the glove box. Connect to pins 6 and 14 (green and brown wires). |
|

Renault Kangoo (before 2009)
Location: Locate the OBDII connector in the glove box. Connect to pins 6 and 14 (green and brown wires). |
|
Renault Kangoo (2009+)
Location: Locate the OBDII connector in the glove box. Connect to pins 6 and 14 (orange and brown wires). |
|

Buses
Volvo B5TL (2017)
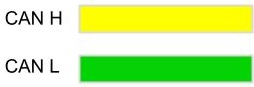
Location: At the back of the instrument cluster, locate the plug A connector pins 15 and 16 represented by a green and yellow twisted pair. |
|

Iveco CREALIS (2021+)
Location: At the back of the power and diagnostic interconnection panel. Locate either the 4-pin FMS round black connector’s pins 1 and 2, or the standard 12-pin green FMS connector’s pins 6 and 9. ✱ NOTE: This connection to the FMS Gateway supports basic engine data, such as:
CAN bus wire colors might be different between similar bus models, as there is no wiring standard. |
|

Setra S 531 DT
Location: Locate the tachograph at the right of the dashboard, and connect to the tachograph white connector’s pins 4 and 8. |
✱ NOTE: CAN bus wire colors might be different between similar bus models, as there is no wiring standard.
BYD ADL Enviro200EV
Location: Locate the two OBD ports inside the compartment near the passenger side door. Connect to the one on the left side labeled diagnostic port #2, pins 6 and 14. | CAN H OBD pin 6 CAN L OBD pin 14 |
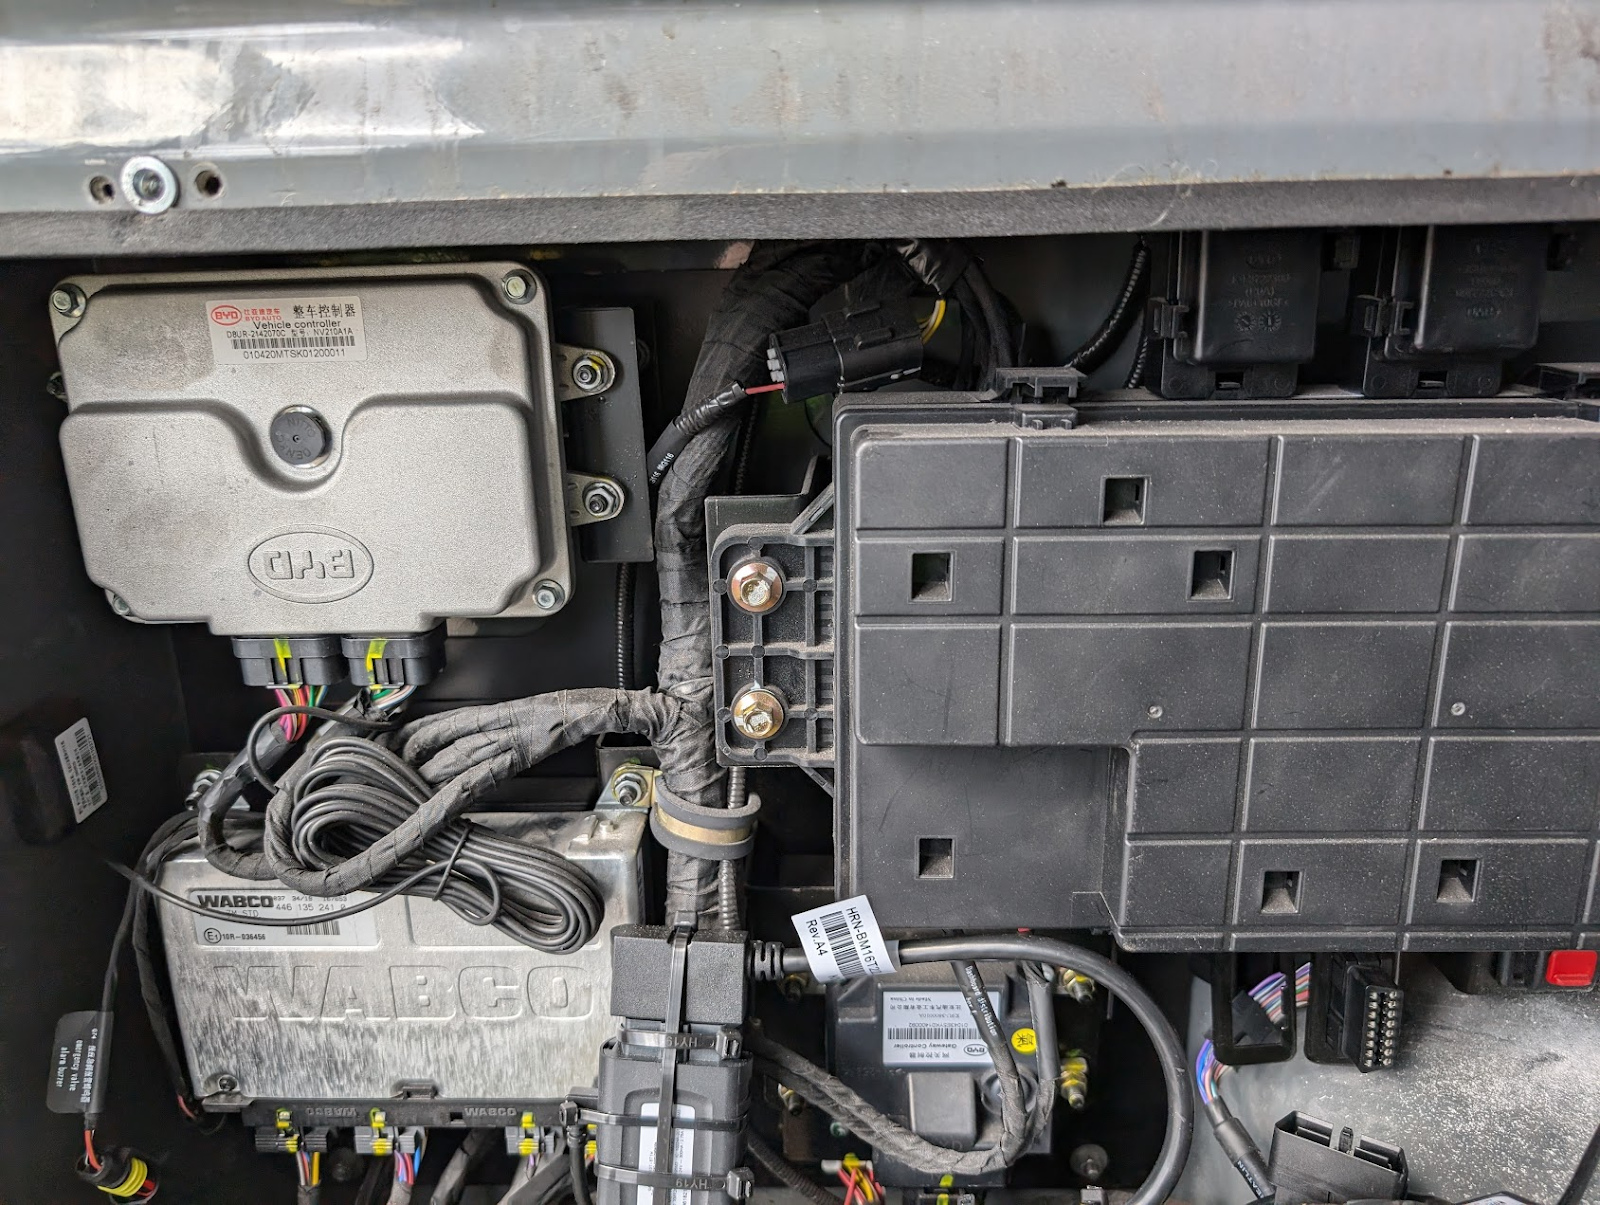


Isuzu ERGA GEN1 (2000 - 2015)
Location: Remove the service panel in the front left hand side of the cabin (behind the vehicle build model/chassis plate) to expose the fuse block and the Mimamori control module. Locate the lower connector to the Mimamori module to identify the CAN pair containing the vehicle data. The wires are adjacent in the connector, CAN Hi white with a blue stripe, CAN Lo is a solid black wire. Remove sufficient insulation from the loom to allow the connection of the uReader / CAN Clamp to this pair of wires. Use a 3 wire harness install + CAN clamp for this vehicle. |
|
|
|


Hino Blue Ribbon II GEN1 (2000 - 2015)
See Above: The Hino Blue Ribbon II is built under the Japan J-Bus program and has the identical location to the Isuzu ERGA, see above for CAN bus location |
