Routing & Optimization – Route User Guide
Support Document
0 mins to read
This document serves as a reference guide for the Routing & Optimization – Route module in the Fleet Management Application. The Route module uses your unique business objectives to create daily routes, helping you to determine which plans have the most favorable economic impact on your business.
December 2025
DE-DE ES-ES ES-LATAM FR-CA FR-FR IT-IT PT-BR
Introduction
This document serves as a reference guide for the Routing & Optimization – Route module in MyGeotab. The Route module uses your unique business objectives to create daily routes, helping you to determine which plans have the most favorable economic impact on your business. When creating your daily plan, choose from various optimization profiles to meet your goals, such as minimizing drive distance or increasing on-time arrivals.
! IMPORTANT: A subscription to Advanced Routing is required to use this module.
Getting started
The Route module can be accessed directly from MyGeotab.
To access the Route module:
1 | Log in to MyGeotab. |
2 | Navigate to Productivity > Advanced Routing > Route from the main menu.
|
3 | The Route page displays. |

! IMPORTANT: To successfully use the Route module, all essential configurations must first be completed in Administration. For more information about Administration, refer to the Optimization Administration User Guide.
Viewing plans
The Plans page displays when you launch Route. The Plans page features a table that displays information about Plans and includes the following actions:
- Click the Dark Theme (half moon) icon to switch the display to Dark Mode.
- Click the Light Theme (lightbulb) icon to switch the display to Light Mode.
- Click the Help Center (person) icon to access help articles.
- Filter the list of Plans by:
- Selecting one or more Branches using the Branch menu
- Setting the Plan date range as required
✱ NOTE: The default Plan date range is seven days before and seven days after the current date.
- Selecting one or more plan Statuses using the Status menu

- Search for a particular Plan by entering the Name (full or partial) in the Search field.
- Click the + New Draft Plan button to create a new Plan. See Creating a new plan – Single Date or Creating new plans – Multiple Dates section for more information.

- View the following information about the Plans:
- Name – Indicates the name of the Plan. Click the column name to sort from ascending to descending order.
- Filled capacity – Indicates the percentage of Resource availability that is used.
- Branch – Indicates the operational location of the Plan. Click the column name to sort from ascending to descending order.
- Plan date – Indicates the date of the Plan. Click the column name to sort from ascending to descending order.
- Unassigned Orders – Indicates the number of appointments that are not assigned to a Resource but exist in the Plan.
- Resources with work – Indicates the number of Resources with appointments assigned.
- Drive Duration – Indicates the total driving duration.
- Idle duration – Indicates the total available time between assigned appointments.
- Order duration – Indicates the total duration of all assigned appointments.
- Date created – Indicates the date the Plan was created. Click the column name to sort from ascending to descending order.
- Created by – Indicates the user who created the Plan. Click the column name to sort from ascending to descending order.
- Status – Indicates the Plan status:
- Draft – Plan has been created. This is the automatic status change after Processing.
- Failed – Plan creation process failed.
- Processing – Plan is currently being created. Status will automatically change to Draft when complete.
- Published – Plan has been finalized and can be passed to the Dispatch module, becoming the Active Plan for the specified plan date.
- Replaced – Plan was previously Published but a different Plan has since been Published, taking its place as the Active Plan.
- Dispatch – Plan that is the Active Plan in the Dispatch module for the plan date.
✱ NOTE: This Plan may differ from the last Published plan for the specified date due to branch-specific Dispatch settings (configured in the Administration module).

- Click the Sorting Options (list) icon to choose one or more columns to sort the list of Plans by.
- Click the Columns (gear) icon to switch the order of columns and toggle the visibility on or off.
- Click the Notes (speech bubble) icon to view or add notes to the Plan.
- Click the three-dot menu to choose from the following actions:
- Open – Open the Plan in a new tab.
- Publish – Publish the Plan to finalize it, making it the Active Plan, and pass to the Dispatch module.
✱ NOTE: Only use this action if also using the Dispatch module.
- Lock and Publish – Lock all current appointment assignments including sequence, and Publish the Plan, while allowing automatic optimization of new or unassigned appointments when the Plan is passed to the Dispatch module.
- Compare – Compare the selected Plan with another Plan.
- Download - Full Detail – Export the Plan to a CSV file in Advanced Routing format.
- Download - Fleet Application – Export the Plan to a CSV file in Basic Routing format.

- Click the box next to the Name of one or more Plans to select, or the box next to Name column to select all Plans in the list, then
- Open in new tabs – Opens the selected Plans in a new tab.
- Compare – Provides metrics to compare the selected Plans.

✱ NOTE: Only Plans for the same Branch can be compared.
Comparing plans
Once two or more Plans have been selected, review the key metrics for each in a side-by-side view. The metrics of a Plan are compared to those of the Plan positioned to its immediate left. The following markers may appear if the compared values differ:
Marker
Description

Indicates the value is greater than the compared value.

Indicates the value is less than the compared value.
You can complete the following actions:
- Swap the position of a Plan by clicking the Swap icon to move the Plan panel left or right, or drag the Plan panel to the desired position.
- Remove a Plan from the comparison by clicking the Remove icon.
- Click Replace this plan and search by name to change out the plan.
- Click Select another plan, and search by name to add it to the comparison.
Creating a new Plan – Single Date
- From the Plans page, click the + New Draft Plan button.
- In the New Plan panel, enter your plan Name.
- Select the Branch for which to run the plan for.
- Select the Plan date you want to create the plan for.
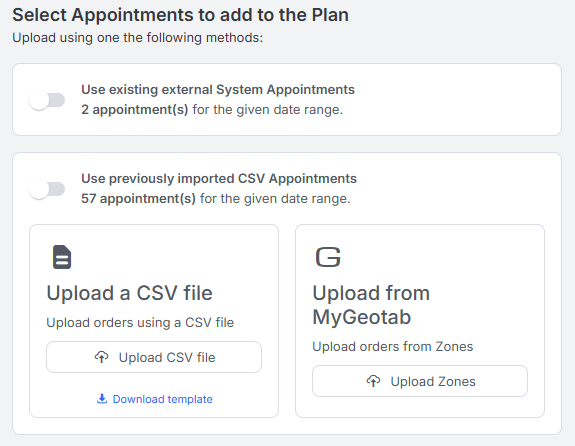
- Add appointments to your draft plan by:
- Uploading a CSV file, or Uploading zones from MyGeotab.
✱ NOTE: Download the CSV template, and leave the Appointment Date cells blank or set to the same date for all appointments. Fill in all other required sections.
Additional options may also appear if applicable:
- Toggle on:
- Use existing external System Appointments to add appointments previously added via API.
✱ NOTE: This option can be combined with previously imported CSV Appointments or one or both Upload options.
- Use previously imported CSV Appointments to add appointments previously added via CSV.
- From the Optimization Profile, select from the following options:
- Reduce drive time – Reduces drive time while risking On-time arrival.
- Balanced – A balanced approach between Reduce drive time and On-time arrival.
- On-time arrival – Increases On-time arrival at the expense of drive time.

- Click Next, and the Plan details page is displayed.
- (Optional) Use the dropdown to change the Vehicle Type from the Branch default. This setting defines the plan route type navigation (drive using car or truck-safe roadways).
- To add comments about the Plan, click Add note.
- The Resources available to work in the selected Branch on the selected date display in the Resources available to work section.
- Click the Columns (gear) icon to switch the order of and toggle the visibility of columns in this section

- Click the Edit (pencil) icon to edit a Resource’s attributes. For more information on how to edit a Resource, refer to the Editing a Resource section.
- Click Next.
- The Plan orders page displays with all the uploaded appointments.
- From the Plan orders page, you can complete the following:
- Review, edit, and delete the uploaded appointments.
- Upload and edit Bill of Materials and add appointments manually.
For more information about adding or editing an appointment, refer to step 3 of the Editing a Plan Appointment section.
✱ NOTE: There must be at least 1 vehicle scheduled in order to upload Bill of Materials.
Appointment Identifiers:
- If appointments in the CSV file were previously uploaded, an Update label will appear to the right of the pencil icon (Edit order).

- If appointments from step 5 were included, a CSV or API (external System) label will appear to the left of the Appointment ID.

✱ NOTE: Any appointments with an Error, Warning, or Important Information displays at the top of the orders list and is identified with a specific color-coded icon. Any errors must be corrected in order to proceed to the next step, while it is recommended Warnings and Information also be reviewed and edited if needed before proceeding.
- (Optional) To view appointment count, revenue total, and total duration by plan date or to filter order list by issue type (if applicable), click on the Expand (down arrow) icon to expand the section.

- If required, click the + Appointment button to add an appointment manually. At minimum, fill in all required fields, then click Save or Save and create another.
- If routing with vehicle capacity consideration, click the Upload Bill of Materials button and upload the prepared CSV file.
- Click the Create plan button.
The Plans page displays and the Plan you created displays with Processing status. Once the Plan is created, a notification displays and the Status will change to Draft.
Creating new Plans – Multiple Dates
- From the Plans page, click the + New Draft Plan button.
- In the New Plan panel, enter your Plan Name.
✱ NOTE: A Plan for each date in the CSV file will be created, with the date automatically appended to the Plan Name you enter.
- Select the Branch for which to run the plans for.
✱ NOTE: All plans will be run for the same Branch, but for each date as specified in the CSV file.
- Toggle on the Multi Day slider then,
- Set the Plan date to the earliest date in the CSV file to be uploaded
- Set the End date to the latest date in the CSV file to be uploaded
- Add appointments to your draft plans by:
- Uploading a CSV file, or Uploading Zones from MyGeotab.
✱ NOTE: The Arrival Date in the CSV file must be populated for each order.
- If applicable, toggle on the option to Use existing external System Appointments (added via API) and/or, Use previously imported CSV Appointments The total number of appointments will be displayed and no additional imports are required.

- Click Next.
The Plan details page is displayed. All dates with imported or external System appointments will be displayed at the top.
- Click on the relevant date to review and edit the plan and Resource details.

- For each plan date:
- (Optional) Edit the plan Name
- (Optional) Use the dropdown to change the Vehicle Type from the Branch default. This setting defines the plan route type navigation (drive using car or truck-safe roadways, and the default navigation type when Navigation (BETA) is used in Mobile..
- (Optional) The Optimization Profile can be customized for each plan. You can select the applicable profile for each of the plan dates as required.
- Reduce drive time – Reduces drive time while risking On-time arrival.
- Balanced – A balanced approach between Reduce drive time and On-time arrival.
- On-time arrival – Increases On-time arrival at the expense of drive time.
- (Optional) Add a Note to the plan

- Review the Resources available to work section.
- Click the Columns (gear) icon to switch the order of and toggle the visibility of columns in this section
- Click the Edit (pencil) icon to edit a Resource’s attributes. For more information on how to edit a Resource, refer to the Editing a Resource section.

- Click Next.
The Plan orders page is displayed. Click on each date at the top to review and/or edit the appointments. Any appointments with an Error, Warning, or Important Information will be at the top of the list and identified by a specific color-coded icon.
✱ NOTE: Some appointments may have labels. See Appointment Identifiers for more information.
- (Optional) To view appointment count, revenue total, and total duration by plan date or to filter appointment list by issue type (if applicable), click the Expand (down arrow) icon to expand the section.
✱ NOTE: Any plan dates with appointmentsthat have Errors will be indicated on the date with a red dot at the top. You must review the Plan orders detail for the marked dates and make any necessary corrections in order to proceed to the next step, while it is recommended to also review Warnings and Information before proceeding. See the Editing a Plan Appointment section for more information.
- If routing with vehicle capacity consideration, click the Upload Bill of Materials button and upload the prepared CSV file for the selected date. Repeat upload for each applicable plan date.
- Click the Create plan button.
- The Plans page is displayed and the plans you created will be displayed with a status of Processing. Once the plans are created, a notification will appear and the status will change to Draft.
✱ NOTE: Depending on the number of plans and appointments created, the processing time increases.
Editing a Resource
- Complete steps 1-9 from the Creating a new plan – Single Date section, or 1-8 (for each date) of the Creating new plans – Multiple Dates section.
- Once the Resources available to work section displays:
- If there is a blue box with a checkmark, then the Resource is already scheduled to work and their schedule can be edited using the pencil icon.
- If there is a white box with no checkmark, then the Resource is not currently scheduled to work (not part of this plan), but you can add the Resource by selecting the pencil icon and editing their shift. They will be added to the plan for the specific date you are currently creating the plan for.
- Click the Edit resource (pencil) icon to edit the Resource.
- From the top toolbar, edit the Resource’s availability, by adding Available time, adding a Break time range, taking Time off, adding a Break time, creating a Meeting time, or Delete availability.

- You can also update the following:
- Efficiency Rate – Edit the pace at which the Resource can complete an order.
- Order groups – Edit the order groups the Resource is capable of performing.
- Order types – Edit the types of orders the Resource is capable of performing.
- Start Location – Edit where the Resource starts the shift by selecting:
- Use branch – The preconfigured address of the Branch the plan is being created for
- Use profile– The preconfigured address in the Resources’s profile in Rostering
- Customize – Manually input a specific address
- End location – Edit where the Resource ends the shift by selecting Use branch, Use profile, or Customize.

- Click Save changes.
✱ NOTE: Changes made here will be applied only for the plan with the specific date you are currently creating. The scheduled parameters remain unchanged in the Availability Calendar unless the plan is published, then the Availability Calendar is automatically updated accordingly.
- Click Next, then proceed with step 13 of the Creating a new plan – Single Date section, or step 10 of the Creating new plans – Multiple Dates section.
Editing a Plan Appointment
- Complete steps 1-11 from the Creating a new plan – Single Date section, or steps 1-10 of the Creating new plans – Multiple Dates section.
- Once the Plan orders page displays, click the Edit (pencil) icon to edit a specific appointment.
✱ NOTE: Only appointments added through a CSV file upload can be edited, existing external System appointments and previously imported CSV appointments cannot.
- From the Edit details window, you can edit the following:
✱ NOTE: Attributes marked with an asterisk (*) are required.
- Appointment ID* – Indicates the order identification number.
- Order type* – Indicates the type of order or appointment.
- Time window start* – Indicates the start time of the appointment arrival time.
- Time window end* – Indicates the end time of the appointment arrival time.
- Duration* – Indicates the Order’s on-site duration.
- Revenue* – Indicates the Order’s revenue.
- Location*– Indicates the complete address of the Order. Details are auto-populated based on the selection made using the Search field. Click the X in the Search field, then type full address and make the applicable selection to change the details.
- Resource – (Optional) Select Preferred or Must be Resource.
- Contact details – Indicates the Customer name*, primary and secondary phone numbers, and Email address.
- Preferred contact method – Indicates the Customer’s preferred method of contact of Phone, SMS, or Email.
- Do not use contact method – Indicates the method of contact the Customer does not want used.
- Add note – Click to edit or remove existing notes, or add new.

- Click Save.
Additional options on the Plan orders page
- Use the Search field to locate an Order using the Appointment ID or Customer Name.

- Click the box next to one or more appointments to select, then click Delete to remove the appointments from the Plan orders list, excluding them from the Plan.
- For a Single Date plan only:
- Click + Appointment to add an appointment to the Plan manually. For more information about the fields in the Add Appointment popup window, refer to step 3 from the Editing a Plan Appointment section
- Click the down arrow at the top right of the page to expand the appointment metrics and filter options.

Plan Overview
Reviewing a Plan
- From the Plans page, click on the plan you want to review or click the more option (...) and choose Open to open the plan in a new tab.
- View plan metrics such as the Filled Capacity, Orders, and Overview Metrics.

- From the Schedule Board, you can:
- View each scheduled Resource, their individual capacity, assigned appointments (orders), and scheduled availability. Click or hover over the Information (i) icon next to each Resource’s name to view more detailed information about that Resource.
- Click the Order by (list) icon to change the sort order by Name, Capacity, or Team.
- Find a specific appointment (Order) or Resource by using the Search bar.
- Toggle between small, medium, or large view options for the Schedule Board display.

- Click Open Map, then select one or more Resources to view their assigned route with sequence on a map.
- View routes across the day by using the position buttons to move backward, to current time, or forward, or by clicking anywhere except on an appointment and dragging left or right. To zoom in or out, use the + and - controls.

- Click the Unassigned Appointments (orders) button to view the list of appointments in the plan that are not assigned to a Resource.

Editing a Plan
A plan in a Draft status can be manually modified in various ways such as reassigning appointments between Resources, editing the duration of appointments, resequencing assigned appointments, assigning unassigned appointments, and more.
- Once a plan has been created, click the Draft plan from the Plans list, or click the more option (...) and choose Open to open the plan in a new tab.
- Click the Edit button. See the following sections for more information:
- Editing an Assigned Appointment
- Reassigning an Assigned Appointment
- Resequencing an Assigned Appointment
- Editing an Unassigned Appointment
- Assigning an Unassigned Appointment
- Adding an Appointment or Resource: Click + Add, then select
- Add Appointment to create an appointment (added as Unassigned). See step 3 of Editing a Plan Order.
- Add Resource to schedule an additional Resource. See step 3 of Editing a Resource.
- Associating or Unassociating a Driver and Vehicle
- Once edits are complete, click the Save button.
- (Optional) If you are also using the Dispatch module and you want to finalize the plan, click Publish then choose Publish or Lock and Publish to make the plan active and automatically pass it to Dispatch on the plan date.
✱ NOTE: If Optimize on release is enabled in the Branch > Dispatch settings (in the Administration module), the Published plan will be reoptimized when it transitions to Dispatch, regardless of any edits. To keep your edits and only auto-optimize unassigned appointments (if applicable), choose Lock and Publish.
! IMPORTANT: You can run any number of plans for a given date, but publishing a plan makes it active. You can replace a published plan by publishing another up until the day before the plan date. Once the plan date is ‘today’s date’ however, you can no longer replace the last published plan.
Editing an Assigned Appointment
- Click the desired assigned appointment (order).
- From the appointment detail popup, the following displays:
- Custom Status - Add or modify from the dropdown (if applicable).
- Verify –Add the applicable event and optional comment.
- Notes – View existing or add a new note to the specific appointment
- Details – View whether a Locked Resource or Preferred Resource is associated with the appointment.
- Click the Edit (pencil) icon and choose from the following options:
- Edit – Change the duration of the appointment.
- Lock – Lock the current assigned Resource to the appointment.
- Unlock – Remove the Locked Resource from the appointment.
✱ NOTE This displays if the order is Locked.
- Unassign – Unassign the appointment from the Resource.
- Delete appointment – Remove the appointment from the plan.
- Bill of Materials – Review, edit, or add materials associated with the appointment.

- Click the Save button to save your edits.
Reassigning an Assigned Appointment
- Click and drag the assigned appointment from the assigned Resource’s route to the route of the other Resource.
The Schedule Board filters to display the two impacted Resources’ routes, and the appointment being moved displays in the new route, marked in red.

- Click Confirm assignment to complete the reassignment.
Resequencing an Assigned Appointment
- Click and drag the desired appointment along the route to the target position.
✱ NOTE: The target sequence position will change from green to white as you drag the appointment along the route.
- Release at the desired sequence position.
Editing an Unassigned Appointment
- Click the Unassigned Appointments (green triangle) icon to expand the list.
- Click the desired unassigned appointment.
- From the unassigned appointment detail popup the following displays:
- Custom Status - Add or modify from the dropdown (if applicable).
- Verify –Add the applicable event and optional comment.
- Notes – View existing or add a new note to the specific appointment.
- Details – View whether a Locked Resource or Preferred Resource is associated with the appointment.
- Click the Edit (pencil) icon and choose from the following options:
- Edit – Change the duration of the appointment.
- Delete appointment – Remove the appointment from the Plan
- Bill of Materials – Review, edit, or add materials associated with the appointment.
- Click the Save button to save your edits.
Assigning an Unassigned Appointment
- Click the Unassigned Appointments (green triangle) icon to expand the list.
- Click the desired unassigned appointment and drag to the desired Resource’s route.

- Click Confirm assignment to complete the assignment.
Associating or Unassociating a Driver and Vehicle
When you associate a Driver to a scheduled Unassociated Vehicle, the appointments assigned to the vehicle will be added to the Driver’s route, adhering to the Driver’s schedule and details.
When you unassociate a vehicle from a Driver, only appointments with Bill of Materials are removed from the Driver’s route, and are instead assigned to the vehicle which then appears under the Unassociated Vehicles section of the Schedule Board.
Associate a Driver to a vehicle:
- Click the No truck button below the Driver’s name.

- From the detail pop up, select the scheduled unassociated vehicle from the dropdown.

- Click Update Driver to complete the vehicle association.

✱ NOTE: The vehicle will no longer be displayed under the Unassociated Vehicles section of the Schedule Board.
Unassociate a Driver from a vehicle:
- Click the vehicle name button below the Driver’s name.

- From the detail pop up, click Unassociate Vehicle.

- Click Update Driver to complete the vehicle unassociation.

To change the associated vehicle:
- Follow steps 1 and 2 from the Unassociate a Driver from a vehicle section.
- From the detail modal, select a different vehicle from the dropdown.
- Click Update Driver to save the change.
