Raspberry PiOX Configuration Guide
Support Document
0 mins to read
This document outlines how to configure the remote debugging environment for the Raspberry Pi 4 board for deployment.
Configuring the Remote Debugging Environment
Requirements
Hardware
- Raspberry Pi 4 board for deployment and debugging
- Host machine
- GO device
- CAN cable to connect between PiCAN3 and GO device
- Ethernet cable to connect between RPi and host machine or Wi-Fi connection
- PiCAN3 CAN Bus Board for Raspberry Pi 4 from: https://copperhilltech.com/pican3-can-bus-board-for-raspberry-pi-4-with-3a-smps-and-rtc/
Software
- A Linux standalone or virtual machine (VM) desktop
- Raspberry Pi OS
- Cross compilation ARM tool chain
- gdbserver
- Java Development Kit (JDK)
- Eclipse IDE
- Linux can-utils
- Raspberry PiOX Demo Githab source code
Hardware configuration:

For the hardware installation of the PiCAN3 CAN Bus Board on Raspberry Pi 4, refer to the following link. Note that the software installation part is covered later.
https://copperhilltech.com/content/PICAN3_UGA_10.pdf
Configuring the Raspberry Pi
General configuration
- Download and launch the Raspberry Pi Imager from the following link: Download Raspberry Pi OS
- Set up your Raspberry Pi by following the instructions in the following link: Setting up your Raspberry Pi
- Raspberry Pi documentation (Quickstart, Installation, Configuration, etc.) can be found here: Raspberry Pi Documentation
Setting a static IP address
By default, the IP address of RPi is dynamic and is assigned by the DHCP server. However, when using the RPi as a remote target, and when access to the device will be through remote tools such as SSH (Secure Shell), it’s useful and practical to assign the RPi a static private IP address.
In the RPi environment, open the command prompt and type the following command to open the dhcpcd.conf file:
sudo nano /etc/dhcpcd.conf
Scroll down to the end of the dhcpcd.conf file and manually add the static IP address (e.g. 192.168.2.66/24), the network gateway, and the domain name server with the following format:
Example configuration
interface eth0
static ip_address=192.168.2.66/24
static routers=192.168.2.1
static domain_name_servers=192.168.2.1
✱ NOTE: If your RPi is connected to the internet via an Ethernet or network cable, then enter the command interface eth0. If it is connected to the internet via Wi-Fi, then enter the command interface wlan0.
To save and exit the dhcpcd.conf file, press Ctrl+X, press Y, and then press Enter. Finally, reboot the device.
For more information, see the following link:
Setting Up a Cross-Compilation Toolchain (Linux)
As a prerequisite, you will need a Linux OS standalone or virtual machine (VM) desktop instance.
✱ NOTE: The following section is implemented on Virtual Box with Ubuntu 20.04.
Updating the Linux OS
✱ NOTE: If Linux OS was just installed, you can skip this step as the OS should already be the latest version.
Open terminal command prompt and type the following commands:
sudo apt-get update
sudo apt-get upgrade
Updating the sources lists
You need to update the sources lists to include the cross-toolchain sources list, which makes a list of available cross-compilation packages.
Navigate to the sources.list.d directory by typing the following command:
cd /etc/apt/sources.list.d/
Create a new file crosstools.list in this directory by typing the following command:
sudo nano crosstools.list
Manually add the following to the crosstools.list file:
deb http://emdebian.org/tools/debian jessie main
Save and close the file. Press Ctrl+X, press Y, then press Enter.
Adding armhf as a foreign architecture and updating the list of available packages
In the terminal, type the following command:
sudo dpkg --add-architecture armhf
Check the native architecture of the system by typing the following command in the terminal:
dpkg --print-architecture

Check the foreign architecture in the system by typing the following command in the terminal:
dpkg --print-foreign-architectures
Ensure that the output includes armhf.

Then type the following command:
sudo apt update
Installing the cross-build toolchain
In the terminal, type the following command:
sudo apt install crossbuild-essential-armhf
Navigate to the bin folder and check the entry of gcc\g++ for natively compiling x86 code and arm-linux-gnueabihi-gcc\g++ entry for cross compiling armhf code:
cd /usr/bin
gena@desktop:/usr/bin$ ls -l *g++

Installing and Configuring Eclipse for Remote Debugging
Installing the Java Development Kit (JDK)
To use Eclipse for C\C++ programming, you need to install the Java Development Kit (JDK) on your Linux machine.
- First, update the apt package index with the following command:sudo apt update
- Once the package index is updated install the default Java OpenJDK package with:sudo apt install default-jre
- Verify the installation, by running the following command which will print the Java version:java -version
The output will look something like this:

Downloading Eclipse
Eclipse can be downloaded from the following link: https://www.eclipse.org/downloads/
Extract the downloaded package, by default Eclipse package should be downloaded into the ~/Downloads folder of your home directory.
Installing Eclipse IDE
Use the commands below to extract the content in the ~/Downloads folder and then launch the installer:
tar xfz ~/Downloads/eclipse-inst-linux64.tar.gz
cd Downloads/eclipse-installer/eclipse-inst
Select the package Eclipse IDE for C/C++ Developers to install and continue:

Use the onscreen instructions to complete the installer. Accept the default installation directory and continue. Next, accept the license terms and continue, wait for Eclipse installer to download and install all the packages.
Configuring Eclipse for cross-compilation
Start Eclipse IDE, specify the default Workspace directory, and then click Launch.

Create a new project by navigating to File > New > Project > C/C++ > C/C++ Project and then click Next.

Select C Managed Build as the template and then click Next.

Enter a project name, and then:
- Under Project type, in the Executable folder, select Empty Project.
- Under Toolchains, select Cross GCC.
- Click Next.

Keep all default settings on the Select Configuration screen. Click Next.

On the Cross GCC Command screen:
- In the Cross compiler prefix text box, enter arm-linux-gnueabihf-
- In the Cross compiler path text box, enter /usr/bin
- Click Finish.

The Eclipse IDE is now configured for cross-compilation using the cross-compilation toolchain. You can write your code or import source code from an existing project.
Importing existing source files to the project
Right click on the project name and then click Import...

- Under General, select File System and then click Next.
- Use the Browse button to navigate to the location of the source code folder.
- From the list on the right, select all source file checkboxes (.c and .h) and then click Finish.
All selected source files are now moved into the project folder. See the right screenshot for an example — note how the CANTxManager.c, CANTxManager.h, can.c, and can.h files that were selected are now in the project folder.
|
|


Next, you should be able to build the project. Right click the project name and click Build Project. If everything is configured properly, the build finishes with 0 errors.

Remote debugging
To allow debugging communication between the host machine and Raspberry Pi, you must install gdbserver on Raspberry Pi. This section describes how to do this.
For more information about gdbserver, refer to the following link: https://www.man7.org/linux/man-pages/man1/gdbserver.1.html
Open the terminal command prompt and enter the following command:
sudo apt-get install gdbserver
Now, go back to the host machine to configure Eclipse for remote debugging.
Open the terminal and install gdb-multiarch to support the target's ARM architecture on the host machine by typing the following command:
sudo apt-get install gdb-multiarch
Next, Eclipse must be configured so that it can connect to the RPi’s gdb server.
In Eclipse, right click the project name and then select Debug As > Debug Configurations...

In the Debug Configurations window, double-click C/C++ Remote Application. This will create a new remote debug configuration session. In the Connection section, click New.

In the dialog that appears, select SSH from the Choose connection type drop-down menu. Click OK.

In the New Connection dialog, do the following:
- In the Host text box, enter the IP address of the remote target (the Raspberri Pi).
- In the User text box, enter the username of the remote target. This is “pi” by default.
- Select the Password based authentication radio button and then enter the password of the remote target.
- Click Finish.

Back in the Debug Configurations window, select the Debugger tab, change the GDB debugger text box from gdb to gdb-multiarch, and then click Apply.

Still in Debug Configurations, go to the Main tab. In the Build (if required before launching) section, select “Debug” from the Build Configuration drop-down menu.

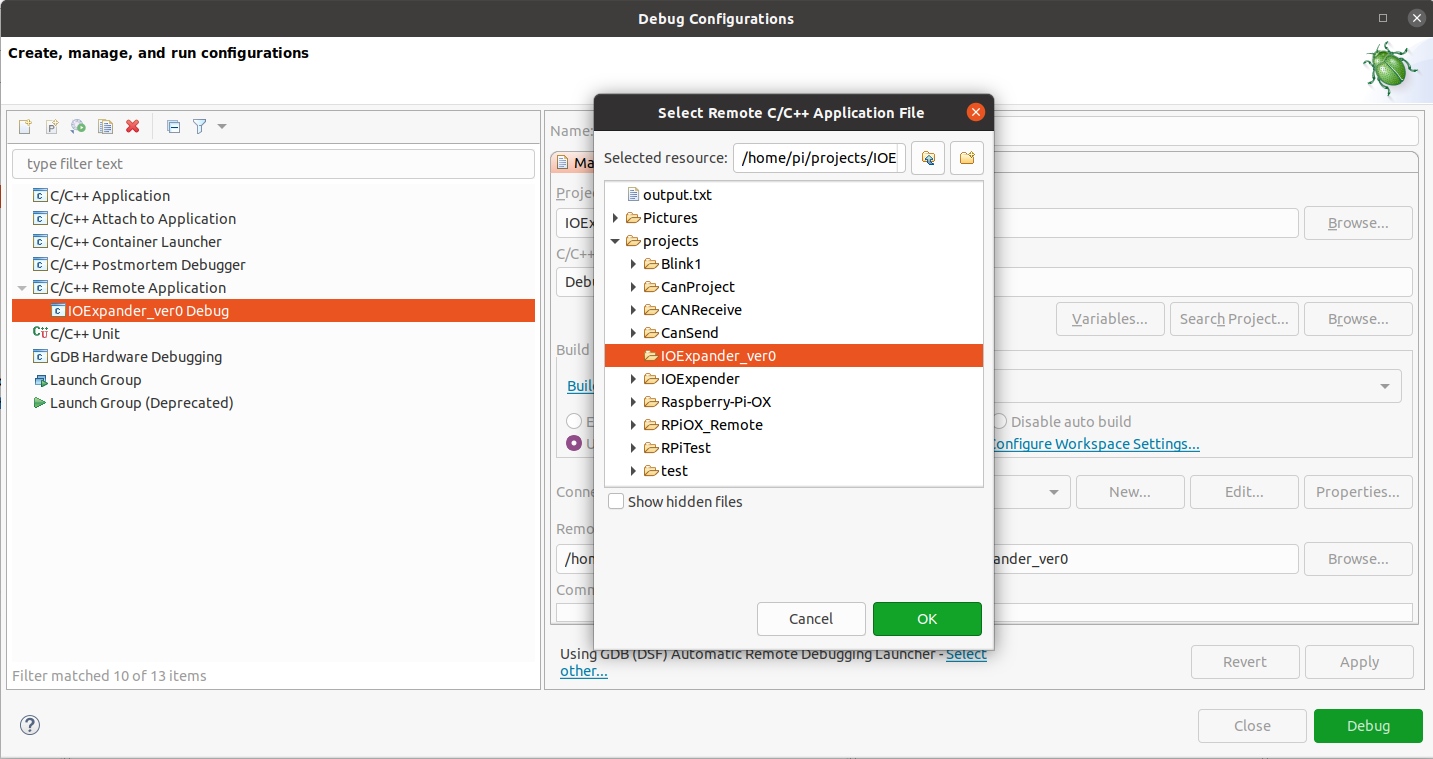
Next, under Remote Absolute File Path for C/C++ Application, click Browse and navigate to the folder in the remote target (the RPi) where the executable file is located and then click OK.
Finally, click Apply and then click Debug to start the debugging session with the Raspberry Pi.

Configuring the CAN Communications
For software installation and configuration settings of PiCAN3 CAN Bus Board on Raspberry Pi 4, see:
https://copperhilltech.com/content/PICAN3_UGA_10.pdf
For a hardware schematic of the PiCAN3, see:
