Drive App — Driver's Guide to the Work Diary (Australia)
Support Document
0 mins to read
The Work Diary App is a work management system for drivers, with Australian rulesets. Drivers use this free-of-charge app together with a Geotab GO device to record their hours of rest or work, to minimise fatigue and aid in the completion of paper logbooks.
Introduction and Prerequisites
The Work Diary App helps drivers manage their work hours and fatigue, improving safety and compliance. With the release of MyGeotab 8.0, Geotab Drive™ is now updated to include features for calculating driving hours, diary management for work and rest records, and for vehicle inspection. The Work Diary App currently supports Standard hours (solo drivers) rules.
In order for you to use the Work Diary app, your vehicle must be equipped with a telematics device, and a compatible Android or iOS mobile device. For more information about installing and configuring a telematics device, see Setting up the telematics device. For a list of compatible mobile devices, see the Mobile Requirements section below.
The Work Diary:
- Supports only the Australia Standard Hours Solo with Exemption Hours ruleset.
- Is available on the Regulatory, Pro, and ProPlus rate plans.
✱ NOTE: All Work Diary fields can be edited in the Fleet Management Application. Edited logs will be permanently marked as having been modified.
Mobile Requirements
Android
| iOS
|
Logging In
When you log in to the Work Diary, you are prompted to complete a set of tasks to synchronize your assets and ensure the vehicle is safe to operate.
| If you start driving the vehicle without logging in, the Work Diary detects the motion, and warns you to stop the vehicle and log in. If you do not log in, the Work Diary is unable to associate your duty status and other driving events with your account. |

Before you can start driving, you are prompted to:
- Select a vehicle
- Add a trailer (optional)
- Add a shipment (optional)
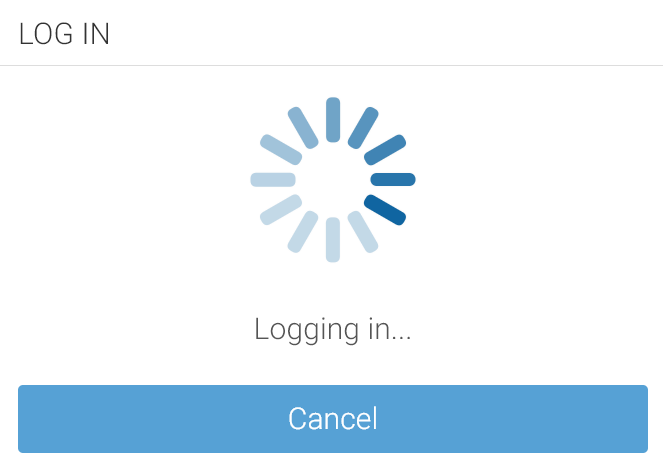
| The first time you log in to the Work Diary, you are prompted to Accept the End User Agreement. After accepting the agreement, enter your Username and press Next to display the Password field. Enter your password (minimum 8 characters in length), and press Log in. ✱ NOTE: Tap the eye symbol to show/hide your password.
| |
| After authenticating your login credentials, the Work Diary synchronizes your data for a brief period before loading (i.e. driver profile, shipments, Work Diary, and Asset Inspection records). ✱ NOTE: You remain associated with your driver’s logs even when you switch vehicles. |


Selecting Assets
You must select a vehicle before the Work Diary and other electronic records can be assigned to you.
| Based on the geolocation of your device, the App locates the closest vehicles within a 1 km/0.6mi radius. You can continue with the closest vehicle, or select another vehicle. If there is no vehicle assigned to your account at the time of login, select No Vehicle. |

| After selecting your vehicle, you have the option to attach a trailer and shipments. You can select up to four trailers; however, each trailer must be assigned a unique name. You can select up to 25 shipments. When finished, press Save and Continue. ✱ NOTE: Shipments are optional and do not affect the user workflow. |

Using the Dashboard
After completing your login tasks, you are taken to the Dashboard. The Dashboard is your main screen for navigating the Drive App. Shortcuts to key features such as Work Diary are available at the bottom of all screens. Messages, events, notifications and connection status are available at the top of all screens. You can find Settings and other useful tools under More.

Checking Connection Status
| You can check your connection status by pressing the wireless icon in the top-right corner of the screen. A red exclamation mark indicates a disconnection. When pressed, the disconnected item displays in red, which can be selected for additional information. |

Vehicle Disconnected
This message displays in red when your Telematics Device is not communicating with the Drive App server. This can be caused by issues with the wireless network, or a loss of power from the device.
Drive Disconnected
This message displays in red when your mobile device is not connected to the Drive App server. This can be caused by a poor data service on the mobile device, or the mobile device is in airplane mode.
✱ NOTE: Logging out is disabled when the Drive App is in this state. This preserves your logs until a connection to the server is re-established. Similarly, you will not be able to log in while disconnected.
GPS Disconnected
This message displays in red when there is a disruption with GPS communication on the mobile device. This can be caused by location, environment, or airplane mode. The Drive App uses GPS as a fallback for the lock screen.
Power Disconnected
The driver is at risk for losing device power if their mobile device is not being charged. The lock screen may not be as responsive if power is not connected.
Checking Messages and Notifications
| Shortcuts to messages, events and notifications are available by pressing the notification icon. ✱ NOTE: To learn more about these features, refer to Messages and Events. |
|


Adding Assets
After logging in, you can change vehicles, or add trailers and shipments by pressing the asset name on the Dashboard. You can also press More, then Assets from the shortcuts menu at the bottom of the screen.

| Press the X icon to change the vehicle. Press the + button to add up to four trailers. Press the + button to add up to 25 shipments. |

| Your new assets are displayed on the Assets screen. |

Using the Work Diary
| The Work Diary provides all the tools necessary to track and record your work. You can also apply the Work Exemption, and monitor driving limits. The Work Diary screen is divided into Status and Logs tabs. |

Status Tab
The Status tab allows you to view and set your duty status, as well as view and apply exemptions.
| Duty status is displayed by one of the two buttons on the screen:
The Status tab displays the Base Time, ruleset information, remaining work limits, and your work exemption. Press View Exemptions > Start to apply a work exemption.
|


Motion Detection When Driving
| If the vehicle begins moving while you are logged into the Drive App, the App screen locks to minimize driver distraction. All other information is hidden, and you are only shown the remaining driving time available. If you continue to drive after your available work hours are used up, the screen notifies you that you are in violation of your ruleset. In addition to Work limits, the App broadcasts an audible warning, whether the App is in the background or the foreground. The audible warning does not occur if you are in the Rest status. |

Logs Tab
The Logs tab displays a list of Work Diary logs for the past 16 days, including any violations incurred. Logs are displayed below the graph, one day at a time, and can be navigated using the arrows at the top of the screen, or by pressing the date picker to display the calendar.
Using the Graph
Duty status is plotted along the graph for a 24-hour period for each day. The total time spent in a particular duty status is displayed to the right of the graph. The bars on the graph are color-coded in the following way:
- Green: Work Diary logs
- Green striped: Work exemption
- Red: Driving in violation
| Select a log from the graph to display details, such as the duration of the log and the creation date. You can also edit certain elements of the log. If a log requires attention (e.g. missing location), a notification appears at the top of the page. Press the notification to go to the log and make the necessary updates. |
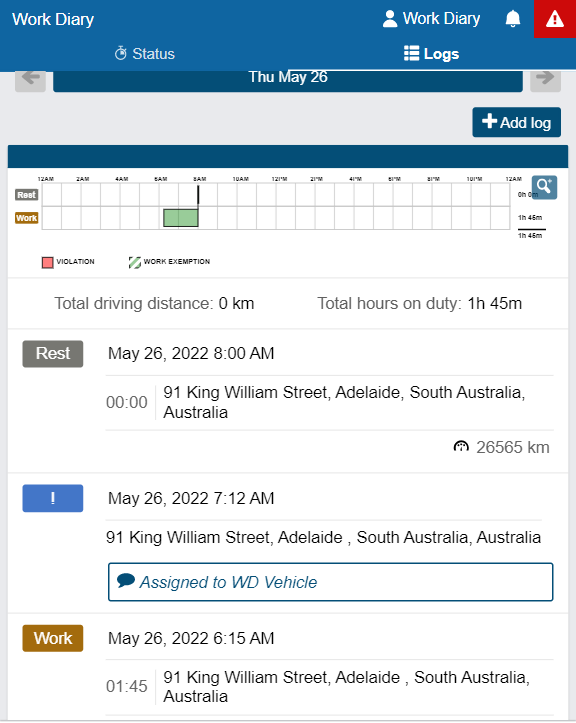
| Press the arrow to expand the starting and ending odometer values at the bottom of the Logs screen. |

| When you select a log, the screen shows when and where the log was created, work status, work duration, inspections performed, and any violations incurred.
You can also add your own annotations in the text field at the bottom of the screen. |


Location Information
The Telematics Device installed in your vehicle captures location information. If the GPS signal on the Telematics Device is unavailable, the App uses the location of the mobile device. If the mobile device is unavailable, you must enter the location manually by pressing the Where was this? button.
| Enter the address where the log occurred, or to add location information if an exemption is applied. |

Manual Logs
Manual logs allow you to correct your Work Diary logs when existing logs are found to be incorrect or incomplete. Manual logs allow you to update any status for a specific date and time, select the appropriate options for that status, and assign yourself a vehicle.
| You can add manual logs for the past 16 days. To manually add a log, press the + Add Log button. ✱ NOTE: You cannot add logs for more than 16 days. The App only displays 16 days of logs. | |
| On the screen that follows, press the pencil icon for each applicable element of the log, and add the odometer value. You can add a new annotation to provide context for the manual log. Press Add to create the log. | |
| Choose the Status, Date and Time to start the log. | |
| If you have a vehicle assigned to you when you create the manual log, that vehicle is automatically selected. If the selected vehicle was not the vehicle assigned to you at the time you were driving, search for and select the correct vehicle. Otherwise, select No Vehicle. | |
| The App returns you to the Logs screen. Press Where was this? to add a location. To view details, select the log. |


If you made a mistake while creating a manual log, press the pencil icon to edit the log status or date. You can also add new annotations. Press Save when you have finished making changes.
Settings
| The Settings page has basic information about your system, as well as options to change your password, enable Night Mode, and report any bugs. You can access the Settings page by pressing the gear icon from the Dashboard. |

Updating the App
The Drive App is constantly updated with features and fixes. Generally, the Drive App remains up to date on its own; however, you can force a manual update using the Check for updates button on the More screen.
Enabling Night Mode
The Drive App can be optimized for viewing in low-light settings by enabling Dark Mode. To enable Dark Mode, select More from the navigation menu, then toggle Dark mode on or off.
|
|


Logging Out
Logging out of the Drive App disassociates you from your vehicle. Any trips made in a vehicle while logged out of the Drive App are not associated with the driver.
| You can log out of the Drive App by pressing your name and selecting Log out from the dropdown menu. |

Installing Add-Ins
Add-ins expand the capabilities of the Drive App by integrating third-party software with your system. For more information about Add-Ins, contact your Administrator.
Reporting Bugs
If you experience any issues while using the Drive App, use the Report a bug button on the Settings page to file a bug report. Your bug reports help us identify and resolve issues with the Drive App.
Appendix: Setup and Configuration
Setting up the Telematics Device
| You must install a Telematics Device in the vehicle to be used together with the Drive App. Click here for installation instructions. Once the device is installed, log in to the Fleet Management Application and select Vehicles from the main menu. Next, click Add and then select Add device from the dropdown menu. Enter the device’s Serial number, and add a Description to help identify the device. Enter the VIN and make/model/year of the vehicle, then click OK to add the device. |

Once the device has been added, select it from the Vehicles page. On the page that follows, click More Details and then do the following:
- In the License plate text field, enter the vehicle license plate (optional).
- In the State/province text field, enter Australia to ensure the setup works correctly.
When the vehicle is communicating with the Fleet Management Application, verify that the following information is correct:
- Odometer value
Once the telematics device is installed and configured as described above, you can now install the Drive App on a compatible Android or iOS mobile device, as described below. For a list of supported devices, see here.
Installing the Drive App
Android Setup
- Make sure you have access to the Google Play Store.
- Enable Wi-Fi and disable Flight mode.
- Under Mobile networks, enable Data access over mobile network.
- Enable all location services, and High accuracy mode if available.
- Set Date & time to automatic.
- In the Google Play Store settings, enable Auto-update apps at any time.
- Go to the Google Play Store and install the Drive App.
iOS Setup
- Make sure you have access to the Apple App Store.
- Enable Wi-Fi and disable Airplane mode.
- Under iOS settings > Privacy, enable Location Services.
- Under Drive App, select Always, and enable Use Cellular Data, then set Notifications to Allow Notifications.
- Under iOS settings > iTunes & App Store > Automatic Downloads, check Updates and Use Cellular Data.
- Ensure that the Date & time are set to automatic.
- Go to the App Store and install the Drive App.
Setting up Driver Clearances for Work Diary Users
Clearances determine the features that users have access to in the Drive App. Security clearances can be created and modified by clicking the Clearances button in the Fleet Management Application.

The Drive App has a built-in clearance for users of the Drive App called the Drive App user. The Drive App user clearance allows the user to access Work Diary, Asset Inspection, and Messaging capabilities.
To allow users to only use the Work Diary, remove the following clearances from the default Drive App user clearance:
- Administer Asset Inspection Logs
- View Asset Inspection Logs
- Send Messages
- View Messages
