Installation Document
0 mins to read
Keyless Lite Implementation Guide
Installation Document
0 mins to read
The Keyless Lite Solution by Geotab enables your fleet to easily share vehicles – locate, unlock and lock – from a simple mobile phone application using virtual keys. It is an optimal solution when no pre-reservations are required: drivers unlock vehicles and go. I
✱ NOTE: Do you have a use case/feature request for the Keyless Lite Solution?
The Geotab Product Management Team wants to hear from you! We work hard to improve our products, and your feedback is important to us. Contact keylessinfo@geotab.com and cc your Partner contact(s).
The Keyless Lite Solution by Geotab enables your fleet to easily share vehicles – locate, unlock and lock – from a simple mobile phone application using virtual keys. It is an optimal solution when no pre-reservations are required: drivers unlock vehicles and go. It consists of a number of solution components:
- For Drivers: The Keyless Lite mobile application enables drivers to access your fleet’s shared vehicles – locate, unlock and lock – from a simple mobile phone application, in locations with or without data connectivity. It automatically assigns Drivers, enabling you to know who has or had access to which shared vehicle, in MyGeotab features and reporting. Keyless Lite is an Add-in for Geotab Drive, Geotab’s mobile application.
- For the fleet operations / management team, your Geotab Partner, and Geotab Support: Keyless Monitor enables you to configure, control, and monitor Geotab Keyless hardware and correct setup; it allows you to send commands – such as lock and unlock – to vehicles remotely (over-the-air). Keyless Monitor is a MyGeotab Add-in.
- Geotab’s GO9 device (telematics device) and Keyless Hardware is the starting point. The Keyless Lite Solution supports IOX-KEYLESS and IOX-KEYBOX Beta (future availability) hardware.
✱ NOTE: What about NFC fob access? NFC fob access is not yet supported; as we evolve our solution, we will assess support on our roadmap. Contact keylessinfo@geotab.com and cc your Partner contact(s) if this is important to support your fleet.
Hardware and software setup
Initial hardware and software setup for Keyless Lite is a multi-step process that requires action from the Partner and the Customer.
Steps for Partners
Geotab Partners must complete the following tasks:
- In MyAdmin Device Admin:
- Change the rate plan of the GO device to ProPlus + Keyless.
- Place the GO device on the Keyless Devices Channel firmware channel.
- First, to verify a device’s firmware channel, check Include Connect Data within the Options / Device Search Options. In the results, you will see a column Firmware Channel.
- Next, if the device is not on the Keyless Devices Channel, select it in the results and choose button option Configure Firmware Channel. Select Channel Keyless Devices Channel and click OK.
- If the GO device is not already added to the customer’s database, add the GO device to the MyGeotab database. ✱ NOTE: For Keyless to function, the device must belong to the primary database of the Keyless solution customer (the Keyless database). The device’s data stream cannot be shared from another database into the customer’s Keyless database via Extendible Services.
- Install and set up the Keyless Monitor Add-in via the instructions in the Keyless Monitor Guide.
- A Keyless Tenant, which is a connection from the Keyless database to the Keyless Service, enabling Keyless functionality, is required: If you do not have a Keyless Tenant connection, Keyless Monitor will guide you to complete this process.
- ✱ NOTE: For Tesla vehicles, you must send a Tesla Key Fob Configuration to the vehicle using the Keyless Monitor Add-in. Follow the instructions in Key Fob Configuration in the Keyless Monitor Guide.
- Install Keyless Lite (Geotab Drive Add-in): There are two ways to install.
Marketplace
Install the Keyless Lite Add-In directly from the Geotab Marketplace:
Manual installation using a config file
Consult How to install/add an add-in manually into a MyGeotab database and use the following config file text:
{
"url": "https://app.geotab.com/addins/geotab/keylessLiteDrive/manifest.json"
}
Hardware installation: steps for Installers (or Customers performing the installation)
The GO device (telematics device) and Keyless Hardware (IOX-KEYLESS or IOX-KEYBOX Beta) are installed inside the vehicle to perform lock/unlock functionality.
The entity performing the hardware installation must complete the following tasks.
✱ NOTE: For GO device installation, refer to the GO device installation area on Geotab Support Center.
✱ NOTE: The IOX-KEYLESS does not support concurrent operation with an IOX-BT installed.
- Install the Keyless hardware:
- IOX-KEYLESS: See IOX-KEYLESS installation instructions
- If optionally chosen for installation: Install relay harness hardware.
- For advanced IOX-KEYLESS installation documentation and best practices, see Keyless Installation Document Index
- IOX-KEYBOX (Beta availability only): See IOX-KEYBOX installation instructions.
- For starting point built-in clearances from which to create your sub-clearance, use Drive App User (recommended for most cases) or Administrator (if any users in the Administrator role will also be accessing vehicles via Keyless Lite).
- Keep your current account for MyGeotab use, including Keyless Monitor.
- Create a new account for your use as a Driver (in the Geotab Drive app) with a sub-clearance of Administrator (or Drive App User) optimized for Keyless Lite without ELD features, as outlined below.
- Under Access to feature, disable the following:
- Administer Asset Inspection Logs
- Administer HOS Logs
- Administer shipments
- Administer trailers
- Mark Asset Inspection logs as certified
- Mark Asset Inspection logs as repaired
- Perform Asset Inspections
- Send messages
- View Asset Inspection logs
- View HOS Logs
- View messages
- View shipments
- View trailers
- Name/Description: In Keyless Lite, this will be how vehicles are found from the main screen.
- License plate: This further helps uniquely identify the vehicle to the Driver, and will appear on a vehicle’s details and actions screen.
- Comments: Add the physical description of the vehicle (for example, White Kia Forte).
- Set Security clearance to be a new sub-clearance you created above, or alternative.
- Set Data access to the applicable group.
- Navigate to the Driver tab and toggle This user is a driver to Yes. If this is not set to Yes, then Driver assignment to vehicles is not enabled as outlined in How to view which Driver has / had which Shared Vehicle.
- Vehicle receives LOCK & UNLOCK commands
- If relay harness optionally installed: Vehicle receives STARTER ENABLE & STARTER INHIBIT command
- Offline Unlock, Lock and Locate: Ahead of accessing a vehicle in a location without a data connection, a virtual key must be downloaded and available in Lite. To do that, ensure you complete up to step 4 in Get Started with Keyless Lite.
- Smartphone Location is used to identify nearby vehicles. It is recommended that Location is made available to the Geotab Drive application, to help Drivers identify nearby vehicles.
- Bluetooth is always used to Locate, Unlock and Lock vehicles. If a Driver is not within Bluetooth proximity, which typically means the same lot or area of a lot, then the Driver will not be able to access the vehicle. For a vehicle that is out of Bluetooth range, a symbol indicating an incomplete connection will appear on the vehicle information & command page, and options to Locate, Unlock and Lock are not available.
- Keyless Lite responds to a ‘Locate’ request, potentially inconsistently by vehicle type. Typically, this may involve flashing lights and/or honking.
- Data connectivity required for driver assignment: Drivers must have data connectivity when unlocking or locking the vehicle to be assigned to, or assignment removed from, the vehicle.
- In Add Drivers as MyGeotab Users, ensure to navigate to the Driver tab and toggle “This user is a driver” to Yes. If not, Driver assignment for this User will not be supported.
- Open the Map.
- Zoom in to your location and or filter vehicles by your shared vehicle Group(s).
- The Driver who last unlocked (and not yet locked) a vehicle will appear in the vehicle listing, as well as within brackets after the vehicle’s name on the Map.
- Clip on Map from the main menu.
- Click Trips History.
- Click Options.
- Select the desired Date Period to run the report.
- Click Apply Changes.
- Click Report and select Advanced to download the Advanced Trips Report.
Vehicle ignition type: setup considerations
Push-to-start ignition
After initial installation of Geotab Keyless Hardware (either IOX-KEYLESS or IOX-KEYBOX Beta) into the target vehicle, no further installation/setup is required.
In push-to-start ignition use cases, Drivers do not need to access a physical key in order to unlock/lock or start a vehicle while they are in possession of it. After every unlock event, Drivers are allowed to press the brake and push the start button for a period of 10 minutes. After 10 minutes elapses, they will need to press unlock again to be able to start the car.
Bladed key ignition
After initial installation of Geotab Keyless into the target vehicle, a physical key will need to be installed inside the vehicle for drivers to be able to turn the vehicle’s ignition and start the car.
For IOX-KEYLESS hardware
It is recommended that the bladed key be stored inside the glove compartment of each vehicle. If any other location is chosen by the Fleet Manager, communicate to your Drivers about the change.
In bladed key ignition use cases, drivers will unlock/lock the vehicle at the start and end of their use of the vehicle. While they are in possession of the car, they will use a physical bladed key for access. The physical key is required to be able to start the vehicle once they are inside.
! IMPORTANT: Drivers must ensure to replace the key inside the vehicle when they are done with the vehicle, and submit a lock command on the app to ensure the next user is able to access the vehicle.
For IOX-KEYBOX hardware (Beta availability)
The bladed key will be stored and locked inside the key box, which can have various installation locations inside the vehicle, depending on the best fit for the vehicle type. Typically, this is the glove compartment or under a seat, but it could be in the cargo or passenger compartment. The unlock/lock commands which unlocks and locks the vehicle doors, additionally locks and unlocks the key box to access the vehicle’s bladed key.
Once inside the vehicle, the Driver will need to open the key box to access the physical key, which will then be required to start the vehicle.
! IMPORTANT: Drivers must ensure to replace the key inside the key box when they are done with the vehicle, and submit a lock command on the app to ensure the next user is able to access the vehicle.
Customer Keyless database setup
The MyGeotab database must be configured in order for vehicles to properly populate inside the Keyless Lite mobile application and for users to be able to access them.
Create a new Security Sub-Clearance for Geotab Drive without ELD Compliance
Geotab Drive by default has features visible for US ELD (Electronic Logging Device) compliance. If you are not using these features, to reduce your Drivers’ confusion, remove ELD features from view, and only have Keyless Lite features visible.
To do so, create a new security sub-clearance of Drive App User (recommended for most of your Drivers) or Administrator (if any in the Administrator role will also be accessing vehicles via Keyless Lite), then in a future step, assign your Drivers this sub-clearance.
How to create a new Security Sub-Clearance: Follow How to Create a Security Sub-Clearance.
✱ NOTE: Keyless Monitor requires users to have Security clearance ‘Administrator’ and currently users with a Sub-Clearance of ‘Administrator’ will not be permitted. If you are an Administrator, we recommend:
When you add Drivers as MyGeotab Users, which is a step below, ensure that all Drivers are assigned your new sub-clearance.
Create Shared Vehicle Groups and Assign Shared Vehicles
Keyless Lite Drivers are able to locate, lock and unlock all vehicles assigned to a Group, allowing you to allow and restrict access based on MyGeotab groups.
To create new vehicle groups to assigned shared vehicles, see How to create a group.
To assign vehicles to groups, see How to put a vehicle in a Group.
✱ NOTE: While you are assigning vehicles to groups, you may want to follow steps in the Support Driver Vehicle Identification: Add Vehicle Description Informations section to reduce future steps.
If you are new to Groups and have a more complex fleet, see Pro tips for using MyGeotab groups and sub-groups.
When you add Drivers as MyGeotab Users, which is a step below, ensure that all Drivers are assigned Data access to the appropriate created Group(s).
Support Driver Vehicle Identification: Add Vehicle Description Information
Each vehicle inside the MyGeotab database that is accessed by Keyless Lite should have the following details populated with clarity for vehicle identification, which will appear in Keyless Lite to support Drivers identify a vehicle. To add/edit this information, see How to edit a vehicle's information in MyGeotab.
✱ NOTE: Model, which is the Make and Model decoded from the VIN, is not included. Complete this information in Comments to ease vehicle identification.
Add Drivers as MyGeotab Users
In order to start using the Keyless Lite app, Drivers must be added as MyGeotab database Users.
Follow How to add a user in MyGeotab to add Drivers as MyGeotab users.
As you add new Users, follow these additional steps:
✱ NOTE: This will impact what vehicles the user can locate, unlock and lock with in the Keyless Lite mobile app.
Perform an end-to-end system functionality test
Begin by ensuring that all setup steps have been completed prior to hardware validation. Full end-to-end hardware validation should be completed upon successful installation of Geotab Keyless hardware.
Use Keyless Lite mobile application to perform Lock and Unlock
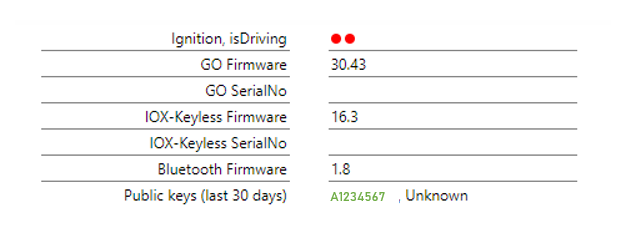
✱ NOTE: A Bluetooth ‘public key’ needs to be available on the GO device for the Keyless Lite mobile app to function. To verify if the ‘public key’ has been successfully received by the device, check the Keyless Monitor and ensure that the public key is green.
Should it not be available on the device due to a possible error or sending delay, alternatively test Lock & Unlock with Keyless monitor, outlined below.
Use Keyless Monitor to complete tests
End-to-end testing can be completed using OTA commands to ensure that the hardware is correctly installed. OTA commands can be sent using the Keyless Monitor.
Ensure the following requirements are complete as a part of the Keyless Hardware functionality testing:
✱ NOTE: It may take up to 24 hours for the GO device to sync/support end-to-end testing.
Ready for Drivers: download the application and start using Keyless Lite
Once the above steps are completed, we’re ready for Drivers.
Drivers can follow this simple explanation hand-out: Getting started with Keyless Lite.
This video also summarizes how Keyless Lite works: How to use the Keyless Lite Add-In.
Important Notes:
How to view which Driver has / had which Shared Vehicle
Keyless Lite will automatically assign a Driver to a vehicle when they unlock it, and stop the assignment when they lock it.
✱ NOTE:
See which Driver has which shared vehicle (currently)
✱ NOTE: If Personal Mode is enabled, the vehicle will not appear actively on the Map as outlined below.
See historic shared vehicle access
The Driver name is displayed in Column G of the downloaded Advanced Trips Report.