Aplicación Drive: Guía del conductor sobre la aplicación Drive
User Guide
0 mins to read
Aprenda a utilizar la aplicación Drive para cumplir con las horas de servicio (HOS) como conductor, incluyendo cómo realizar las tareas de inicio de sesión, utilizar el panel principal, realizar inspecciones de activos y llevar a cabo controles en carretera.
✱ RELATED DOCUMENTS:
- Driver’s Guide to Hours of Service (HOS) — A quick reference sheet. Companion to this Guide.
- Driver’s Guide to Asset Inspection — A quick reference sheet. Companion to this Guide.
- Driver’s Guide to Roadside Checks — A quick reference sheet. Companion to this Guide
- Driver’s Guide to Data Diagnostic and Malfunction Events — Mandatory in-cab driver’s Guide.
- Administrator's Guide to the Drive App — Companion to this guide. Also linked in the footer below.
- Administrator's Guide to Hours of Service (HOS) — Companion to the Administrator’s Guide.
Introduction
The Drive App is a mobile application for maintaining Hours of Service compliance. The App is available for Android and iOS devices. As part of the Cloud ELD solution, the Drive App is used together with a Telematics Device — a type of Electronic Logging Device (ELD) — and the Fleet Management Application (2017-11 release or higher), to provide end-to-end compliance with federal regulations for motor carriers.
The Drive App has six main features:
- Adding Assets
- Hours of Service (HOS)
- Asset Inspection
- Roadside Checks
- Messaging
- Software Add-Ins
✱ NOTE: The Drive App, running on a compatible mobile device, is available on the GO Plan.
Compliance
The Drive App is a self-certifying tool for meeting Electronic Logging Device (ELD) requirements in North America. Before using the Drive App, you must:
- Make sure you have an in-cab copy of the Driver’s Guide to the Drive App, the Driver’s Guide to Data Transfer at Roadside Checks, and the Driver’s Guide to Data Diagnostics & Malfunction Events.
- Make sure you have reviewed the Driver's Guide to Hours of Service (HOS) and Driver's Guide to Asset Inspection.
! IMPORTANT: The Driver’s Guide to the Drive App, Driver’s Guide to Data Transfer at Roadside Checks and the Driver’s Guide to Data Diagnostics & Malfunction Events must be kept in the CMV at all times. For drivers in the USA, these documents must be made available during a roadside check in accordance with FMCSA 49 CFR §395.22 (h). In addition, drivers must have a supply of blank Records of Duty Status (RODS) paper logs sufficient to record the driver’s duty status and other related information for the duration of the current trip. Maintain a second backup copy of the electronic hours-of-service files, by month, at a different physical location from where the original data is stored — FMCSA 49 CFR § 395.22(i).
The Drive App:
- Operates on a fixed 24-hour cycle starting at 12:00 AM.
- Supports three co-drivers logged into the same device.
- Supports all time zones.
- Supports the following rulesets:
- FMCSA 7-day/8-day
- California intrastate
- Florida Intrastate
- Texas intrastate
- Canadian Duty 1 and 2
- Supports the following exemptions:
- Short Haul
- Non-CDL Short Haul
- 16-hour
- Adverse Driving Conditions
- Personal Conveyance
- 30-minute rest exemptions on federal rulesets.
- 24-hour Restart (for oil transport drivers)
- Oil well Wait Time and 24-hour Restart (available to off duty co-drivers)
- Off-duty deferral (Canadian, currently in Beta)
- Yard Move
- Salesperson
- Geotab Drive 6.4.1
- Android 7.0 or higher
- 4.7-inch+ screen (recommended)
- Capacitive touch screen preferred
- Built-in cellular modem (3G or LTE) with data connection (Avg monthly data usage: 350MB)
- 2GB RAM
- 250MB data storage
- Built-in GPS
- Certified by Google, with access to the Google Play Store preferred
- Geotab Drive 6.4.2: iOS 12.0 or higher
- Geotab Drive 6.7.0: iOS 15.0 or higher
- 4.7-inch+ screen (recommended)
- Capacitive touch screen preferred
- Built-in cellular modem (3G or LTE) with data connection (Avg monthly data usage 350MB)
- 2GB RAM
- 250MB data storage
- Built-in GPS
- Certified by Apple, with access to the App Store preferred
- Make sure you have access to the Google Play Store.
- Enable Wi-Fi and disable Flight mode.
- Under Mobile networks, enable Data access over mobile network.
- Enable all location services, and High accuracy mode if available.
- Set Date & time to automatic.
- In the Google Play Store settings, enable Auto-update apps at any time.
- Go to the Google Play Store and install the Drive App.
- Make sure you have access to the Apple App Store.
- Enable Wi-Fi and disable Airplane mode.
- Under iOS settings > Privacy, enable Location Services.
- Under Drive App, select Always, and enable Use Cellular Data, then set Notifications to Allow Notifications.
- Under iOS settings > iTunes & App Store > Automatic Downloads, check Updates and Use Cellular Data.
- Ensure that the Date & time are set to automatic.
- Go to the App Store and install the Drive App.
- Select a vehicle;
- Add a shipment;
- Verify logs;
- Inspect the vehicle (Asset Inspection); and
- Inspect the trailer (Asset Inspection).
- OFF
- Sleeper Berth (SB)
- Drive (D)
- ON
- Available cycle time tomorrow;
- Hours used within each day in the cycle; and
- Total hours used within the cycle.
- Apply exemptions.
- Start/stop Yard Move.
- Start/stop Personal Conveyance.
- Daily rest requirement decreases by two hours
- Daily off requirement decreases by two hours
- Daily driving available increases by two hours
- Daily duty available increases by two hours
- Workday driving available increases by two hours
- Workday duty available increases by two hours
- The Yard Move Exemption rule can be enabled on the rules page of MyGeotab. This rule applies to US drivers only and will disable Yard Move when leaving a set zone type or exceeding a speed of 20mph (or less). Both options can be enabled at the same time. In addition, enabling this rule will keep the driver in yard move after an ignition cycle.
- Drivers on Canadian rulesets are removed from Yard Move when they exceed 32km/h. This is not configurable.
- Yard Move and Personal Conveyance exemptions are disabled when the Telematics Device is unable to communicate with the vehicles’ Engine Control Unit (ECU).
- Gray: Unverified logs
- Green: Verified logs
- Yellow: Edited logs
- Red: Driving in violation of HOS ruleset
- Striped: Personal Conveyance and/or Yard Moves
- Blue: Qualifying Break identifies logs that meet the break requirements for Canadian rulesets only.
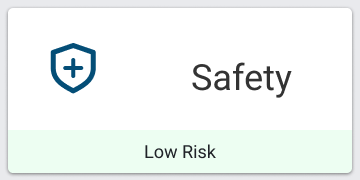
- Low risk – You have a lower predicted risk of collision compared to other similar drivers
- Moderate risk – Your predicted risk of collision is similar to the average for other similar drivers
- High risk – You have a higher predicted risk of collision compared to other similar drivers
- At risk – Your performance in this area falls significantly below most similar drivers. Your attention to this area is needed to reduce safety risks.
- Underperforming – Your performance in this area falls moderately below many similar drivers. Your attention to this area is needed to reduce safety risks.
- Average – This area presents a similar risk to most other drivers, with some room to further reduce safety risk.
- Great – Your performance in this area is better than many similar drivers, demonstrating good driving habits that contribute to reducing safety risks.
- Best – You are a top performer in this area, demonstrating exemplary driving skills that minimize potential safety risks compared to other similar drivers.
- Geographic location
- Overall risk of the areas you drive in
- Type of work
- Vehicle type
- Vehicle distance
- Engine hours
- CMV VIN
- CMV power unit number.
- Set your HOS duty status
- Complete an Asset Inspection
- Detach trailers and shipments
- Verify your logs
✱ NOTE: All Records of Duty Status (RODS) fields can be edited in the Drive App. Once a new RODS is created, a toast message displays with a Change time or annotate link. Use this link to edit. Edited RODS will be permanently marked as having been modified.
Requirements
Android | iOS |
Android Setup
iOS Setup
In-Vehicle Setup
Equip your vehicle with a telematics device, a compatible Android or iOS mobile device, and an IOX-USB accessory (optional). Contact your Administrator for more information.
Getting started
When you log in to the Drive App, you are prompted to complete a set of actions to synchronize your assets, ensure the vehicle is safe to operate, and verify any outstanding logs.
| If you start driving the vehicle without logging in, the Drive App detects the motion, and warns you to stop the vehicle and log in. If you do not log in, the App is unable to associate your duty status and other driving events with your account. |
Before you can start driving, you are prompted to:
Logging In
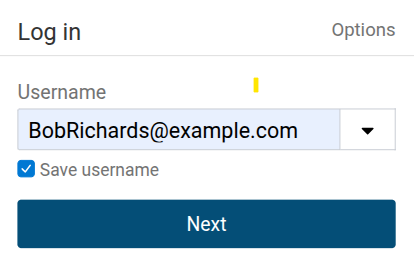
| The first time you log in to the Drive App, you are prompted to Accept the End User Agreement. After accepting the agreement, enter your Username and press Next to display the Password field. Enter your password (minimum 8 characters in length), and press Log in. ✱ NOTE: Tap the eye symbol to show/hide your password.
| |
| After authenticating, the App synchronizes your data (i.e. driver profile, shipment information, HOS logs, and Asset Inspection records) for a brief period before loading. ✱ NOTE: You remain associated with your driver’s logs even when you switch vehicles. |
Saving your username
| You can save your username to save time when logging in. Tap the Save username checkbox to add your username to the saved username list. | |
| The next time you log in, tap the dropdown arrow next to the username field to open the list of saved usernames. Tap your name in the list and press Apply to automatically enter your username, then enter your password as normal. ✱ NOTE: Saving your username helps reduce log in time by removing the need to type out your username every time you log in. It does not store your password on your device. |
Select Assets
You must select a vehicle before duty status and other electronic records can be assigned to you.
| After logging in, the Exemptions notification informs you if PC (Personal Conveyance) or YM (Yard Move) is enabled. The notification also displays your ELD-exempt status. ✱ NOTE: For Canadian ELD drivers, if no exemptions are enabled, Exemptions: None available displays when you select your vehicle. Based on the geolocation of your device, the App locates the closest vehicles within a 1 km/0.6mi radius. You can continue with the closest vehicle, or select another vehicle. If there is no vehicle assigned to your account at the time of login, select No Vehicle. Without a vehicle, you can only set the duty status to ON and OFF duty. | |
| In some cases, your current vehicle may have been claimed by another driver and dissociated from your account. If this occurs, you are asked if you would like to reassign the vehicle to yourself. By selecting No, you are automatically assigned to No Vehicle, and prompted to select another vehicle. If you are logged in with a co-driver, they receive the same message. |
| After selecting your vehicle, you have the option to select a trailer and shipments. You can select up to four trailers; however, each trailer must be assigned a unique name. If you select a trailer, you are prompted to perform an Asset Inspection on the trailer. If you remove a trailer, you are also asked to perform an Asset Inspection. You can select up to 25 shipments. When finished, press Save and Continue. |
Review Availability
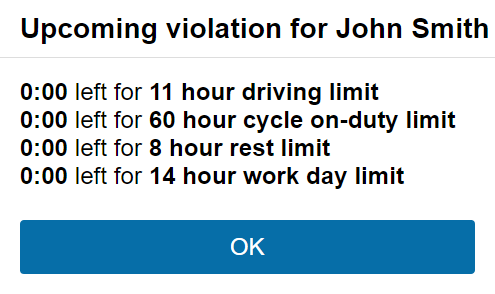
After selecting assets, the App takes you to the Availability screen where you can review duty status notifications, monitor driving limits, and apply the Exempt HOS exemption. The Availability screen warns drivers that are in violation, at risk for violation, or have upcoming violations. Drivers can add an OFF log for upcoming violations.
| Tap the prompt to add a duty status log. In the screen that follows, make the required updates and tap Add. |
Verify Logs
If you have unverified logs from earlier driving activity, you are asked to review and verify them.
| Use the Verify button for any 24-hour period to verify by day, or use the Verify all days button to verify all visible logs. You can also skip this step by pressing the Skip button. If you choose to skip this step, an audit log is created indicating the time and date the Skip button was pressed. The App will inform you if your logs remain unverified, or are missing required information. Tap to review.
|
Claim Unassigned Logs
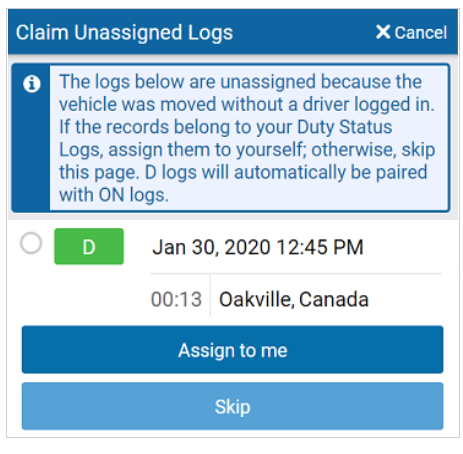
The Drive App creates duty status logs even when your vehicle is driven without a user logged in. If this occurs, you are asked to review and claim the unassigned logs.
| You can claim logs by selecting all relevant logs and pressing the Assign to me button. You can also skip this step with the Skip button. The D and ON Duty Status Logs are paired when claiming them in the Drive App. |
Inspect Assets
To complete the login process, you are prompted to perform a new Asset Inspection on your vehicle, including any attached trailers.
✱ NOTE: If you do not have clearance to perform an Asset Inspection, press Skip remainder to go to the Dashboard. You can find more information on performing an Asset Inspection here. | Press Inspect to begin a new Asset Inspection. If your previous inspection included unresolved defects, you must resolve them, and certify the inspection before you can perform a new one.
When defects are resolved, the previous inspection is marked as complete, and you can begin your new inspection.
To ensure the thoroughness of Asset Inspections, the inspection completion confirmation banner includes the time that was taken to complete the inspection.
|
✱ NOTE: Inspections only need to be certified when defects are reported. For Canadian and Australian rulesets, certification is not required.
In-App Onboarding
Use in-app onboarding for guided tutorials and smart tips to help you get up to speed quickly. The onboarding provides guided tutorials and smart tips to help you understand how to use the Drive App.
If you are a new driver, you will automatically receive onboarding help when you first use the Drive App. The guided tutorials appear automatically the first time you enter a new workflow. These tutorials can also be accessed anytime from the in-app help (?) in the toolbar.
✱ NOTE: After completing onboarding, the tutorials will not autoplay again, but you can replay them anytime from the in-app help.
Using the Dashboard
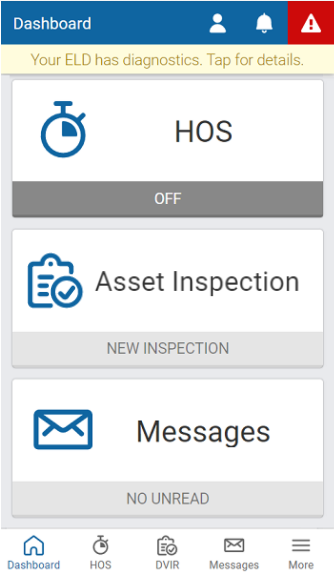
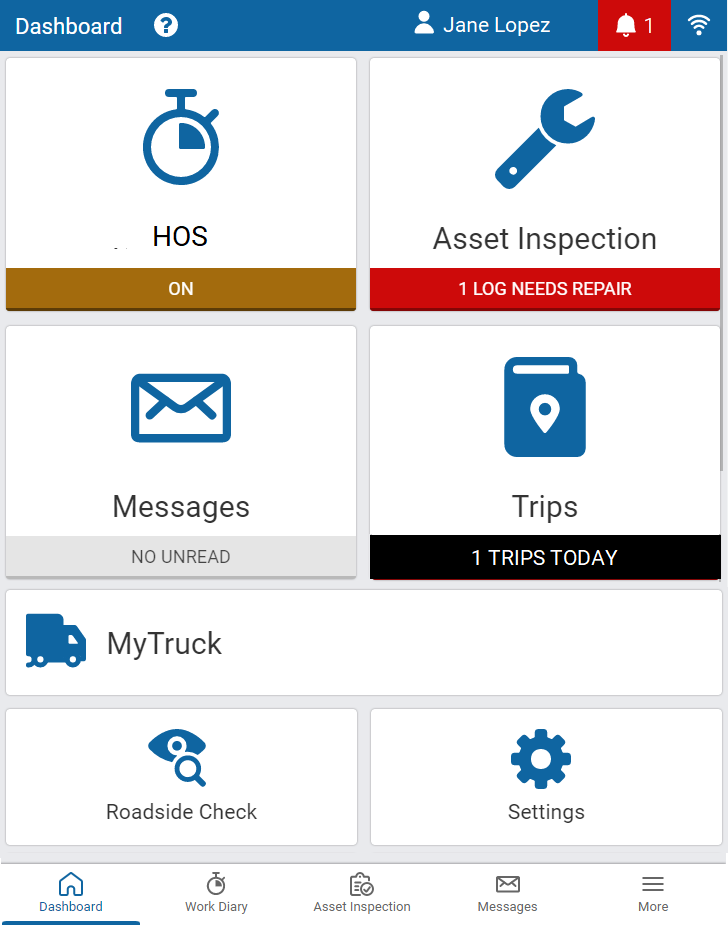
After completing your login tasks, you are taken to the Dashboard. The Dashboard is your main screen for navigating the Drive App. Shortcuts to key features like HOS and Asset Inspections are available at the bottom of all screens. Messages, events, notifications and connection status are available at the top of all screens. You can find Settings, Add-ins and other useful tools under More. Click the question mark (?) icon near the top of the screen to get context-specific content for each screen.
✱ NOTE: Your Dashboard may look different based on your user clearances and the Add-Ins that you have installed. This may include Personal Mode, Routes, Advanced Routes, Fuel Tracker, and more.
Check Connection Status
| You can check your connection status by pressing the wireless icon in the top-right corner of the screen. A red exclamation mark indicates a disconnection. When pressed, the disconnected item displays in red, which can be selected for additional information. | |
| A Telematics Cable alert indicates that an IOX cable has been unplugged, and neither the App nor the Telematics Device are connected to a wireless network. To maintain compliance, the alert recommends a manual change to duty status, or to reconnect the cable. ✱ NOTE: The alert only displays when the vehicle is not connected to a wireless network. It will not display because the cable has been unplugged. |
Vehicle Disconnected
This message displays in red when your Telematics Device is not communicating with the Drive App server. This can be caused by issues with the wireless network, or a loss of power from the device.
Drive Disconnected
This message displays in red when your mobile device is not connected to the Drive App server. This can be caused by poor data service on the mobile device, or the mobile device is in airplane mode.
✱ NOTE: Logging out is disabled when the Drive App is in this state. This preserves the driver’s logs until a connection to the server is re-established. Similarly, the driver will not be able to log in while disconnected.
GPS Disconnected
This message displays in red when there is a disruption with GPS communication on the mobile device. This can be caused by location, environment, or airplane mode. The Drive App uses GPS as a fallback for the lock screen.
Power Disconnected
The driver is at risk for losing device power if their mobile device is not being charged. The lock screen may not be as responsive if power is not connected.
Check Messages and Notifications
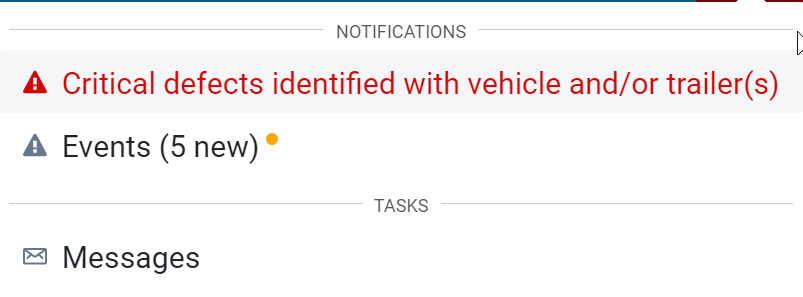
| Shortcuts to messages, events and notifications are available by pressing the notification icon. ✱ NOTE: To learn more about these features, refer to Messages and Events. |
|
Add Co-Drivers
You can add co-drivers to the Drive App by pressing your name in the top-right corner of the screen, then pressing the Add driver button. The co-driver is prompted to enter their login credentials. You can add up to three drivers per vehicle. When the vehicle is in motion, the app does not allow a co-driver to switch the Driver’s seat with the driver.
| After logging in, the names of all drivers display in the user list. When multiple drivers are logged in, the steering wheel icon indicates the active driver. Use the Driver’s seat button to switch the active driver. The duty status changes automatically to D for the active driver. The co-driver must change their status manually through the App. The Driver’s seat button is disabled for the active driver while in the D status. If the active driver logs out, the co-driver becomes the new active driver. |
Co-drivers can use the Drive App to adjust their individual duty statuses. To become an active user of the Drive App, press your name from the driver list. Once you are the active user, your name displays at the top of the driver list. At this point, you can adjust your duty status without affecting the duty status of your co-drivers.
Adding Assets
After logging in, you can change vehicles, or add trailers and shipments by pressing the asset name on the Dashboard. You can also press More, then Assets from the shortcuts menu at the bottom of the screen.

| Press the X icon to change the vehicle. You are prompted to perform an Asset Inspection each time you change vehicles. Press the + button to add up to four trailers. You are prompted to perform an Asset Inspection each time you change trailers. Press the + button to add up to 25 shipments. |
| Your new assets display on the Assets screen. Shipment information is also displayed in the Compliance Print in the Fleet Management Application. |
Recording Hours of Service (HOS)
| The HOS feature provides all the tools necessary to record your duty status. You can also verify logs, apply exemptions, and transfer logs during roadside checks. The HOS screen is divided into Status and Logs tabs. |
Status Tab
The Status tab allows you to view and set your duty status, as well as view and apply exemptions.

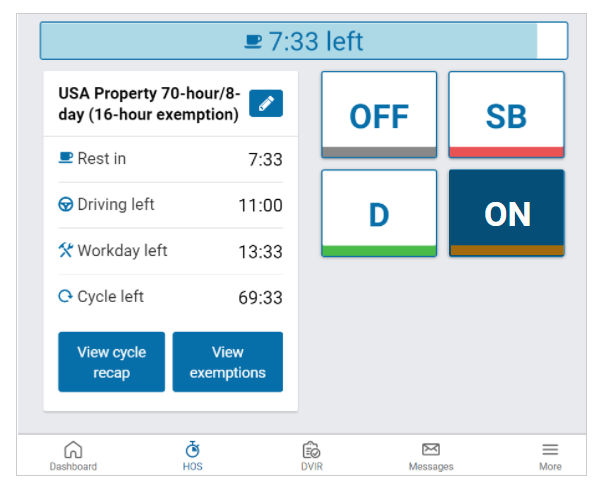
| Duty status is displayed by one of the four buttons on the screen: The Status tab displays ruleset information, remaining driving limits, a recap of your work cycle, and exemptions applied as driving conditions require. You can change your ruleset by pressing the pencil symbol. By default, the app displays the last three rulesets. To view all rulesets applied, click Show all. Split sleeper displays if the current ruleset includes a matching Split sleeper ruleset. |
✱ NOTE: When outside of cell coverage, you are notified to manually set your status.
|
The red bar at the top of the screen indicates that you have no driving time remaining and must take a break. |

The blue bar at the top of the screen indicates the time remaining before you must take a break.
Once you begin to drive, your status automatically switches to D when the vehicle reaches a speed of five mph (eight km/h). Once you stop driving, after three seconds, your status remains as D for an additional five minutes. When five minutes have passed, you are prompted to change your status to ON duty. If you do not respond within a minute, your status switches to ON duty.
✱ TIP: You can manually switch your duty status at any time by pressing HOS on the Dashboard.
|
| The Rest in timer is the time remaining before you must take a break. When the Rest in timer reaches 0:00, a Rest duration timer replaces it when you go off duty. The Rest duration timer is the time that has passed during the break period. |
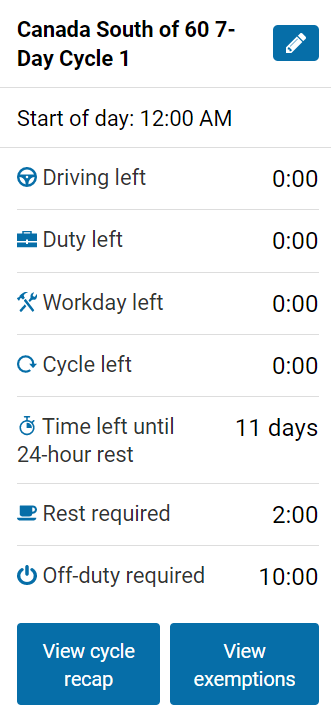
| For a summary of your cycle, press View cycle recap.
View cycle recap displays: Depending on your ruleset, cycle recap provides a quick view of how much time you have used, and how much time is remaining for the following day. |
| The Exemptions screen indicates which exemptions are currently disabled or unavailable. To apply exemptions, press View Exemptions and use the corresponding buttons to activate them.
View exemptions allow you to do the following: The exemptions must be configured by your Fleet Management Application Administrator. |
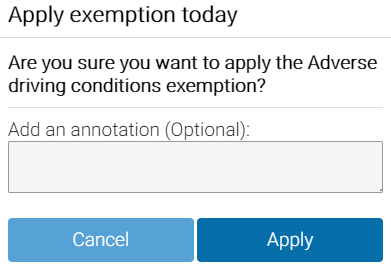
| The Adverse Driving Conditions exemption is only available while on-duty and applies to the current work shift. A banner displays when the exception is active, and you can manually remove the exemption if needed. ✱ NOTE: This exemption cannot be applied retroactively after a shift has ended. If you apply the Adverse Driving Conditions exemption, you must confirm your selection before applying the exemption. Additionally, you can add an annotation to provide further details. You must also acknowledge the applicability of the exemption and provide a reason for using it. |
If you apply the Adverse Driving Conditions exemption when driving south of latitude 60°N (along the southern border of Yukon, Northwest Territories and Nunavut in Canada), the following changes are made to your HOS availability:
The Yard Move and Personal Conveyance exemptions must be configured by your Administrator. You can stop a Yard Move event by turning the ignition off and on during a power cycle. You can stop a Personal Conveyance event by confirming the event ended when the ELD prompt displays, also during a power cycle. If a confirmation is not made and the vehicle is in motion, the ELD defaults to none.
You will receive a notification when you reach the Personal Conveyance driving limit.
✱ NOTES:
The Exempt HOS exemption must be set by your Administrator. You can apply the Exempt HOS exemption if operating in an HOS-exempt capacity as an emergency declaration defined by the enforcement requirements in North America.
| If you apply the Exempt HOS exemption, you must confirm your selection and add an applicable annotation before applying the exemption. |
The FMCSA Railroad exemption responds to unplanned events as described in FMCSA–2020–0171. This exemption is available when operating under the “USA Railroad 60-hour/7-day” and “USA Railroad 70-hour/8-day” rulesets.
To apply the FMCSA Railroad exemption, you must consult with your local FMCSA field office.
A full list of all available exceptions can be found in the Hours of Service Ruleset Matrix.
Motion Detection
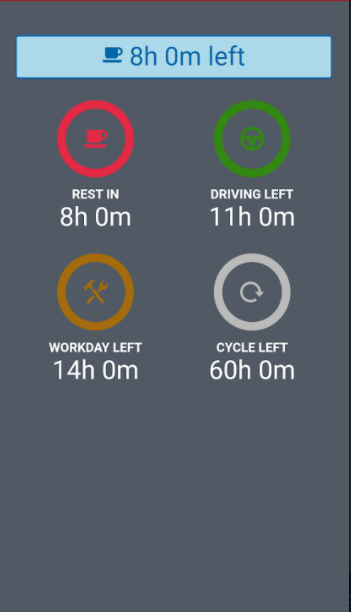
| If the vehicle begins moving while you are logged into the Drive App, the App screen locks to minimize driver distraction. All other information is hidden, and you only see the remaining driving time available. When the vehicle is in motion, the app does not allow a co-driver to switch seats with the driver. If the vehicle has stopped for five minutes, a prompt displays on the screen. Confirm if you have stopped driving, or if the vehicle is still in motion. If a response is not submitted to confirm or deny the prompt within one minute of receiving the prompt, the ELD automatically creates an ON duty status log. ✱ NOTE: Canadian drivers (based on the selected ruleset) can no longer exit the lock screen while the vehicle is moving. If you continue to drive past your available hours, the screen notifies you that you are in violation of your ruleset. The App broadcasts an audible warning in addition to Hours of Service limits, whether the App is in the background or the foreground. The audible warning does not occur if you are in the OFF or Sleeper Berth (SB) status. |
Driving in Violation
| The Drive App notifies you when you are approaching a violation two hours before the violation; one hour before the violation; 30 minutes before the violation; and just before the violation. |
| If you switch your duty status to Drive after your remaining driving time has expired, you are warned that doing so puts you in violation of your selected ruleset. If you drive after being warned, a violation is recorded in your log. |
Logs Tab
The Logs tab displays HOS logs for the past 14 to 28 days, depending on the ruleset, including any violations incurred. Logs are displayed below the graph, one day at a time, and can be navigated using the arrows at the top of the screen, or by pressing the date picker to display the calendar.
Graph View
Duty status is plotted along the graph for a 24-hour period for each day. The total time spent in a particular duty status is displayed to the right of the graph. The bars on the graph are color-coded for easy reference:
| Select a log from the graph to display details such as the duration of the log and the date created. You can also edit certain elements of the log. If a log requires attention (e.g. verification, requested edits, missing location, etc.), a notification displays at the top of the screen. Press the notification to go to the log and make the updates. |
| Press the arrow to expand the starting and ending odometer values at the bottom of the Logs screen. |
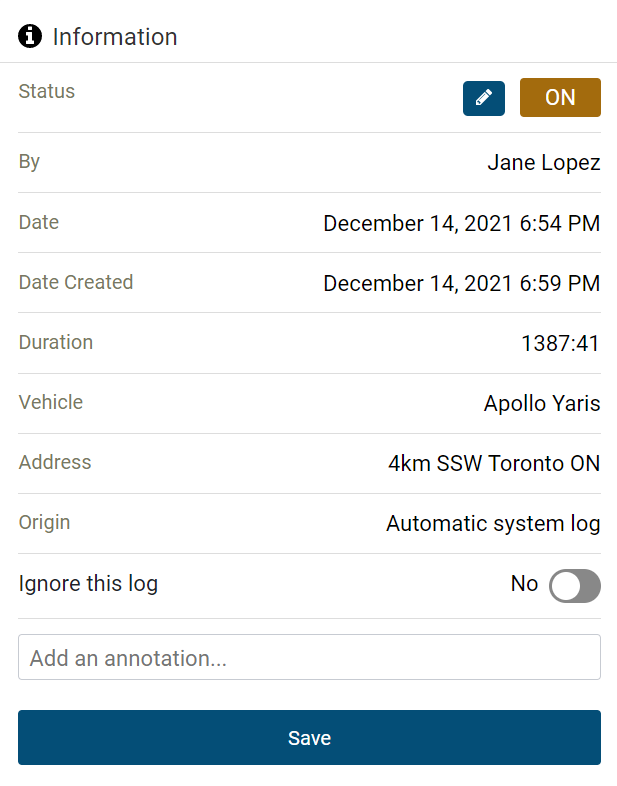
| When you select a log, the screen shows when and where the log was created, driving status, driving duration, changes to rulesets, inspections performed, and any violations incurred. You can also add your own annotations using the field provided.
To exclude a log from your HOS availability, toggle Ignore this log to Yes, and annotate as required. Review the notification banner at the top of the screen, and press Save.
|
✱ NOTE: Ignored logs are still displayed in Roadside Checks. You must have the Ignore HOS logs security clearance to ignore logs. To learn more, please contact your Administrator.
Location Information
The Telematics Device installed in your vehicle captures location information. If the GPS signal on the Telematics Device is unavailable, the App uses the location on the mobile device. If the mobile device is unavailable, you must enter the location manually by pressing the Where was this? button.

| Enter the address where the log occurred, or to add location information if an exemption is applied. |
Manual Logs
Manual logs allow you to correct your HOS logs when existing logs are found to be incorrect or incomplete. For example, you can add a manual OFF-duty log for the previous day, if the App remained ON-duty after you finished your workday. You can also use manual logs when the status does not change automatically (e.g. a bug in the software), or if you are driving in an area without wireless coverage.
Other examples include creating a manual ON-duty log for a day that you started at the office, or when the App does not detect driving, and places you ON-duty after an inspection. Manual logs allow you to update any duty status for a specific date and time, select the appropriate options for that status, and assign yourself a vehicle.
| You can add manual logs for the past 14 days. For Canadian rulesets, you can add manual logs for the past 28 days. To manually add a log, press the + Add Log button. | |
| On the screen that follows, press the pencil icon for each applicable element of the log. You can select or add a new annotation to provide context for the manual log. Press Add to create the log. | |
| Choose the Status, Date and Time to start the log. | |
| If you have a vehicle assigned to you when you create the manual log, that vehicle is automatically selected. If the selected vehicle was not the vehicle assigned to you at the time you were driving (D) or ON duty, select the vehicle that was. Otherwise, select No Vehicle. | |
| The App returns you to the Logs screen. Press Where was this? to add a location. To view details, select the log. |
If you made a mistake while creating a manual log, press the pencil icon to edit the log status or date. You can also add new annotations. Press Save when you have finished making changes.
✱ NOTE: Only manual logs can be edited in the Drive App. Automatic driving logs cannot be modified or changed to another status.
Change Rulesets
When you change your ruleset, the preceding log is annotated to reflect the change.
Apply Exemptions
When the 16-hour exemption, Adverse driving conditions, or Oil well wait time exemption is applied, the preceding log is also annotated to reflect the change.
✱ NOTE: Drivers can disable Adverse driving conditions if used by accident by clicking the Red ‘Remove’ button in the Exemption section. This will remove the additional benefits of the exemption from the work shift

Diagnostic and Malfunction Events
If the Drive App detects a diagnostic event, a yellow bar indicates a diagnostic is present, and a red bar indicates a malfunction is present. You can press the yellow or red bar to view more details about the events.
Consult the Driver’s Guide to Data Diagnostics & Malfunction Events for instructions on what to do when these events occur. When a diagnostic event occurs, the yellow or red bar disappears after the issue is resolved.
|
|
| When a malfunction event occurs, it must be addressed by the driver or the Administrator. Press the Malfunctions button at the top of the screen on the Logs tab. |
| Diagnostic or malfunction events are displayed, along with the date the event occurred. When an event has been resolved, press the Clear button. To learn more, review the Driver’s Guide to Data Diagnostics & Malfunction Events, or select the question mark beside each diagnostic or malfunction event. |
Verify Logs
The Verify button allows the driver to confirm that the logs recorded by the Drive App are accurate and valid. The button displays in the summary header of every daily list of logs. Press the Verify button to display the following screen. Press the Agree button, to verify each log for the selected date. Verified logs display a check mark beside them, and the Verify button is replaced with Verified.


✱ NOTE: The driver will be notified of unverified logs when logging out. Logs that are left unverified for over 14 days disappear from the list and can no longer be verified electronically.
Carrier Edits
When a log is edited by a carrier, it displays as a carrier edit in the Drive App. All modifications are displayed below the log.
Carrier edits display in yellow on the graph. The driver must accept or reject the edit, and if the edit was made to a verified log, the driver must accept the edit and verify the log again.
If the edit was rejected, the logs and the driver’s availability do not change.
Inspecting Assets
| Asset Inspections help you track the health of your vehicles and trailers. You can access the Asset Inspection from the Drive App Dashboard by selecting the Asset Inspection tab. Press Inspect to begin inspecting your vehicle and/or trailer. The Drive App guides you through all steps in the inspection. You can also find information on Asset Inspections in the Driver's Guide to Asset Inspection. |
✱ NOTE: You must have the Perform Asset Inspections clearance to perform an inspection. To learn more, please contact your Administrator.
| If you are performing a Pre-trip inspection after logging in, and have not manually set a duty status, your duty status automatically switches to On Duty. The new On Duty log is automatically annotated to indicate that a pre-trip inspection was performed. Before performing a new inspection, you must review the previous inspection to indicate you are aware of the vehicle’s defects history. If there were prior defects, you must review the repairs made, then certify that the vehicle is safe to operate. |
✱ NOTE: The Asset Inspection screens below illustrate the workflow for U.S. drivers. For drivers in Canada, screens will differ slightly.
Previous Inspections with Defects
If your previous inspection included defects, they must be resolved, and the inspection certified before you can perform a new inspection. To certify a previous inspection, you must have the Mark Asset Inspection as certified clearance. If defects do not require repairs, no certification is required. To learn more, please contact your Administrator.
| You can begin resolving defects by pressing the red Repair button on the Asset Inspection screen.
Press Expand previous inspection, and under Unresolved defects, review each defect and remarks left by the driver. When defects have been repaired, select Repaired or not a defect and add a new remark with resolution details. Press Save, and on the screen that follows, press Certify previous inspection to begin your new inspection. If a repair is not necessary, add a remark to explain why, and select Repair not necessary for the safe operation of the vehicle. The defect is automatically carried over to the next Asset Inspection. Drivers do not need to remember to re-add the defect manually until the repair is made. If you select Repair not necessary for the safe operation of the vehicle, you have the option to Select a new asset. When prompted, complete the inspection by pressing Yes to Sign Asset Inspection, and to verify that the vehicle was inspected in compliance with regional and/or federal regulations.
✱ NOTE: For Canadian rulesets, the option to certify the inspection is not available. Minor defects can be carried over to future inspections, and when repaired, all inspections carried over, are also marked as repaired. ✱ TIP: You can review previous Inspections from the Roadside Check shortcut. Under the Asset Inspection tab, press the View button. |
New Inspections
To perform new inspections, you must have the Perform Asset Inspections clearance. To learn more, please contact your Administrator.
| After certifying a previous inspection, the App starts a new inspection. To view the most recent inspection, press Expand previous inspection. You can perform three types of daily trip inspections: Pre-trip inspections to verify there are no defects at the beginning of a trip, or that existing defects have been repaired, and the vehicle is safe to operate. In-trip inspections to record defects found while the trip is in progress. Post-trip inspections to verify there are no defects at the end of the trip, or that defects found are recorded and scheduled for repair before the next trip. Walk around the vehicle and record any defects you find. Add remarks to each defect if needed. You can select defects from the default list, or from a custom list(s) created by your Administrator. If a defect is minor, proceed with your day. If a defect is critical, alert your Manager before operating the vehicle. If a critical defect is recorded, the App displays a warning on the lock screen to notify the driver. If desired, press the camera icon to take, or upload a picture of the defect. If no defects are found, press No Major or Minor defects found. If defects are found, press Done. When prompted, press Yes to verify the vehicle was inspected in compliance with regional and/or federal regulations. ✱ NOTE: If no inspection is performed within the app-defined period between previous and new inspections, an exception occurs. The exception is recorded at the end of the period, not for the duration of the period. |
Messages and Events
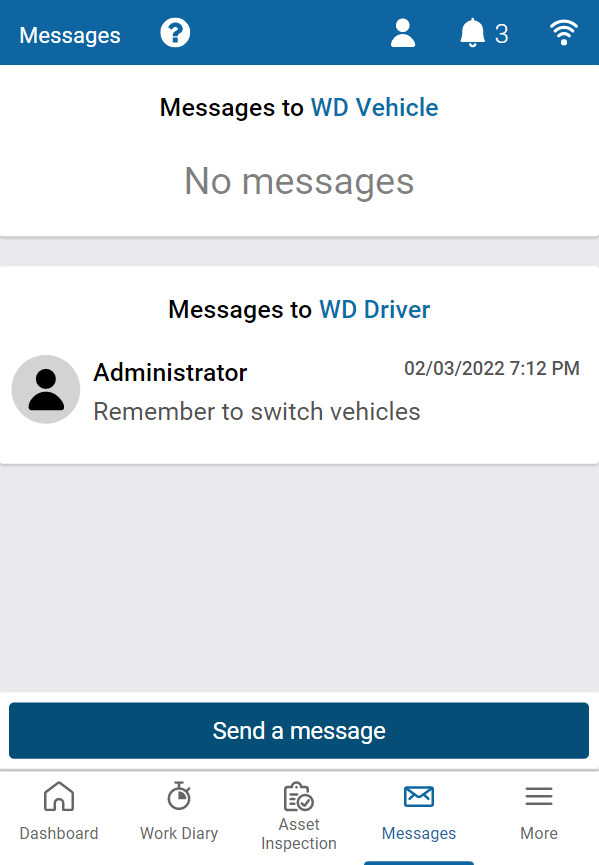
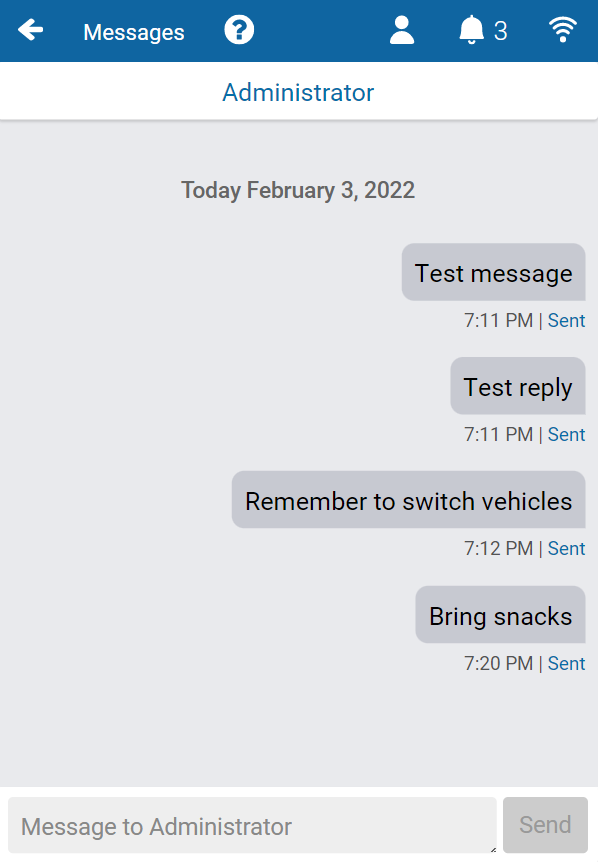
| Your Fleet Manager can send messages and routes to your Drive App account. Press the Messages tab on the Dashboard to view or Send a Message. Press the Notifications icon to check for new messages, or to Clear all messages. When a text message is received while a vehicle is in motion, the Drive App reads the message out loud. Route messages are grouped together in the Drive App. For more information about each route, select the message from the list. |
✱ TIP: You can also press the Notifications icon at the top of each screen to view exceptions and other events, such as reminders to perform asset inspections.
|
|
Categorizing Trips
| The Trips feature allows you to categorize your driving activity as Business or Personal. Trip categories are useful for expense claims, tax benefit calculations, or company drive logs. Trips can be categorized only after they have been completed, and annotations can be shared to provide additional trip details. To require annotations for each trip, your Administrator must enable View trip annotations in the Fleet Management Application. Otherwise, annotations are optional. |
✱ NOTE: Trip Categorization is in Feature Preview. To enable Feature Preview, please contact your Administrator.
| All trips are recorded in the Trips feature, with the option to categorize them as Business or Personal. Although categorization is optional, the App will remind you that you have uncategorized trips. To categorize your trips, press Business or Personal, then press Save. If your Administrator requires annotations for each trip, an alert displays reminding you to annotate the trip in the field provided.
You can edit your saved annotation by pressing the pencil icon, or recategorize your trip by pressing the desired button.
|
Driver-Specific Safety Insights
| Driver-Specific Insights provides you with a personalized safety risk assessment based on your driving. Access this by pressing Safety from the Drive App Dashboard. This tile also displays your collision risk (Low, Moderate, or High) compared to similar drivers, right from the Dashboard. |
| You will see a percentage (%) that represents your predicted risk of being in a collision in the next 100,000 km or miles, compared to other similar drivers. ✱ NOTE: If you don’t see any information in your safety profile, you may need to log more trips. You must select an asset before driving to log your trips. You'll also see a percentage in a pill shape that shows how your risk has changed since your last assessment. An up arrow (↑) means your risk has increased, while a down arrow (↓) means your risk has decreased. |
Understanding your risk level
Your overall collision risk is classified as either Low, Moderate, or High:
| You will also see your performance for specific areas of your driving such as speed, braking, acceleration, and cornering. Each of these are based on the last 500 km that you have driven. They will update as you drive, showing how your performance compares to other similar drivers. |
How is this calculated?
Your risk level is determined by analyzing your driving data and comparing it to other drivers who operate in similar environments and conditions such as:
Using this information
This safety risk assessment is a tool to help you understand your driving habits and identify areas for potential improvement. By monitoring your risk level and taking steps to improve your driving, you can contribute to a safer work environment for yourself and others.
✱ NOTE: This risk assessment is based on statistical analysis and predictions. It does not guarantee or predict any specific outcome.
Completing Roadside Checks
| The Roadside Check feature displays only the information necessary to print or transfer to compliance authorities during a roadside check. If you are asked to participate in a roadside check, you may be asked to provide up to eight (8) days of HOS logs (depending on your ruleset) for inspection. Before entering Roadside Check mode, you can set a one-time 4-digit PIN to be used when entering and exiting Roadside Check mode. A new PIN must be set each time you enter Roadside Check mode. |
If the App is closed during the inspection, opening it will return you to Roadside Check mode, where you will have to re-enter the one-time PIN in order to exit. If the vehicle is driven while in Roadside Check mode, the PIN is cleared and the lock screen activated. You can still exit Roadside Check mode, but a PIN is no longer required.
| Enter a PIN and press Continue. Enter the PIN again when prompted and press Confirm PIN. If you choose not to set a PIN, press No PIN. | |
| For quick access to the Asset Inspection, press Asset Inspection at the top of the screen, and select View. Scroll down and press View to see the list of defects used in the inspection.
| |
| To transfer HOS logs, press HOS at the top of the screen, and enter the code provided by the Officer in the Comments field, and select Email or Web Services to transfer the report. If you are not in the USA, press I’m not in USA. The Drive App will detect the ELD jurisdiction the vehicle is in. To display the report on your mobile device, select Compliance Print. | |
| For drivers in Canada, enter the required email address and press Transfer (Canada). You receive a notification when logs are missing the following non-critical information, and are prompted to Cancel or Proceed: If you are not in Canada, press I’m not in Canada. The Drive App will detect the ELD jurisdiction the vehicle is in. To display the report on your mobile device, select Compliance Print. |
When the Roadside Check is finished, press Exit at the top right, and if you entered a PIN to begin the check, enter the same PIN to exit the check.
Compliance Print
You may also be asked to display a Compliance Print on your mobile device during a roadside check.
| On the Dashboard, scroll to the bottom of the screen and select Inspection. Select Compliance Print to display the Compliance Report on your mobile device. Use the arrow buttons to display up to eight (8) days of logs for US rulesets, and up to fifteen (15) days of logs (for Canadian rulesets). You can also press the date to select the desired date from a list.
If you have your Drive App language settings set to a non-English language, a button allows you to toggle the Compliance report into English.
When a driver enters Roadside Check mode, but is not assigned to a vehicle, the Drive App uses information from the previously assigned vehicle to populate the odometer, engine hours, and other vehicle-related data. | |
| Scroll down to the Graph to display your duty status and logs over a 24-hour period for a given day. When you apply the Personal Conveyance exemption and drive the vehicle, the Compliance report does not count the odometer or engine hours for that duration. Keep scrolling to display additional logs. |
After the inspection is over, press X Exit in the top-right corner to exit Roadside Check mode. If you handed your mobile device to the Inspector in order to scroll through the Compliant Print, the App prompts the Inspector to return the device to the driver.
| After pressing Continue, the App will prompt you to enter the 4-digit PIN that you set. If you have forgotten your PIN, you can log out or begin driving to exit Roadside Check mode. |
You can also transfer your compliance data at roadside checks using an email service. To transfer data, enter an email address, and additional comments in the Drive App. An encrypted email with your compliance logs from the last retention period (7 to 14 days, depending on the ruleset) is sent to the specified email.
Changing Settings
| The Settings screen has basic information about your system, as well as options to change your password, enable Dark Mode, and report any bugs. You can access the Settings screen by pressing the gear icon from the Dashboard. |
Update the App
The Drive App is constantly updated with features and fixes. Generally, the Drive App stays up to date on its own; however, you can force a manual update using the Check for updates button on the More screen.
Enable Dark Mode
The Drive App can be optimized for viewing in low-light settings by enabling Dark mode. To enable Dark mode, select More from the navigation menu, then toggle Dark mode on or off. If you choose to enable Dark mode, the settings are saved when logging out.
✱ NOTE: Enabling Dark mode also impacts co-drivers. If one driver enables this feature, then it is automatically enabled on their co-driver’s profile when they switch profiles as well.
|
|
Logging Out
Logging out of the Drive App disassociates you from your vehicle. Any trips made in a vehicle while logged out of the Drive App are not associated with the driver.
| You can log out of the Drive App by pressing your name and selecting Log out from the dropdown menu. ✱ NOTE: For Canadian ELD drivers, if no exemptions are enabled, Exemptions: None available displays on the screen. |
Before logging you out, the Drive App prompts you to do the following end-of-day tasks:
Inspect Assets
Before you log out, you are prompted to complete another Asset Inspection, if you have driven your vehicle since completing the last inspection. The logout workflow is similar to the log in workflow. Like the log in workflow, available exemptions, including ELD-exempt status, are also displayed.
If you choose to Skip the Asset Inspection, the event is recorded in the Audit Log. If you are performing a Post-trip inspection, your duty status automatically switches to On Duty. The new On Duty status is automatically annotated to reflect that a post-trip inspection has occurred.
Remember, you must have the Perform Asset Inspections clearance to create an Asset Inspection. To learn more, please contact your Administrator.
! IMPORTANT: Although you have the option to skip the Asset Inspection when logging out, according to the ELD requirements in North America, a driver must prepare an Asset Inspection at the completion of each day’s work, and shall submit those reports to the motor carrier upon their return to the home terminal. This does not relieve the motor carrier from the responsibility of repairing and certifying any defects listed on the inspection, prepared at the end of each day’s work, that are likely to affect the safe operation of the motor vehicle.
Verify Logs
The Drive App displays 14 days of HOS logs — excluding logs that have already been reviewed — for verification. It is recommended that you verify your logs routinely, particularly at the end of a shift. However, you can skip log verification using the Skip button.

Set Duty Status
Finally, you will be reminded to set your duty status to an appropriate non-driving status before logging out.

Clock In/Clock Out
The Clock in/Clock out feature allows drivers to complete their login/logout tasks without leaving the Drive App.
If you have completed your end-of-day logout tasks, but want to remain assigned your vehicle, you can Stay Logged in to the Drive App, but clocked out of your workday.
If you want to resume driving, you can clock back into your workday, while still logged in to the App. By staying logged in to the App, you can view duty status logs, asset Inspections and messages if a vehicle is still attached.
The Clock in/Clock out workflow does not require a wireless connection on the driver’s mobile device. However, to fully log out of the Drive App, a wireless connection is required.
Stay Logged In
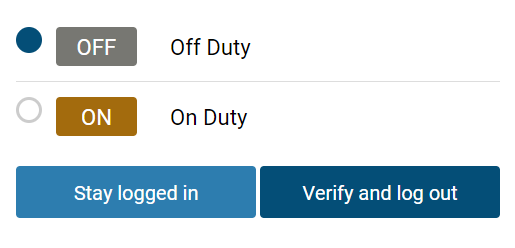
| If you have not already done so, set your status to Off Duty. To stay in the Drive App, press Stay Logged In. | |
| To remain assigned to your vehicle, with access duty status logs, Asset Inspections, and messages, press Yes. To resume driving, press Tap here to start day at the top of the screen to log back in.
|
Clock Out
When selecting OFF duty, you have the option to end your day. By pressing End day, you will be directed through the logout workflow.

Clock In
If you change your status to D or ON, you can either clock in, or choose not to start yet.
By pressing Yes to clock in, you complete your log in tasks, and resume your workday. By pressing Not starting yet, you remain in the ON status but must press Tap here to start day to go through the login workflow. |
Vehicle Proximity
When a driver is out of proximity to the assigned vehicle, the driver is prompted to choose whether to remain assigned to the vehicle, and change the duty status. The range is determined using the GPS on the vehicle and the GPS on the mobile device that runs the Drive App.
Installing Add-Ins
Add-ins expand the capabilities of the Drive App by integrating third-party software with your system. For more information about installing Add-Ins, contact your Administrator.
In-App Help
Use the in-app Help to browse through any frequently asked questions, learn more about specific Drive App features, or access other Drive App guides and hot sheets. Access the in-app Help by clicking the Question mark icon from your toolbar.
Reporting Bugs
If you experience any issues while using the Drive App, use the Report a bug button on the Settings screen to file a bug report. Your bug reports help us identify and resolve issues with the App.


