User Guide
0 mins to read
MyGeotab Quick Reference Guide
User Guide
0 mins to read
Learn more about popular features and common processes in MyGeotab in easy step-by-step instructions. This document includes instructions on getting started in your database, navigating the dashboard, tracking assets on the Map, adding assets, managing engine maintenance, zones and messages, using administration tools, and more.
April 2023
Getting Started & Help
The Getting Started & Help menu offers a variety of options to help you familiarize yourself with the Fleet Management Application and make the most of its capabilities.
Community | Find answers and connect with experts. |
In-App Help | Access in-app tutorials and guides to help answer common questions. |
Support | Live Chat: Contact experts in real-time to ask questions and get answers. |
Contact Information: Find Reseller contact information for support issues. | |
Additional Resources | Product Guide: Introduction to the Fleet Management Application and features. |
Release Notes: Read what’s new in the latest version of the Fleet Management Application and related products. | |
Additional Training: Access training videos and upcoming webinars. | |
Blog: Read the latest on fleet management solution updates and technology. |
Dashboard & Analytics
Dashboard
The Dashboard is a personalized view of your fleet reports.
Customizing the Dashboard
- Using the Main Menu on the left, find and click Dashboard & Analytics > Dashboard.
- To hide a report, click the X in the top-right corner of the report.
- To show any hidden report(s), click the Show hidden reports button near the top-left of your screen.
- To move a report, click and hold the title of the report and move to the desired location.
- To download the report to Excel, click the report. Once it is downloaded, open the report using Excel.
Adding reports to the Dashboard
- Select one or more categories of report templates at the bottom of the Dashboard page and click Get started.
- Select the report templates you would like to add from the Dashboard Report Templates window, and click Next step.
- Toggle Include me as a dashboard viewer to On to include the report on your own dashboard.
- Use the Groups dropdown menu to select who will see the report and click Next step.
- If necessary, enable the appropriate rules to run the reports.
- Click Create reports to save your changes and add the reports to the dashboard.
✱ NOTE: Reports can also be added to the dashboard using the Report Views page. See Assigning Reports to the Dashboard to learn more.
Active Insights
Active Insights leverages data to provide clear push-based insights for fleet managers. Using our data analysis and AI models, Active Insights helps transform your data into measurable cost savings by recommending what you can do to optimize your fleet.
Viewing insight cards
- Select Dashboard & Analytics > Active Insights.
- Click View Insight and/or View Issues to see details regarding the insight and implement recommendations.
✱ NOTE: If no insight cards appear, check again soon. Insights are updated regularly based on new data coming in from your fleet, as well as new insight types being added to Active Insights. Refer to the Active Insights User Guide for more information.
Analytics Lab
The Analytics Lab is a suite of experimental Apps designed to provide performance insights that help fleets make informed business decisions.
Viewing the Analytics Lab
- Select Dashboard & Analytics > Analytics Lab from the main menu.
- Use the tabs at the top of the page to view All experiments, New, Upcoming, or Expiring experiments, or use the search bar to search for a specific experiment.
- Click Try It to use an experiment.
- Bookmark experiments using the Bookmark This Experiment button on each experiment card.
Fleet Industry Trends
Fleet Industry Trends is a report based on intelligence data gathered from the Fleet Management Application. The report is updated monthly and displays in-depth information on fuel economy trends, idling percentages, and hazardous driving incidents.
Viewing the Fleet Industry Trends report
- Select Dashboard & Analytics > Fleet Industry Trends from the main menu.
- Use the toggle in the top right-hand corner of the page to switch between Metric and Imperial units.
- Scroll to view reports organized by Fleet Composition, Idling Trends, Fuel Economy, and Driver Safety.
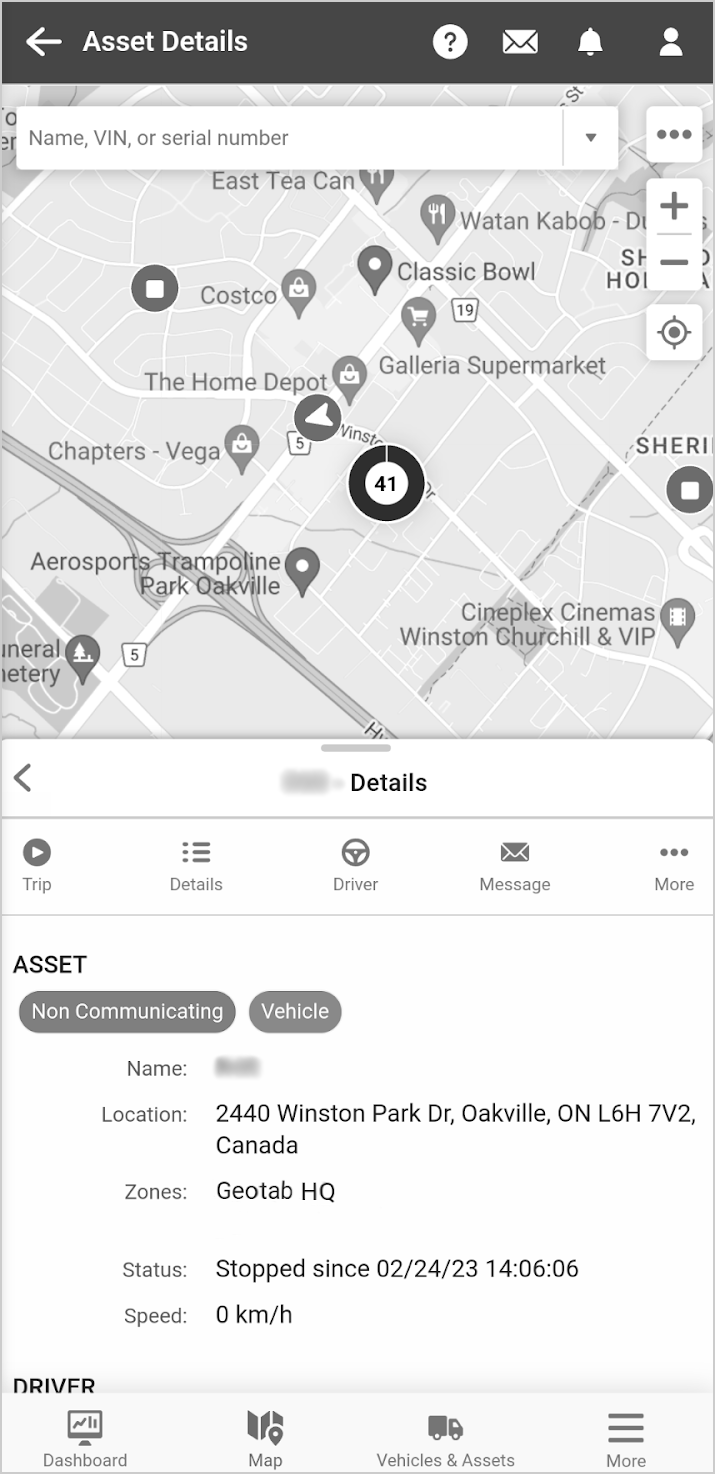
Map
Tracking assets on the map is important for any fleet. Knowing where assets are at any time is imperative for daily productivity, and provides an overview of the fleet. Use the Map to view the current position and status of assets.
Viewing locations on the Map
- Select Map > Map from the main menu.
- Zoom into an area by double clicking, clicking the + sign, or by scrolling the mouse wheel.
- Zoom out by clicking on the – sign, or by scrolling the mouse wheel in the opposite direction.
- Search for an address by typing it into the search bar.
Viewing assets on the Map
- Location is automatically displayed for fleets of less than 50 assets.
- If there are more than 50 assets in your database, click the dropdown arrow to the right of the search bar and select the assets to view, or click Select all to view all assets.
- Click Status to view assets that are Driving, Stopped, or Not Communicating from the dropdown menu.
- Click Zoom to list to display all assets currently in the asset list on the map.
- Click Match list with map to update the assets currently visible on the map. When this checkbox is not checked, moving the map or zooming in does not update the asset list.
- Each asset is displayed by current driving status:
- Assets and their statuses are listed to the left.
- Assets currently moving are listed first, followed by assets that are stopped.
- Each asset’s shape changes depending on its status:
- Driving = navigation arrow
- Stopped = square
- Stopped inside zone = location marker
- Charging = lightning bolt
- Exceptions = triangle with exclamation mark
- Circular icon shows a total number of vehicles present in the area when the area is too large to display individual icons at the selected zoom level. Hover over the circle to view a breakdown of the number of vehicles in each status.
- To zoom in on an asset, select it from the list on the left.
- Hover your mouse over an asset to see the current speed (if driving), or the time of arrival (if stopped).
- On the Mobile version, use the Map mobile layout to select assets and view assets details in a collapsible window, while still maintaining visibility of the Map.
Tracking assets
There are various types of asset tracking:
- Standard tracking: Asset location on the map are refreshed every 15 minutes based on the last known position of the telematics device.
- Active (near real-time) tracking: Devices subscribed to an Active Tracking plan deliver positional updates at a higher frequency.
- No tracking (Personal Mode): Drivers and fleet managers temporarily hide asset tracking for features that use GPS in the Fleet Management application. Personal Mode should not be used with compliance features.
- Restricted Data Mode (Feature Preview): drivers and fleet managers can temporarily forego recording GPS coordinates and GPS-based exceptions.
Sharing asset locations
- Select the asset for which you want to share location information.
- Click Share asset location from the dropdown menu.
- Use the provided shareable link to allow others to temporarily view the asset’s location. When a conventional address is not available, the asset’s last known latitude and longitude is displayed.
✱ NOTE: The shareable link to view an asset’s location expires when the asset reaches its scheduled destination, or when a user-specified time window ends.
Map views
The Map displays North America by default.
Changing the Default Map View
- Select Map > Map from the main menu.
- Zoom into the area you want to display.
- Click the Map Views at the top of the page, then select Save this map view.
- In the Save Map View popup window:
- Select the Viewport checkbox to save the area of the map currently displayed.
- Select the Settings checkbox to save all related Map settings.
- Enter a name for this new view and click Save Map View.
- Click your username in the top-right corner of the page, then select Options.
- Under the Map Settings tab, drag the view just created to the top of the View organizer.
- Click Save when complete.
Additional Map options
While you are using the Map, the Map options drop-down arrow at the top of the screen provides additional display options:
- Clear map: Clears any assets currently displayed and shows the blank map.
- Groups filter (Feature Preview): View assets based on Built-in and User groups.
- Views: Change the map view, save a map view, or lock a map view.
- Map type: Changes your map provider. The new map provider can be set to default by selecting your username on the top-right of the screen, and selecting Options then Map Settings.
- Show traffic: Displays a traffic map of the area.
- Show legend: Displays or hides map symbols from the bottom of the map.
- Show routes: Adds new routes directly from the map, or shows existing routes on the map.
- Show zones: Adds and removes zones from the map, and can display default zones or all zones.
- Show label: Customizes the information shown in each asset label.

Trips History
Displays where an asset has traveled.
Viewing the Trips History report
- Select Map > Trips History using the main menu.
- Select the asset(s) you want to view to load their trip history details.
- Use the Options to include archived data, exclude stops, show the latest and current trip, and trip categories (Feature Preview) in the search results.
- The dark blue bar contains the trip date, asset name, assigned driver (if there is one), and assigned groups, as well as the total stop duration, total driving duration, and total distance traveled for the day.
- Click Show all trips to display all trips for the day on the map, or click Show trips in the dark blue asset bar to show all trips for a particular asset.
- Select a trip below the blue bar to display the breadcrumb path for that trip on the map.
- Use the forward and back arrows to the left of the date to change the date.
✱ NOTE: Click the Live Positions button to return to the Map.

Trips Summary
The Activity and Trips Summary report summarizes where assets have traveled on the Map and provides totals for distance traveled, driving time, and idling for the date range selected.
Viewing the Trips Summary report
- Select Map > Trips History and click the Summary button at the top of the page to view a summarized version of the report.
- Hover your mouse over the pie chart on the right for detailed information on time spent in customer, non-customer, home, and office zones (a pie chart only appears if more than one asset is selected), and assets that have not reported any distance for the specified time frame.
- Click the Detail button to return to the Trips History report.

Routes
For more information about the Routes feature, refer to the Routes section of the Product Guide.
Zones
Zones
Zones are virtual perimeters around a geographical real-world area. They are used to identify important locations such as offices, customer sites, delivery locations, and more. Zones assist in establishing driver accountability, increasing productivity, and tracking high value assets.
Adding zones
- Select Map > Zones… > Zones from the main menu.
- Click Add at the top of the page.
- Select points on the Map to outline the zone. Click the first point to finish the zone.
- Create a Name for the zone and customize its settings.
- Save when complete.
✱ NOTE: You can also add zones directly from the Map using the Add zone button.

Importing zones
- Using the main menu on the left, find and click Map > Zones… > Import Zones to view two sample templates. The first template uses latitude and longitude coordinates, while the second uses the street address. Choose the template that works best for you.
- Using the spreadsheet examples, create a blank spreadsheet using your own spreadsheet software.
- Now on the blank spreadsheet, enter the Name of each zone, followed by either the Latitude and Longitude coordinates, or the complete street address with zip/postal code.
- Enter any References or Comments, or leave cells blank.
- Enter Yes or No for Is the zone circular?
- Enter the zone’s diameter.
- Save the spreadsheet as a .xlsx, .xlsm, or .zip file.
- Back in the Import Zones screen in the Fleet Management Application, drag and drop the spreadsheet file from your computer into the “Drop your file here….” box, or click the box to browse for the file.
- Click the Import icon to import all valid zones.

Click to view a sample template using latitude and longitude coordinates
Click to view a sample template using address
Zone Visits
Zone Visits displays the time spent within zones for each asset, as well as arrival and departure times. This report can be used to view interactions with specific zones, or all zones of a certain type.
Viewing the Zone Visits report
- Select Map > Zones… > Zone Visits from the main menu.
- Select one or more Assets from the dropdown list, or click Select all to select all assets.
- Under Options, select a Date period.
- By default, the report will display stops in all zones. Select the Zone Types dropdown to limit the report to a certain type.
- Select a specific zone, or all zones from the Select Zones dropdown list.
- Click Apply changes when complete.
Vehicles & Assets
Assets management allows users to keep track of all assets, manage asset-based driver feedback, groups, and options, swap and remove devices, and change device settings and time zones.
Adding individual assets
- Select Vehicles & Assets from the main menu.
- Click the Add a new asset dropdown at the top of the page, then select Add single asset.
- Enter the Asset name.
- Enter the Serial number on the device, which is 12 characters long and contains both letters and numbers.
- Select an Asset type group for the asset, and select the Groups.
- Click Save new asset.
✱ NOTE: The letter “O” is never a part of the serial number. Dashes are not required.
Adding multiple assets
- Select Vehicles & Assets from the main menu.
- Click the Add a new asset dropdown at the top of the page, then select Add multiple assets.
- Download the sample template. After adding all necessary information, upload the spreadsheet.
- Select am Asset type group.
- Click Save all assets.
Adding asset types
- Select Vehicles & Assets from the main menu.
- Click the Add a new asset dropdown at the top of the page, then select Add asset type.
- Within the Asset type group, click the + icon to add an additional group.
- Create a name for your new group. This will be the name of the new asset type.
- If desired, create a description and select a color for your asset type.
- Click Save.
Viewing asset information
- Select Vehicles & Assets from the main menu and select the desired asset.
- The Vehicle ID number (VIN), Odometer, and Current engine hours fields are populated automatically, although users can edit these fields if needed. (The device type and serial number fields cannot be changed.)
- Enter or change the Description, License plate, Comments, or State/province.
- Click Save on the top-left when complete.

Advanced asset information
The Asset Edit page allows users to customize settings and view information related to the asset and device. These settings are organized under the following six tabs:
Tab | Function |
Asset | Update basic asset information such as name, driver, groups, VIN, license plate, and odometer, and unplug or remove the device from the asset. |
Health | Monitor the asset’s health by viewing a quick summary of faults, maintenance and Asset Inspection logs. |
Audio feedback | Enable or disable audio feedback options to communicate exceptions to the driver in realtime. |
Extended services | Share asset data between multiple databases. |
Rate plan | View the device’s current rate plan and the features it includes. |
Settings | Enable or disable IOX and auxiliary settings, and control advanced settings such as work time, hours of service, and Active Tracking. |
Unplugging devices
- Select Vehicles & Assets from the main menu. Select an asset from the list to view its information.
- Under the Asset tab, click Unplug device.
- Click Archive asset in the dialog box to confirm.
- Click Save when complete.
✱ NOTE: Unplugging a device renders the device inactive while retaining all of the asset’s data.
Replacing devices
- Select Vehicles & Assets from the main menu. Select an asset from the list to view its information.
- Under the Asset tab, click Replace with new device.
- Enter the serial number, then click OK.
- Click Save when complete.
✱ NOTE: Replacing a device renders the previous device inactive but retains all of the asset’s data.
Mass editing assets
Mass editing is used to make changes to device settings, driver feedback, and group assignments to multiple assets at the same time.
- Select Vehicles & Assets from the main menu.
- Use the Multiple Selection Menu in the top right-hand corner of the page to select assets to edit. You can choose to edit all assets visible in the list (Select visible), individual assets (Select individual), or all assets in the filter (Select all).
- If selecting individual assets, click the check box icon to the right of each asset with the dropdown menu set to Select individual.
- Click Edit selected devices at the top of the page.
- Make the desired edits.
- Click Save when complete.
Driver Feedback
Audible in-vehicle alerts can improve the on-road driving behavior of your drivers by notifying them of unsafe or potentially risky driving events.
Enabling driver feedback
- Select Vehicles & Assets from the main menu. Select an asset from the list to view its information.
- Click the Audio feedback tab at the top of the page.
- To enable feedback options, set Enable audio feedback to On.
- Make adjustments to any options as necessary.
- Click Save when complete.

Feedback Options
Feature | Use |
Driver identification reminder | Used with NFC Driver ID. The slider determines how many seconds the NFC waits before beeping to remind the driver to swipe an NFC fob. Once swiped, the beeping stops. |
Beep on engine RPM* | Prompts the device to beep if RPM exceeds the set value. |
Beep when idling for a period of time | Prompts the device to beep if the asset idles longer than the specified time. |
Speed warning | Start Beeping is the speed at which the device begins beeping, and Stop Beeping is the speed at which the device stops beeping. Turn on Beep briefly when approaching warning speed to make the device beep if the asset approaches the Stop Beeping speed. |
Beep on dangerous driving* | Beeps when dangerous driving is detected. Select the box or drag the slider to set the asset type. Passenger Car = least sensitive, Heavy-Duty = most sensitive, and Truck/Cube Van = middle. |
Beep when seat belt not used* | Sets the speed at which the device beeps when both passenger and driver seat belts are unbuckled. |
Beep when reversing* | Uses accelerometer data to determine when the asset is in reverse. |
* Pro or ProPlus subscriptions are required for this feature. | |
Assigning assets to groups
- Select Vehicles & Assets from the main menu. Select an asset from the list to view its information.
- Under the Assets tab, select a group from the Groups dropdown list. Selecting a Messaging status group is not required to add the asset to a group.
- Click Save when complete.
Status Groups
Drivers with Garmin-equipped assets can update their working status by choosing from a set of common statuses.
Creating status groups
- Select Rules & Groups > Groups from the main menu.
- To create a new group, click the + icon located at the bottom of the group tree.
- Enter Status Groups into the Name field and click Save.
- Repeat the process by creating up to four subgroups inside of Status Groups. Each group should be the name of a status the driver can select.
- Navigate back to the Vehicles & Assets.
- Select an asset to edit.
- Under the Assets tab, use the Messaging Status Groups dropdown menu to choose the available statuses for that asset.Click Save when complete.

Watchdog Report
The Watchdog Report shows if devices are communicating, offline, or have not yet been installed in an asset. It is designed to provide a quick snapshot to help manage uptime and productivity within a fleet.
Running the Watchdog report
- Select Vehicles & Assets from the main menu.
- Select Watchdog Report from the Report dropdown menu in the upper right-hand corner of the page.
- Click the Excel icon to download the report, or view it within the database. Click the More Options (three vertical dots) button to download a PDF, or view in your browser.

Activity
Risk Management
The Risk Management report displays information on driving time, idling time, speed, length of stops, and up to six exception rules. As this report uses a large amount of data, it is often used as a template to create various custom reports related to productivity, efficiency, and safety.
Running the Risk Management report
- Select Activity > Risk Management from the main menu.
- Use the Options menu to select a Date period, Sub-periods (optional), and Exception rules.
- Click Apply changes when complete to run the report.

Safety Center
Safety Center is currently in Feature Preview. To access the Safety Center, follow these steps:
- From the User options dropdown menu, select Options > Feature Preview.
- Enable the Safety Center toggle, then click Save.
- Navigate to the Activity page from the main menu, then select Safety Center.
Viewing the Overall Fleet Score
To view the exception data for your fleet, follow these steps:
- From the Date Period dropdown menu, select the timeframe to generate data for.
- Click the Apply changes button.
Viewing your score based on individual exceptions
- Click the Exception Options dropdown from the Fleet Score panel.
- Select an exception from the dropdown menu to generate data related to that individual exception score.
Customizing exceptions for the Total Exceptions and Exceptions Severity graphs
Total Exceptions
- Click the Exception Options dropdown menu from the Total Exceptions panel.
- Select which exception(s) to display on the stacked bar graph.
Exceptions Severity
- Click the Exception Options dropdown menu from the Exceptions Severity panel.
- Select an exception to generate data related to that individual exception’s severity.
Viewing exceptions per kilometer based on individual exceptions
- Click on the Exception Options dropdown menu from the Exceptions Per Kilometer panel.
- Select an exception from the dropdown menu to generate data related to that individual exception.
Speed Profile
The speed profile is a useful tool that allows users to quickly view an asset’s speed and compare it to the posted speed limits.
Running the Speed Profile report
- Select Activity > Speed Profile from the main menu.
- Under Options, search for or select the necessary assets, and then select a Date period.
- If desired, select a Road speed provider, or leave it set to All (recommended setting).
- Click Apply changes to view the speed profile report.
✱ TIP: The blue line represents the asset’s speed, the red line represents the posted speed limit, and the orange line represents the estimated speed limit. Hover your mouse over the graph to view asset speed details, including date and time.

Driver Congregation
The Driver Congregation Report is used to determine when more than one asset or driver is in close proximity to others. This report can be used to monitor the productivity of your fleet and ensure there is no unnecessary congregating of assets or drivers.
Running the Driver Congregation report
- Select Activity > Driver Congregation from the main menu.
- Using the Options menu, select a date period and which assets and/or drivers to include in the report.
- Choose parameters for congregating: the Distance from one to another (Minimum distance between assets), the Minimum overlap time, and the Minimum number of congregating vehicles.
- Select any zone types to exclude in the Exclude stops in zone types field.
- Click Apply changes when complete to run the report.
Work Hours
Time Card report
The Time Card Report records accurate work hours for each asset and is used to assist in asset utilization and assignments.
- Select Activity > Work Hours > Time Card Report from the main menu.
- Under Options, select a Date period.
- Select an asset to display activity that occurs inside of assigned work hours, or All to display all activity.
- Apply changes when complete.
Work Hours
Work Hours allow users to create different sets of hours and work times for their fleet. When set up, they can be used to monitor after hours usage, long lunches, late arrivals, or any other event that should or should not occur during a specific range of time.
Editing standard work hours
- Select Activity > Work Hours > Work Hours from the main menu.
- Select Standard hours. If Standard Hours does not appear in your list of work hours, use the search bar at the top of the page to locate it.
- Click the pencil icon to edit a day and make the desired changes.
- Click the blue check mark when complete to save changes, or the red X to cancel.
- Make changes to any other days, or click Add work time to add additional days/times.
- Click Save when complete.

Adding new work hours
- Select Activity > Work Hours > Work Hours from the main menu.
- Click the Add button.
- Enter a Name for the set of work hours.
- Click Add work time.
- Choose a day from the dropdown list.
- Enter starting and ending times.
- Click the blue check mark once complete, or the red X to cancel.
- Return to Step 4 and repeat to add additional days/times.
- Save when complete.
Adding work holidays
Work Holidays exist so that holidays do not count for or against any work hours based rules.
- Select Activity > Work Hours > Work Holidays.
- Click Add.
- Enter a name and date for the holiday.
- Click Save when complete.
✱ TIP:
- Holiday group IDs are used if different drivers have different work days, and holidays will apply to some drivers but not others.
- If this is not the case, leave the Holiday Group ID set to 1; otherwise, enter a new Holiday Group ID and save.
- After adding in at least one work holiday, all default work hours sets are automatically assigned a Holiday Group ID of 1.
IFTA Report
The International Fuel Tax Agreement (IFTA) exists between the 48 contiguous states of the USA and the Canadian provinces. Its goal is to create a uniform administration of motor fuel taxation law with respect to qualified interjurisdictional motor vehicles.
Running the IFTA report
- Select Activity > IFTA Report from the main menu.
- Under Options, select a Date period and Vehicles.
- Click Apply changes when complete.
Log Data & Collisions
The Collision & Log Data Report provides a vast amount of information from the asset, including GPS logs, speed, accelerometer data, and engine data. Typically, this report is used for research as part of an investigation following a collision.
Running the Log Data & Collisions report
- Select Activity > Log Data & Collisions from the main menu.
- Under Options, select a Date period and Vehicles.
- Apply changes when complete.
HOS
The HOS menu provides access to duty status logs, HOS violations incurred by drivers, and allows administrators to set availability for drivers.
Viewing duty status logs
- Select Activity > HOS > Logs from the main menu..
- Under Options, select a Date Period and Drivers.
- Click Apply changes when complete.
Viewing driver violations
- Select Activity > HOS > Violations from the main menu.
- Under Options, select a Date period and Drivers.
- Click Apply changes when complete.
Viewing driver availability
- Select Activity > Hos > Availability from the main menu..
- Under Options, select a Date period and Drivers. Use the Show only drivers in violation toggle to quickly filter drivers with no violations.
- Apply changes when complete.
Engine & Maintenance
Fuel Transaction Import
Fuel card transactions can be manually or automatically imported into the Fleet Management Application, which allows fleet managers to verify transactions, identify fraud, and centralize data.
Importing fuel transactions
- Select Engine & Maintenance > Fuel Transaction Import from the main menu.
- Click the Browse button to search for and select a file to upload.
- Click Open File once uploaded.
Engine and Device
Monitoring assets
- Select Engine & Maintenance > Engine and Device > Asset Monitoring from the main menu.
- Select the appropriate asset from the list, or use the search bar at the top of the page to filter the list.
- Use the Sort by drop down menu on the right hand side of the page to quickly sort the list by useful criteria.
Viewing engine faults
- Select Engine & Maintenance > Engine and Device > Faults from the main menu.
- Under Options, select a Date period, Assets, and the Diagnostics you wish to see. You can select more than one diagnostic by holding the CTRL key on your keyboard while left clicking with your mouse. Otherwise, all diagnostics will be applied.
- Select a Source for the diagnostics.
- Click Apply changes to complete.
Viewing engine measurements
- Select Engine & Maintenance > Engine and Device > Measurements from the main menu.
- Select a Date period and Vehicles.
- Select a Diagnostic (measurement) or Select all.
- Select a measurement to view individual events, or the graph to view the data in a visual format.
Viewing engine diagnostics
- Select Engine & Maintenance > Diagnostics from the main menu.
- Select the Choose source filter button to view diagnostics for that protocol.
Fuel and EV Energy Usage
Displays fuel consumed, distance driven, and fuel economy for the period selected.
Running the Fuel Usage report
- Select Engine & Maintenance > Fuel and EV Energy Usage from the main menu.
- Under Options, select a Date period and Assets.
- Click Apply changes when complete.
- From the Fuel and EV Energy Usage Report, select the Fill-Ups button to view fuel transactions.

Asset Inspection
Provides a paperless record of asset inspections as well as quick and easy access to the information. Report shows status of the DVIR log for each asset, pre or post trip, driver remarks, and displays repairs and certification (completed or not completed/safe or not safe to operate).
Running the Asset Inspection report
- Select Engine & Maintenance > DVIR from the main menu.
- Under Options, select a Date period, Display Options, Vehicles, and/or Trailers.
- Click Apply changes when complete.
Reminders
Users can easily prioritize the repairs for their assets based on active diagnostic faults using in-depth engine health information. By focusing on proactive asset maintenance, fleets can save on costly asset repairs by detecting issues early and remembering when to perform other minor automotive services.
For more information refer to the Maintenance Center section of the Product Guide.
Messages
Messages allows users to communicate with drivers through messages sent between the fleet management application and the Drive App.
Sending messages
- Select Messages from the main menu.
- To create a new message, click the New message button.
- Select the recipient based on Assets or Users.
- Type the message.
- Click the text box icon to add a canned reply to the message.
- Click Send when complete.
Rules & Groups
Rules
Rules are a powerful way to monitor and manage a fleet. Designing rules around a company’s policies and procedures can reinforce standards and help drivers to become better at their job.
Productivity, safety, and proactive engine monitoring are all areas that can be measured and improved with rules and conditions, either by standard rules or custom rules.
Standard rules apply to the entire fleet, while custom rules can be set for certain assets or groups.
Using default rules
- Select Rules & Groups > Rules from the main menu.
- Click the On/Off buttons to enable/disable rules as needed.
- Click the question mark on the right icon to display an explanation of each rule.
- Click the envelope icon on the right to view notification recipients when the rule is broken.
✱ NOTE: Rules are divided into five categories: Safety, Productivity, Fleet Optimization, Compliance, Sustainability, Material Management, and System.

Adding custom rules
- Select Rules & Groups > Rules from the main menu.
- Click Add at the top of the page.
- Enter a descriptive name for the rule.
- If desired, select a color to determine the color of the breadcrumb trail when the rule is broken. Red is the default color. Not visible is also an option.
- Apply the rule to a group under Publish to groups from the dropdown list, or start typing to select. By default, the custom rule will apply to all assets in the Company group.
- If desired, add a comment and continue to the Conditions tab.
- Select the appropriate category, then the conditions for the rule.
- Fill in any required values, then click the Add button.
- When complete, continue to set up notifications or Save. Custom rules are listed below the stock rules under Advanced.

Creating custom rules From existing rules
- Select Rules & Groups > Rules from the main menu.
- Click the pencil icon on the right of the rule to edit the rule.
- Create a name and assign a color, groups, and comments as desired.
- Click the Conditions tab.
- Add conditions by selecting the appropriate category, or click the Advanced conditions editor icon to change conditions in the code.
- If using the advanced conditions editor, change conditions in the code using the space provided.
- Click Save when complete.
Available conditions
Condition | Function |
Add Engine | Includes Active Fault measured as on or off (active faults only), any Fault measured as on or off (active and inactive faults), and Measurement or Data which is the reported value, as opposed to on or off. |
Add Zone or Zone Type | Includes Entering zone, Exiting zone, Outside zone, Inside zone, and Stopped inside zone. These can be based on an individual zone, or all zones of a specific type (customer, home, office). |
Add Speed | Sets a threshold for over or under the defined speed. |
Add Speed Limit | Defines speed allowed over the posted limit. Includes or excludes estimated speed limits, and specifies the road speed provider (Commercial, Community, All). |
Add Duration | Defines how much time a rule must be broken before a notification is triggered. |
Add Distance | Defines the distance that a rule is broken before a notification is triggered. |
Device Ignition | Specifies ignition on or off. |
Device | Creates a rule for a specific device. |
Driver | Creates a rule for a specific driver. |
Trip Driving | The asset must be driving to meet this condition. |
Stop | The asset must be stopped to meet this condition. |
Trip Distance | The trip distance must be above, below, or equal to this value. Trip Duration must be above, below, or equal to this value. |
Auxiliaries | Monitor on/off sensors, external input devices connected to the telematics device. |
After work hours rule | The event must occur after the specified set of work hours. |
Work hours | The event must occur during the specified set of work hours. |
After work hours device | The event must occur after an asset’s assigned work hours. |
Device work hours | The event must occur during an asset’s assigned work hours. |
Wrappers | Is value more than/less than/equal to conditions that do not already require these values, and Invert result inverts all conditions. |
Logic | And means already assumed when using multiple conditions, and Or means must be selected manually. |
Creating a rule for more than one vehicle class
- Follow steps one through seven from the Adding custom rules section.
- To get the necessary Group number, open another tab and navigate to Rule & Groups > Groups.
- Select the desired Group and the Group ID displays in the URL.
- Copy the desired Group ID into the Advanced Conditions Editor Group code.
- The Conditions open text field updates to include a description of the Rule along with the Groups selected.
- Click Save.
For more information about sample templates you can use to test the custom rules, refer to the Sample Rules Using Group Filters document.
Exceptions
Exceptions occur when a rule is broken. After setting up rules and gathering data, exceptions reporting can provide valuable insights into driver behavior.
Viewing exceptions
- Select Rules & Groups > Exceptions from the main menu.
- From Options, select a Date period.
- To the right of View by, choose either Asset or Driver to search for assets or drivers.
- Click the Search rules dropdown arrow to search for and select specific Rules.
- Toggle Include dismissed events: to Yes to include dismissed events.
- Click Apply changes when complete.

Setting up email notifications
- Using the main menu on the left, find and click Rules & Groups > Rules.
- Click the envelope icon on the right of a default rule, or scroll down to click a custom rule, then click the Notifications tab.
- Click Add email.
- Start typing to select a recipient in the Email field.
- Click the Add button.
- Repeat step 3 to add additional recipients.
- Click Save when complete.
Sending notifications using templates
- Select Rules & Groups > Rules from the main menu.
- Click the Notification templates button on the top of the screen, and select the desired template:
- Add email template is a notification with field tokens.
- Add web template is a notification posted to a web URL with field tokens.
- Add text template is a popup notification with field tokens.
- Fill in the fields for applicable templates.
- Add any applicable tokens. Do not change the token’s name or remove parentheses.
- Click Save when complete.
Adding distribution lists
Distribution lists create predefined lists of users that receive a notification when a rule is broken.
- Select Rules & Groups > Rules from the main menu.
- Click the Distribution lists button on the top of the screen.
- Click Add at the top of the page.
- Enter a name for the list.
- Add emails using the templates available in the dropdown Template menu.
- Click Save when complete.
Viewing asset locations
- Add a zone around the relevant area (see the Zones & Messages section).
- Select Rules & Groups > Rules from the main menu.
- Click the Add button.
- If desired, name the rule and assign it to a group.
- Under the Conditions tab, click Add zone or zone type.
- Select the zone or zone type from the dropdown list.
- Select an event and click Add.
- Save when complete. Data will be generated for events from this point forward.
✱ NOTE: Events can be viewed by running an exceptions report (see Viewing Exceptions).
Reprocessing data
- Select Rules & Groups > Rules from the main menu.
- Click the Reprocess data button on the top of the screen.
- Select a start date, the appropriate assets, and the relevant rule(s).
- Click Apply changes when complete.
Groups
Groups are designed to separate data into sections for ease of viewing and reporting. Assets, users, rules, and zones use groups to organize a fleet. Groups are also used to designate data access. Assets assigned to a group will be visible to any users that have access to that group or higher (one of its parents).
Creating groups
- Using the main menu on the left, find and click Rules & Groups > Groups.
- Select the + sign to create a new group or subgroup.
- Enter a name for the group.
- If desired, enter a description and color.
- Click Save when complete.

Assigning assets to groups
See Groups and Mass Editing in the Assets & Vehicles section.
Editing groups
- Select Rules & Groups > Groups from the main menu.
- Select a group to edit.
- Click the Edit button.
- Edit the name, description, and color.
- Click Save when complete.
Moving groups
- Select Rules & Groups > Groups from the main menu.
- Select the group you want to move.
- Click the Move button.
- Click the new destination parent group.
- Click Move to Selected.
Removing groups
- Select Rules & Groups > Rules from the main menu.
- Select the group you want to remove.
- Click the Remove button.
- Confirm the removal by selecting Remove from the popup.
✱ NOTE: Groups cannot be removed while subgroups are attached, or if assets or users are still assigned.
Using the groups filter
- In the Groups Filter box in the top left-hand corner of the page, start typing to select a group, or select the dropdown arrow.
- Use the AND and OR operators to combine groups as necessary.
✱ NOTE: Groups currently used as a filter are listed at the top of the page. Click the x beside the group name to remove it from the filter.
Administration
Report Setup
The report setup menu provides easy access to the full suite of reports available in the application.
Previewing reports
- Select Administration > Report Setup > Report Views from the main menu..
- To Preview a report, click the Preview link on the right-hand side of the report.
Adding Marketplace or custom reports
To display Marketplace or custom reports and choose who can see them:
- Select Administration > Report Setup > Report Views from the main menu.
- Click Create custom report at the top of the page.
- Drag and drop the file, or click to browse your computer.
- Choose who can see the report from the dropdown list. The default is everyone.
- To show the report in Report Views, or to run an on-demand report, set Show report in dropdown list to On.
- If desired, select the name of the report and rename.
- Continue to set up as a dashboard or emailed report.
Running on-demand reports
A best practice is to check along the top of the screen for an Options or Report button. If these are present, it generally means there is a report that can be exported.
Assigning reports to the Dashboard
- Select Administration > Report Setup > Report Views from the main menu.
- Select a report from the provided list.
- Click the Dashboard tab, and set the Dashboard graphic options to Yes.
- Select viewers from the Group dashboard viewers and Individual dashboard viewers dropdown lists.
- Set Include me as a dashboard viewer to Yes to view the report on your dashboard.
- Select a Date range.
- Select a Refresh period, which is how often the data will refresh itself on the dashboard.
- Select the Next run, which is when the report will begin.
- Select any group(s) from the Belonging to dropdown list. Select any group(s) from the list that should be displayed in the report. The default is everything (data for all groups).
- Select any Additional Report Options at the bottom of the page as necessary.
- Click Save when complete.
✱ NOTE: To quickly view which reports are configured as dashboard reports, select Administration > Report Setup > Dashboard from the main menu.
Emailing reports
- Select Administration > Report Setup > Report Views from the main menu.
- Select a report from the provided list.
- Under the Email report tab, set Email options to Yes.
- Select recipients from the Group recipient list and Individual recipient list dropdowns.
- Set Email the report to me to Yes if you want to receive the report.
- Redirect report sends the report to a single user other than yourself based on certain conditions. If you are a recipient, or you have selected other recipients, leave this turned off.
- Select a Date range.
- Select a Refresh period to set how often the report will be emailed.
- Select the Next run to set when the report will begin.
- Belonging to lists the groups set up in your database. Select any group(s) from the list to be displayed in the report. The default is everything (data for all groups).
- Additional Report Options at the bottom of the page lists additional features you can use; use as required.
- Click Save when complete.
✱ NOTE: To quickly view which reports are configured as emailed reports, select Administration > Report Setup > Emailed Reports from the main menu.
Users
Configuring user options
To display user preferences such as regional, Map, UI settings, and applicable HOS rulesets:
- Click your username in the upper-right corner of the screen, then Options.
- Edit settings as desired.
- Select the Main Settings tab to edit regional and UI settings.
- Select the Map Settings tab to edit map settings.
- Select the HOS Settings tab to edit rulesets and other HOS settings.
- Make your changes.
- Save when complete.
Viewing users
- Using the main menu on the left, find and click Administration > Users.
- Select a user to view details or edit.
Adding users
- Using the main menu on the left, find and click Administration > Users.
- Select the Add button.
- Fill in a username—User (Email)— First name, and Last name. The username should be an email address if you want the user to receive emailed reports or alerts.
- Select a security clearance from the dropdown list.
- By default, users can see information for all assets. If you want them to only view a specific group, select Modify under Data access and use the dropdown menu and AND/OR operators to create a custom data access condition for the user.
- If desired, add in the user’s designation, employee number, or any comments.
- If the user is a driver, click the Driver tab near the top of the screen and set This user is a driver to Yes.
- Click the UI Settings, Map Settings or HOS Settings tabs and repeat steps in User Options to select user settings.
- Click the Map Settings tab to control the default map type, view, and zone display.
- If the user is an HOS driver, click the HOS Settings tab, select a ruleset, and complete all fields.
- Click Save when complete.
✱ NOTE: After creating the user, the system will send an email prompting them to create their own password. To create a password for the user, set Force password change on next login to No.
Updating user passwords
- Using the main menu on the left, find and click Administration > Users.
- From the table, select the user you would like to change the password for.
- Do one of the following:
- If the User (Email) field is an email address, then enable the Force password change on next login toggle.
- If the User (Email) field is an email address, click Reset Password and specify a password that meets User account policy requirements.
✱ NOTE: The user will receive an email with instructions on how to reset their password through their web browser.
- Click Save.
Mass editing user options
To edit information, driver settings, and regional and UI settings for multiple users at the same time:
- Using the main menu on the left, find and click Administration > Users, then click the check mark icon in the upper-right of your screen.
- Choose whether to edit all users visible in the list (Select visible), individual users (Select individual), or all users (Select all) in the list.
- If you choose Select individual, click the check mark next to the users you want to edit.
- Click the Edit selected users button.
- Make the desired edits.
- Click Save when complete.
Enabling Feature Preview options
- Click your account name and select Options.
- Open the Feature Preview tab.
- Review the different options and set the ones you want to try to On.
- Click Save.
Security clearances
Security clearances allow administrators to control exactly what other users are allowed to see and do in the database.
There are six default security clearances ranked below from most permissions to least:
- Administrator: Provides access to all data and features.
- Supervisor: Cannot administer groups, security clearances, or users; cannot change global system settings.
- View only: Can view all data but cannot make any changes.
- Default user: Used primarily for asset tracking.
- Drive App user: Used for HOS drivers using the Drive App.
- Nothing: Access to Getting Started & Help.
See Standard Security Clearances for more information.
Creating custom security clearances
- Using the main menu on the left, find and click Administration > Users.
- Click Clearances.
- Select a clearance on which to base the custom clearance.
- Click Add Sub-clearance.
- Enter a name for the new sub-clearance.
- Click the red X or blue check mark to turn the permission on or off.
- Save when complete. The new clearance will display in the security clearance dropdown list when adding or editing a user.
System
System settings allows you to turn on or off settings within your database that will affect all those who have access to it. The Audit Log lists notable activity within the application and is useful for tracking changes to your account when multiple users have administration access.
Purging data from a Group
You can permanently delete (purge) certain types of data, including private data, at specific time intervals. You can set up to 20 purge schedules.
- Navigate to Administration > System… > System Settings from the main menu.
- Under the Purge tab, toggle Routinely purge older data to On to enable Purge Settings.
- Click Add Purge Schedule to set a purge schedule for a Group, then select the schedule to expand purge settings.
- Select how long you want to keep each data type and when the selection period passes, the data will be permanently deleted.
- Click Save. A popup window displays the following message and prompts you to enter your password to enable the purge.
- Click Enable. After you enable a purge, all the Administrators on your server will receive a notification.
Viewing the Audit Log
- Select Administration > System > Audit Log from the main menu.
- Click Options and select the Date range, Audit types, and Users.
- Click Apply changes when complete.
Configuring additional property sets
Property sets allow you to manually track additional asset information that is not built into the application.
- Navigate to Administration > System… > System Settings from the main menu.
- Select the Additional properties tab.
- Configure additional property sets for your assets.
✱ NOTE: The additional properties are displayed on the Vehicles & Assets page by configuring the columns, and the Asset Edit page.
About
The About section provides the software version of the Fleet Management Application database and the End User Agreement.
Marketplace
To help optimize and improve fleet operations, Marketplace offers telematic solutions from a variety of partners.
Additional languages
This document is available in Spanish (ES-LATAM)
Quick Reference Guide (Spanish) [PUB]
Revision history
Version | Date | Name | Revisions |
2.4 | 10/29/2020 | Document Editor | High level grammar/edits |
2.5 | 10/30/2020 | Document Editor | Step-by-step document edit; formatting consistency updates; review for pre-translation. |
7.0 | 3/15/2022 | Document Editor | Reorganized and updated content, current to release 7.0 |
8.0 | 6/15/2022 | Document Editor | Updated content to release 8.0. |
8.1 | 10/28/2022 | Document Editor |
|
8.2 | 11/10/2022 | Document Editor | Added Alt-text. |
9.0 | 11/21/22 | Document Editor | Updated content to release 9.0. |
10.0 | 03/09/2023 | Document Editor | Updated content to release 10.0 |
11.0 | 4/19/2023 | Document Editor | Updated content to release 11.0 |